
Creative Photography + Stories Behind the Lens
Throughout my career as a photographer I’ve gone through a number of phases that at the time I’ve thought are just the coolest thing ever.
There was the lovely vignetting phase back in 2009, the tilt-shift blur of 2011 (that never really looked like tilt-shift blur) and then there was my underwater, split-level phase which started in 2012 and has stuck with me until today.
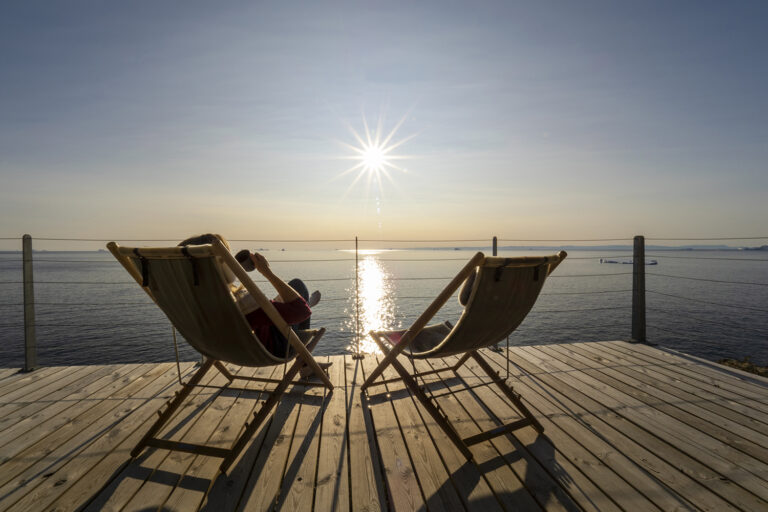
Lately though I’ve been a little crazy about creating fog-like reflections, making the foreground a misty haze that reflects the sky and clouds. It’s not done via editing, it’s all in camera with the help of a handy little reflection surface that I’ve always got with me, my mobile phone.
It’s become such a phase that wherever I’m photographing I need to take a shot with this technique before I can settle, otherwise I feel it’s an opportunity missed. After I’ve got my foggy reflection I can continue with the rest of the shoot and capture traditional angles. I know, geek.
Since I’ve started creating these reflections I’ve loved how they change the foreground. How they replace what might be a crowd of people or an average street scene and instead flip the sky and add a little colour.
Now I’m not sure if anyone else is with me in liking this style of photography but I know for sure that I’m definitely stuck with this phase for a while. My mind can’t unsee the foreground reflections and now I’m always on the hunt for a subject that will work beautifully.
If you scroll down I’m sharing a few behind the scenes stories from some of my favourite reflection photos, otherwise if you’re keen to try it out, keep reading below.
Creating the Reflections –
I’ve spoken before about ‘Turning Trash into Photography Equipment’ after finding a piece of reflective coffee table glass in the bin of a little French village. You really can use anything that reflects however I’ve found that in order to produce a foggy reflection that blurs into the scenery, you need a tinted, dark surface.
I started using my iPhone when I forgot my piece of glass and got a little desperate for something to use. Once it worked I was hooked.
You can obviously make things a little easier on yourself and whip out a tablet which is a little bigger, but whatever you use, I’ve found that the screen surface on the phones/tablets are perfect because they’re dark and don’t produce a mirror-like reflection. I prefer it when the reflections are less exact, when they’re gentle, foggy (I know I’ve used that word a lot) and a little blurry.
To produce the best results it helps to have your subject or the horizon straight ahead, within a direct line of sight, not too high or low. Subjects that stand tall with minimal distractions around them work wonders and are really fun to photograph.
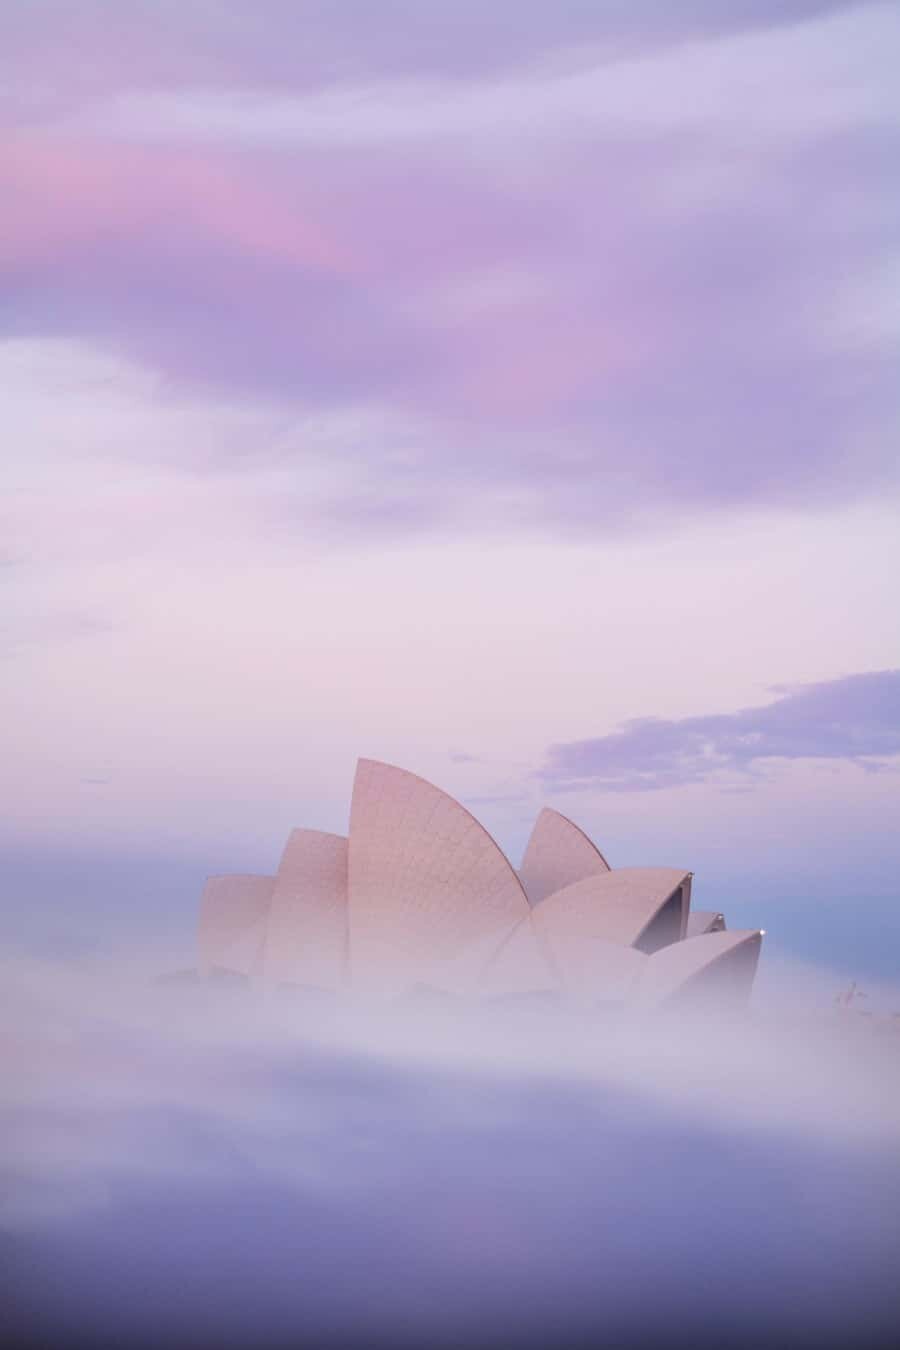
I got a little carried away with the Sydney Opera House last week (see more images here), it’s sail-like structure provided the perfect canvas to work with in reflecting the sky and creating fog.
So, to find the reflection, simply hold your phone or reflective surface up to your lens and move it around until you can see it. It can help to simply hold it up to your eye first without the camera just so you know what to expect to see through the lens.
Tilt the surface back and forward until you find the reflection and then rise or lower it against your lens to create the effect you want.
Best Settings For Phone Reflections
While the technique is relatively simple, there are a few things that will help you produce the best results.
In order to ensure the reflection blends beautifully into the scene, you’ll need to shoot with a wide aperture, the wider the better. I tend to photograph using f/2.8 or wider if possible which means the edge of whatever you’re using for the reflection, will become invisible and blur straight into the scenery. You don’t want any pesky edges ruining the illusion! High quality lenses like the Olympus M.Zuiko PRO range which I personally shoot with will allow you to shoot from anywhere between f/1.2 and f/2.8 which is ideal for removing the edge of your phone screen and producing a beautiful blend between the scene and reflection.
In terms of focal length, when using your phone for reflections, it’s best to have a focal length of around 25mm – 50mm which means it’ll photograph just over the front edge of the surface yet still be wide enough to capture the scene reflecting. You can of course shoot with a wider focal length, I’ve also attempted with a 14mm lens but you will need a bigger surface to reflect on, a phone is just too small and you’ll end up photographing all the edges.
Little tip: Be careful not to scratch the front of your lens with whatever you’re using! With phones it’s usually fine but if you start using glass or something like I found in the garbage, it could damage your camera.
Here’s a video of my attempting to explain on camera how I photograph the reflections. Forgive me, I’m not the best in front of the camera haha.
Stories Behind the Lens –
Some of my favourite foggy reflections are below with a little behind the lens story about each of them…
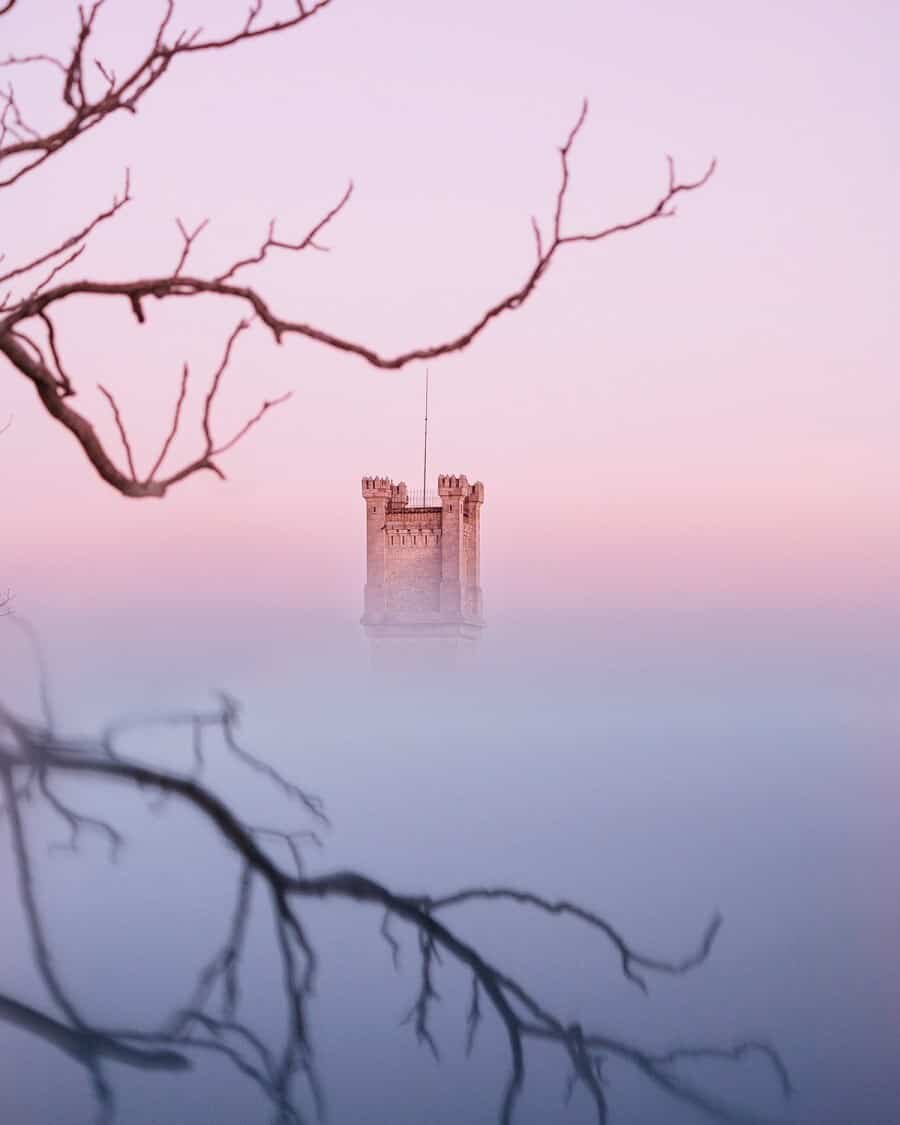
A Castle in the Sky – Provence, France
This shot was taken on our final road trip around Provence before we flew back to Australia. After living in France for two years, we wanted one final day driving without any particular plans around the beautiful Provence region we had called home.
Visiting some of our favourite villages like Rousillon, Lacoste and Lourmarin we took a drive up into the hills surrounding Bonnieux because my partner Clement remembered learning to ride his bike in the Foret des Cedres. After a picnic dinner looking over the landscapes of the Luberon from the Foret de Cedres we started the drive back down the hill when I saw what looked like a castle. Stopping the car in the middle of the road (not a busy road!) I jumped out and couldn’t believe my eyes.
With the pastel, dusk sky above I used the reflection to create what appears to be a fog in the foreground. The branches of the overhanging trees weren’t in my initial shot but once they crept their way in, I couldn’t resist framing the image with them.
Read more: Beautiful Villages + Most Photogenic Villages in Provence, France

The Burj al Arab, Dubai
I had this shot in mind before arriving in Dubai, it was just about finding the right spot to take it.
Wandering through the canals of the Madinat Jumeriah (trying to sneak into guest areas even though I couldn’t afford to stay there!) I couldn’t get the angle I wanted and of course, couldn’t gain access to the guest beach beside the Burj al Arab.
Instead, I walked around to the public beach of Dubai. It was about 42 degrees, I was completely melting but continued to walk for about 20minutes until I reached the water and stood for a few minutes up to my knees to cool down.
Then by using the reflection on my phone screen, I could block out all the people on the beach and the construction work that was happening just along the shore.
Read more: Dubai Photography Location Guide
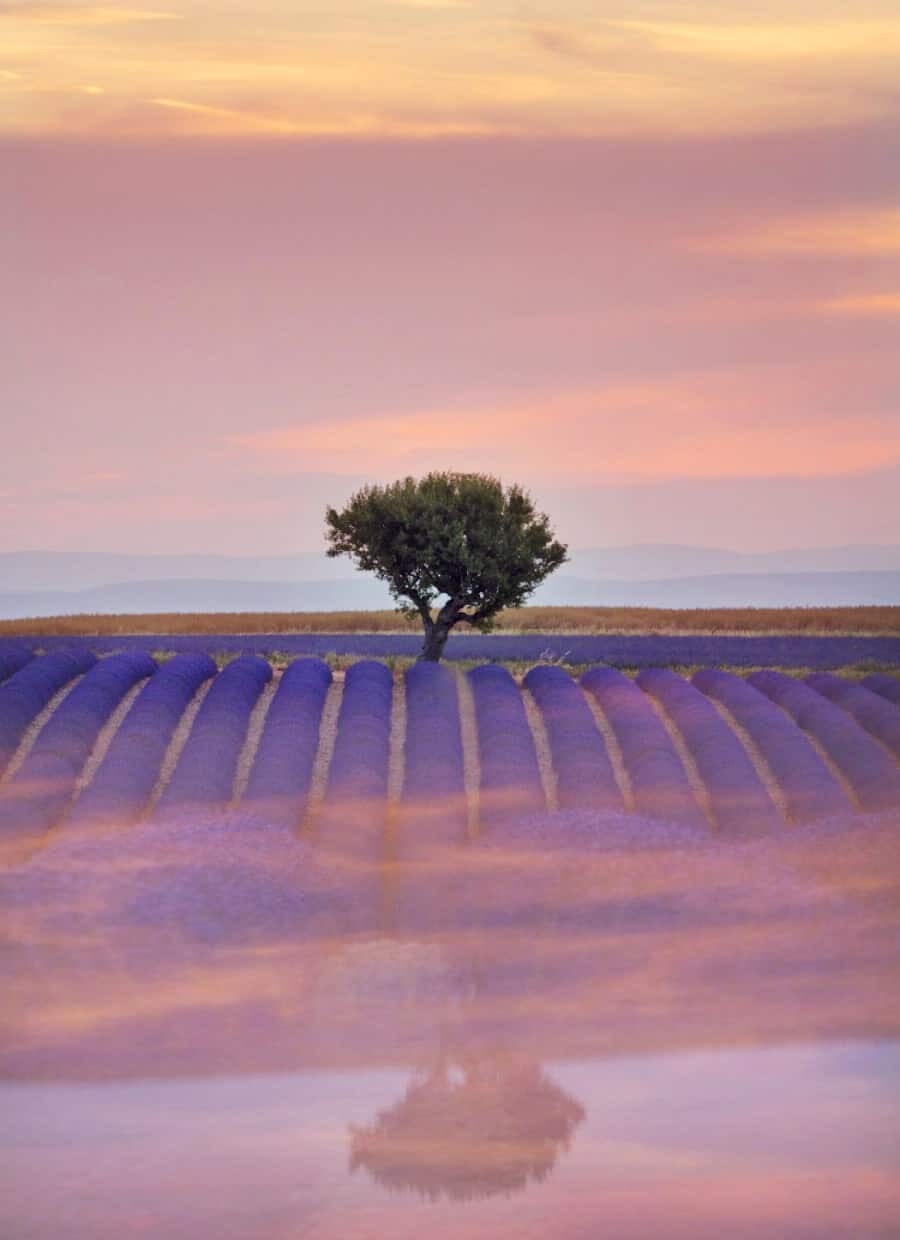
The Lavender Fields – Provence, France
The day I found the piece of coffee table glass last year, I headed to the lavender fields near Valensole to photograph sunset. The glass worked as the perfect reflector for the scenery, just flipping the sky but allowing the scenery to still be visible a little bit.
I loved how it captured a hint of the purple lavender due to the glass being tinted but clear, a great effect on a scenic landscape like this.
I went a little crazy that day with capturing reflections as you can see in this article.
To read more about the lavender fields of Provence, read my ‘Guide to the Lavender Fields of Valensole“
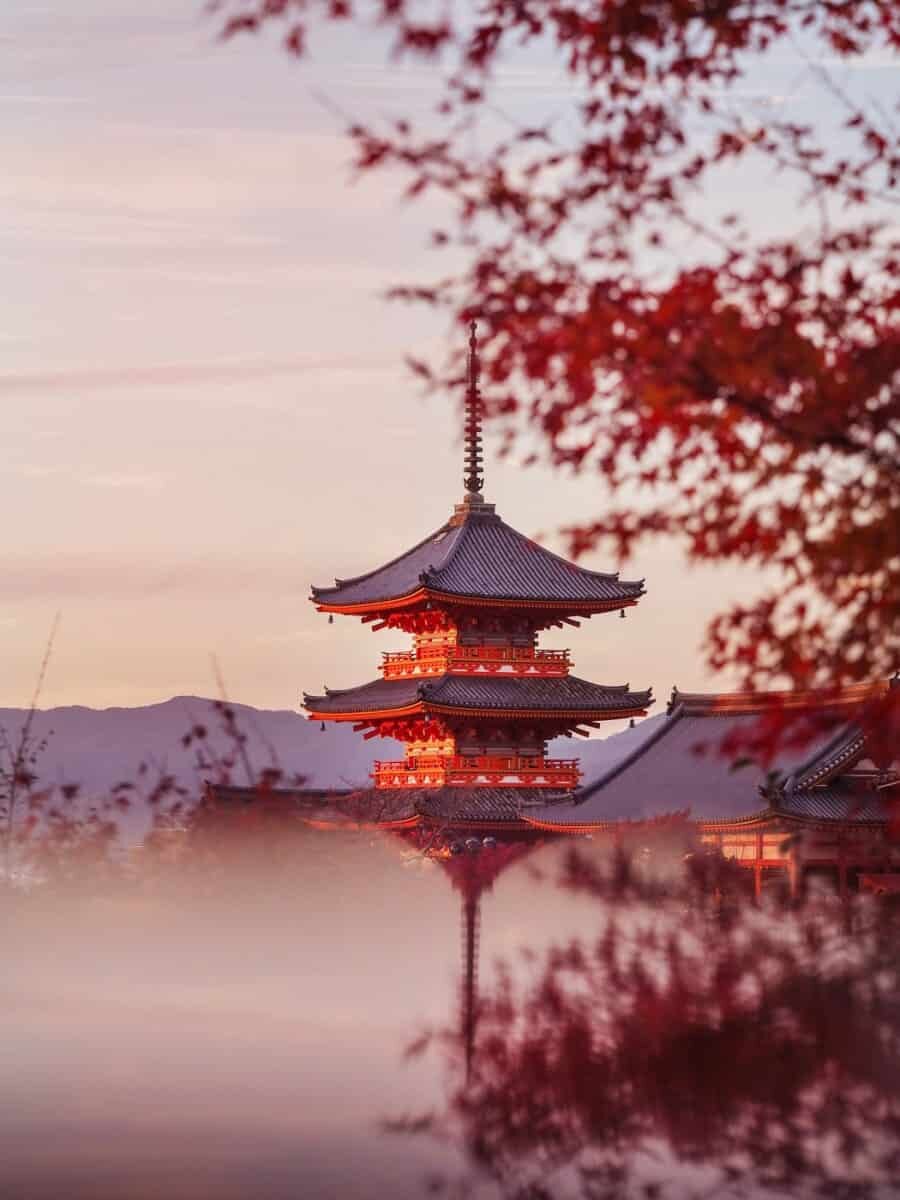
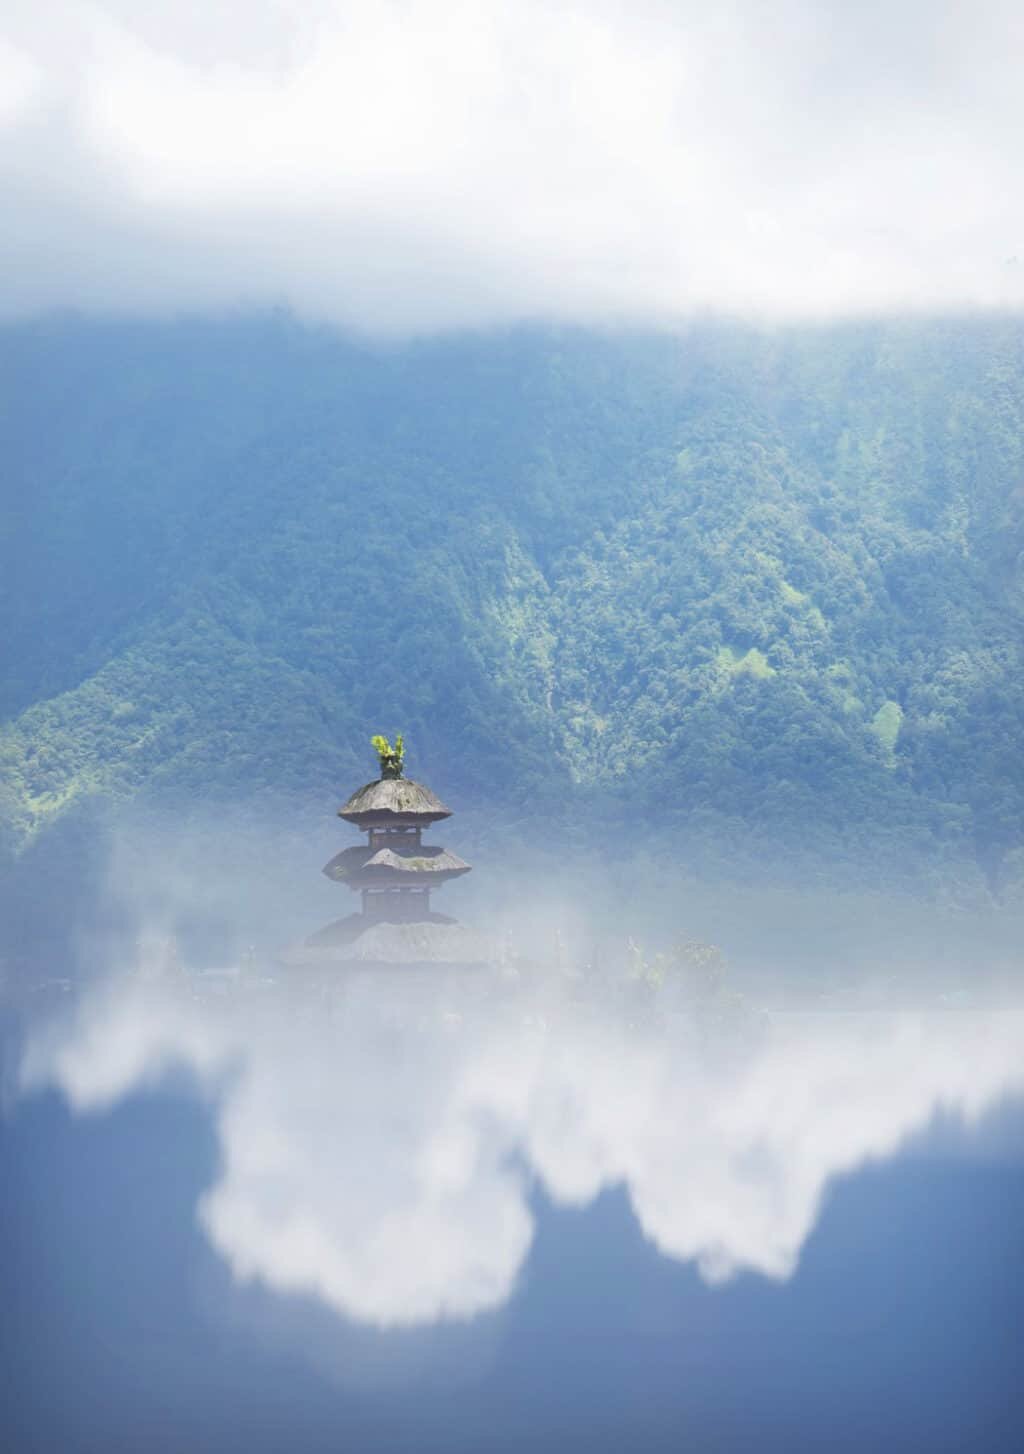
Kiyomizudera Temple – Kyoto, Japan
As the vibrant colours of autumn dangled all around us, I couldn’t resist doubling their beauty with a reflection.
Kiyomizudera is one of the most photogenic sights in Kyoto and while on my Japan Photo Tour, the group found a great spot to photograph sunset over the pagoda.
Using the effect to frame the image and flip the Japanese Maple tree so it’s colours were all around, I couldn’t get enough of how beautiful Japan was in the autumn!
Oh and also, while we were standing here taking photos, there were so many adorable and very well loved puppies in prams and blankets. Nothing makes me happier than dogs AND beautiful scenery!
Join me in Japan to experience and photograph the beauty of autumn! For more details click here.
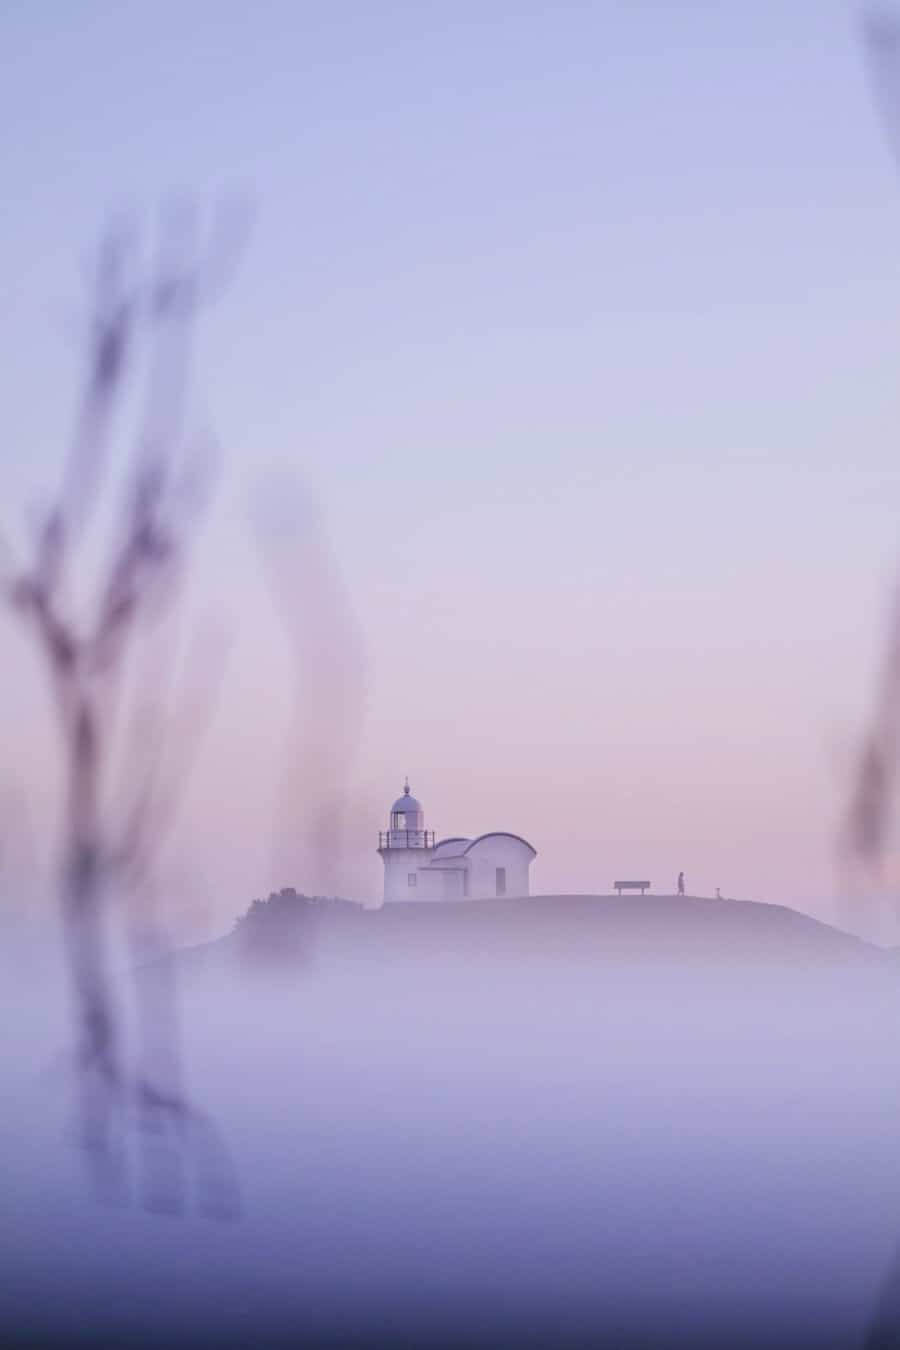
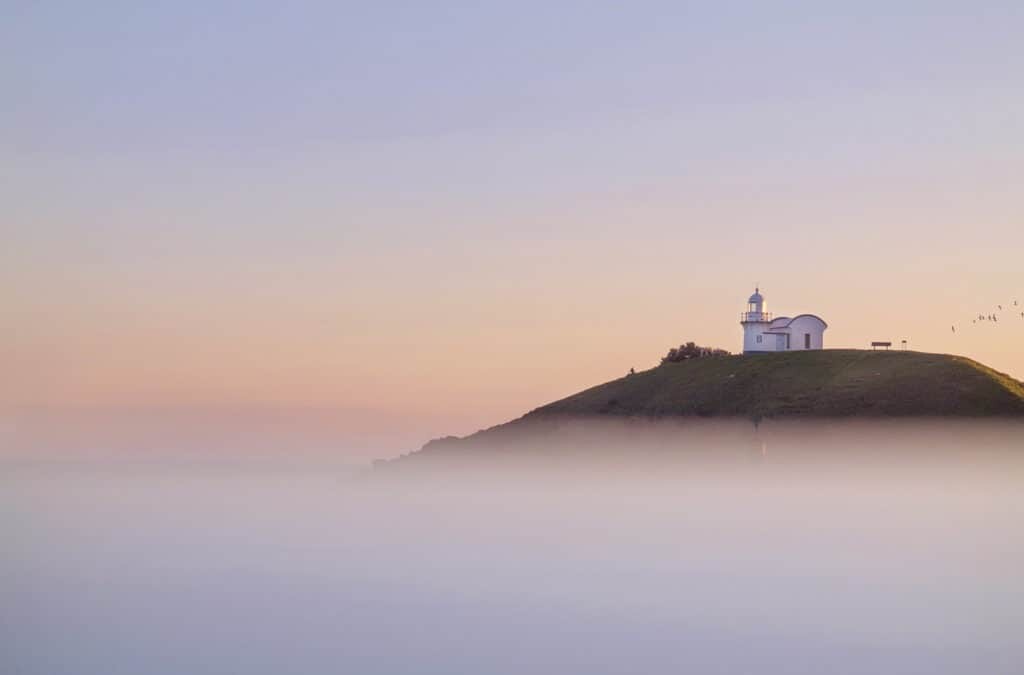
Tacking Point Lighthouse – Port Macquarie, Australia
There’s a little spot to the north of the lighthouse where rocky coves are belted by waves and you can capture a great angle looking South towards the headland.
I love to go and sit there, sometimes just to watch the waves, have a picnic or swim in the rockpools. This time though I took my camera to try and capture some photos of the lighthouse at sunset. While the sky didn’t do much as the sun set, dusk was a different story. Beautiful pastels filled the sky and I used some nearby coastal Banksia trees to frame the shot.
Also, I got attacked by mosquitoes while taking this photo…my knuckles were covered in bites because I got carried away taking shots and standing still!
 Have you tried this technique? If so, leave a link to your Instagram profile or wherever you’ve shared it in the comments below or with the hashtag #thewanderinglens.
I love to hear how you went too…if you’ve got any questions about creating reflections leave them below too.

Hello! I’m the founder and photographer behind The Wandering Lens.
With 19+yrs experience as a professional travel and landscape photographer, all advice found on this site is from my personal experience, or that of contributors, on the road. I hope it’s useful for your own travels and would love to hear in the comments about your trips and experiences around the world.
Blog Comments
Rome
March 13, 2018 at 9:02 am
A few weeks ago I was back home in San Diego. I saw this dude leaning over the top of my car using the sunroof to get reflection of the tall buildings. Immediately thought of you. I hope he got a good shot. These here are remarkable.
Lisa Michele Burns
March 13, 2018 at 10:30 am
Haha that’s so good! I’ve definitely bent awkwardly over the car roof or bonnet before to attempt a reflection, I hope he got a great shot too!
Anh
March 27, 2018 at 10:15 pm
This is so cool! I’m gonna try it next time I’m on the road.
I have a quick question, do you need to do any extra editing to blend the edge of the phone to the image? (except from using a wide aperture). And is it possible to edit it with Lightroom, or only with Photoshop? Thank you!
Lisa Michele Burns
March 27, 2018 at 10:22 pm
Exciting, have fun trying it out! You don’t need any extra software or tricks to make it work. Once you’ve lined up the reflection properly and shoot with a wide aperture it’ll blend together nicely 🙂
As for editing photos, I use Photoshop and Lightroom, both work well! I use Photoshop for more intricate adjustments and Lightroom for simple colour toning or consistency.
Good luck!
Tracy
July 12, 2018 at 12:15 am
Wow – there you go – I thought the shots where photoshopped. So cool how those shots are done. Thanks for sharing.
Ernst
December 2, 2018 at 1:15 am
Thanks for the great write-up! Really intriguing results from this seemingly simple but oh so creative technique. So there’s a use for phones in photography after all (jk)! Looking forward to expiriment.
Kelvin
June 10, 2019 at 12:02 am
wow, love your photo technique. The ‘floating castle’ really brought a smile onto my face!
Thanks so much for your generous sharing!
Lisa Michele Burns
June 24, 2019 at 2:38 am
Thanks Kelvin, so nice to hear 🙂