
Photographing in the Columbia Icefields of Canada
At first glistening crunch, I knew I was back in my happy place. Hearing the sound of ice crunching beneath my crampons, watching as the ice sparkled before my eyes, and marveling as my mind attempted to soak in the immense beauty as it piled in icy chunks toward the head (the top). Glacial landscapes are an environment like no other, and I’m about to share how you can walk upon one!
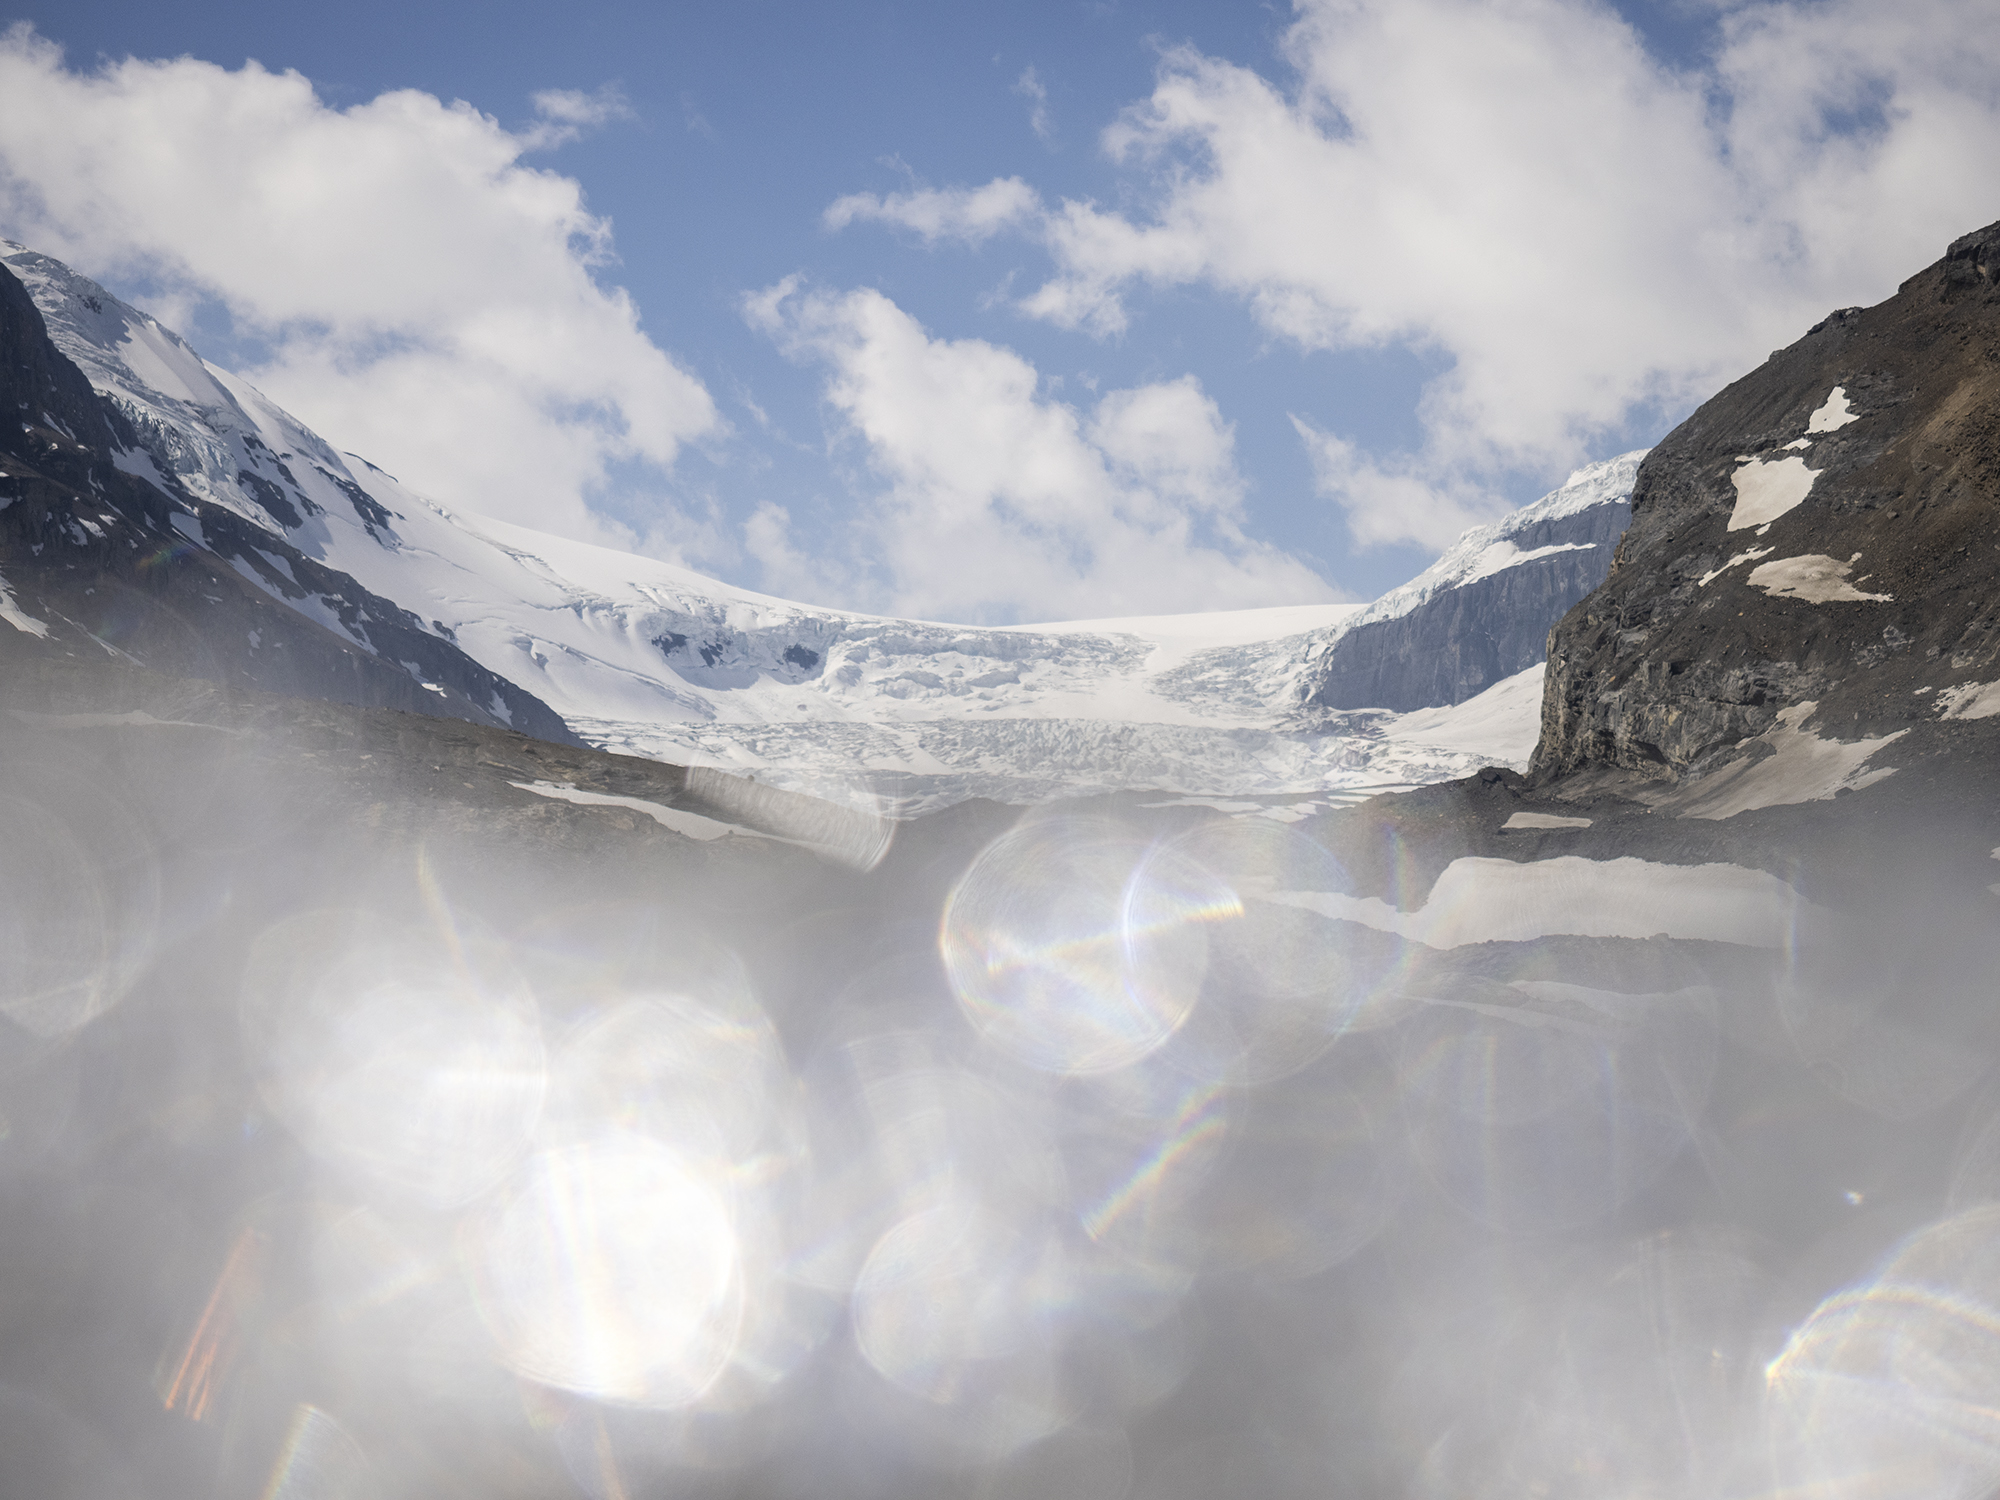
Athabasca Glacier in Alberta, Canada, is one of the most accessible glaciers in the world. Located within the Columbia Icefields on the Icefields Parkway, it’s roughly a one-hour drive from Jasper and two hours to Banff. While you can cruise on by and catch views from the car, it’s beyond worth stopping and staring a little longer. Or, spending a few days gazing upon the magnificent mountainside formations if you’re like me and can’t bear to look away.
What makes this glacier so special is that you’re able to get up close to something that’s normally the result of a multi-day hike, hidden in a distant alpine valley. Glaciers are formed when snow accumulates over time, turning to ice over many centuries, and the pressure then creates a flow effect, outward and down, a little bit like a very slow-moving ice river. They’re found in alpine areas and shift and change throughout the seasons, calving, creeping, however, most recently, receding rapidly.
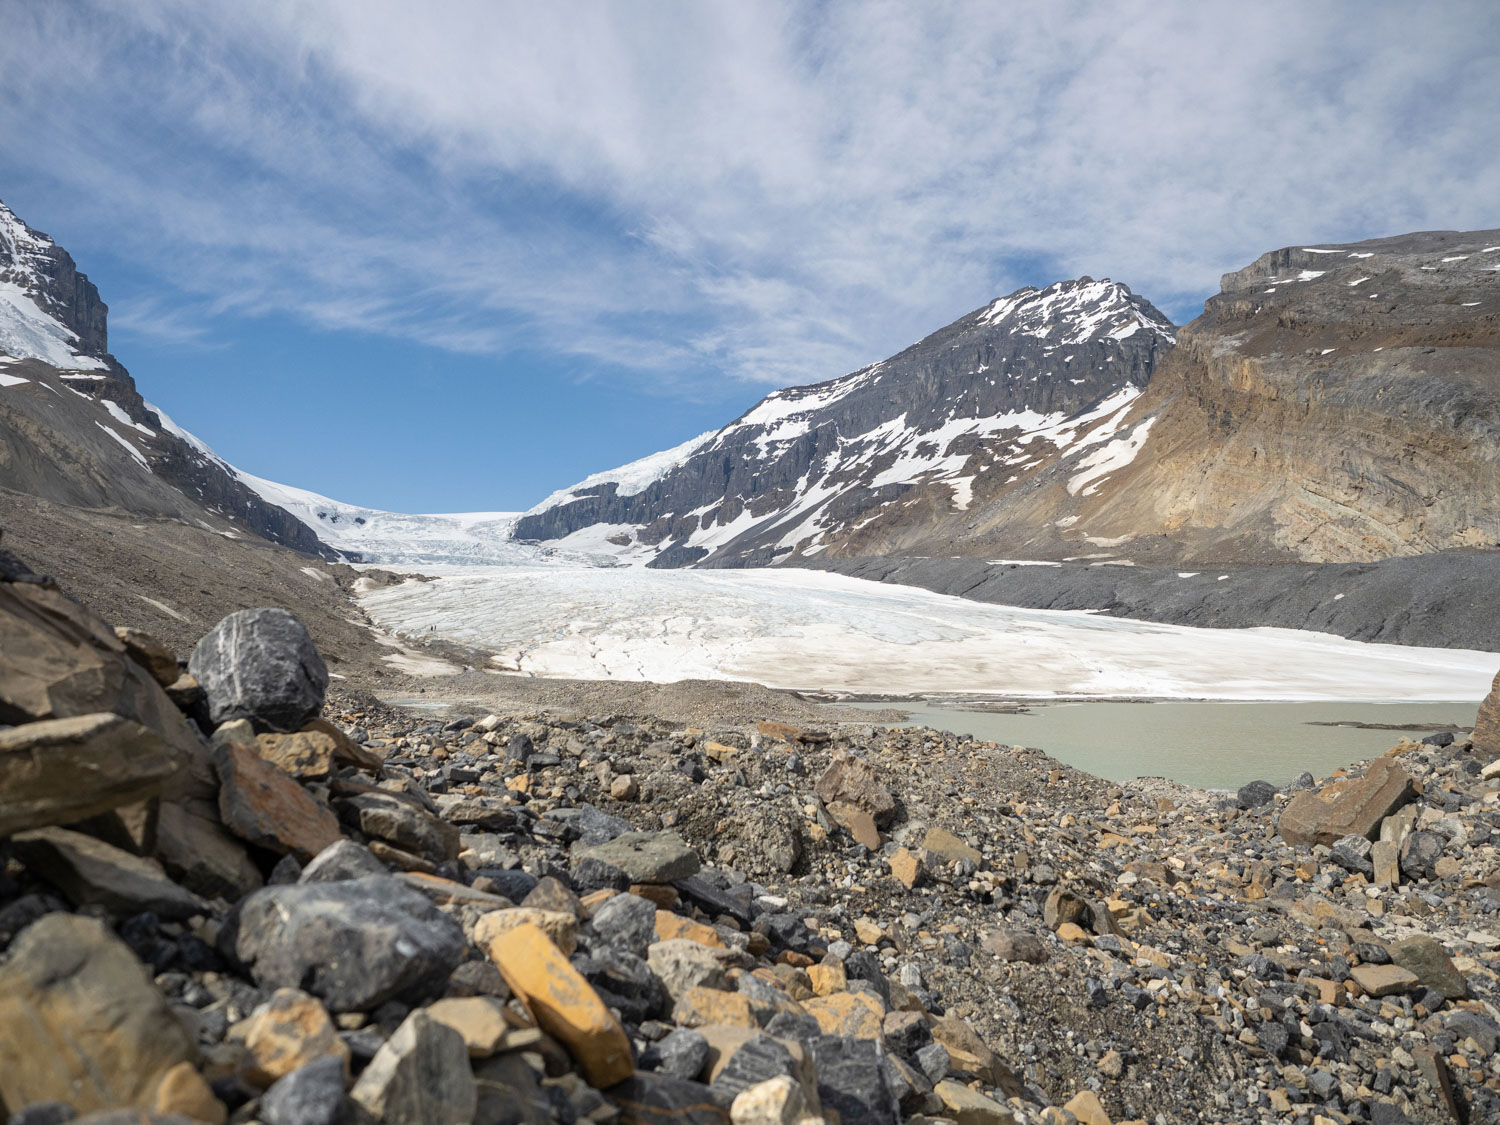
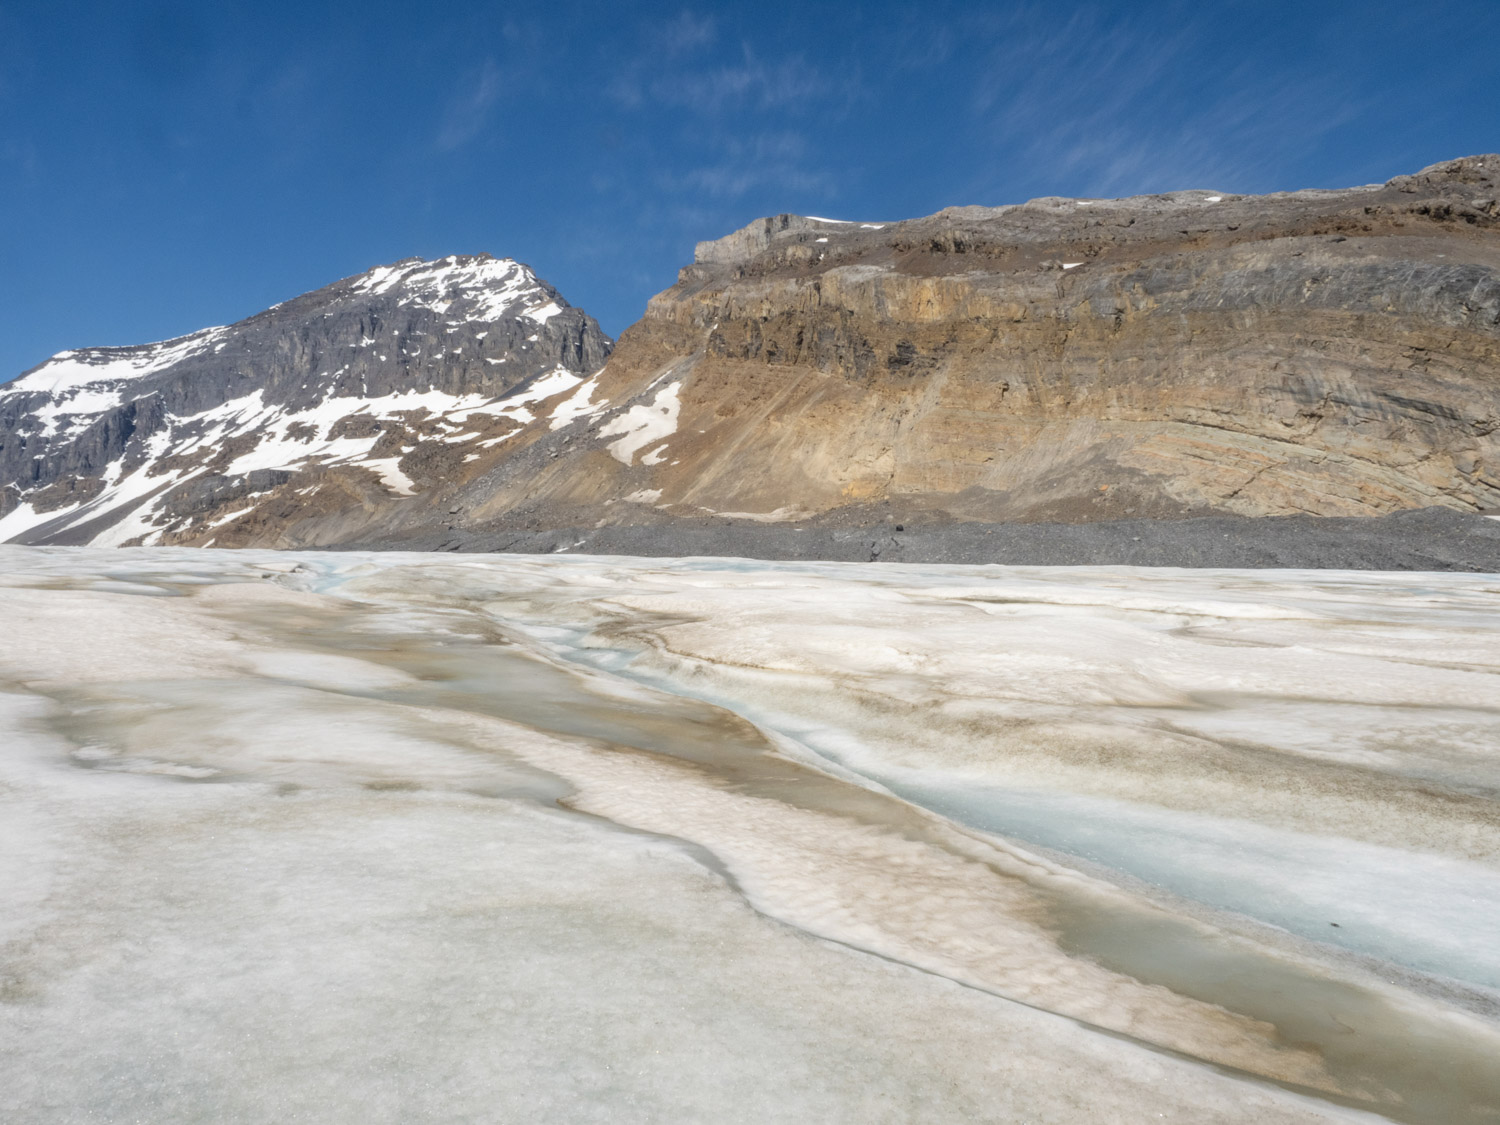
Not only do the glaciers themselves change, but the surrounding landscape is shifted over time. An example of this is seen in sharp piles of debris and rock known as lateral moraines which have been transported and carried by the glacial ice, only to be later revealed once the ice melts. Lateral moraines are seen alongside the glacier, and Athabasca Glacier has some great examples of this process.
When visiting the Athabasca Glacier, you can take a short, self-guided hike to the foot of the glacier, accessible via a car park just off the Icefields Parkway, or, you can take things one very exciting step further.
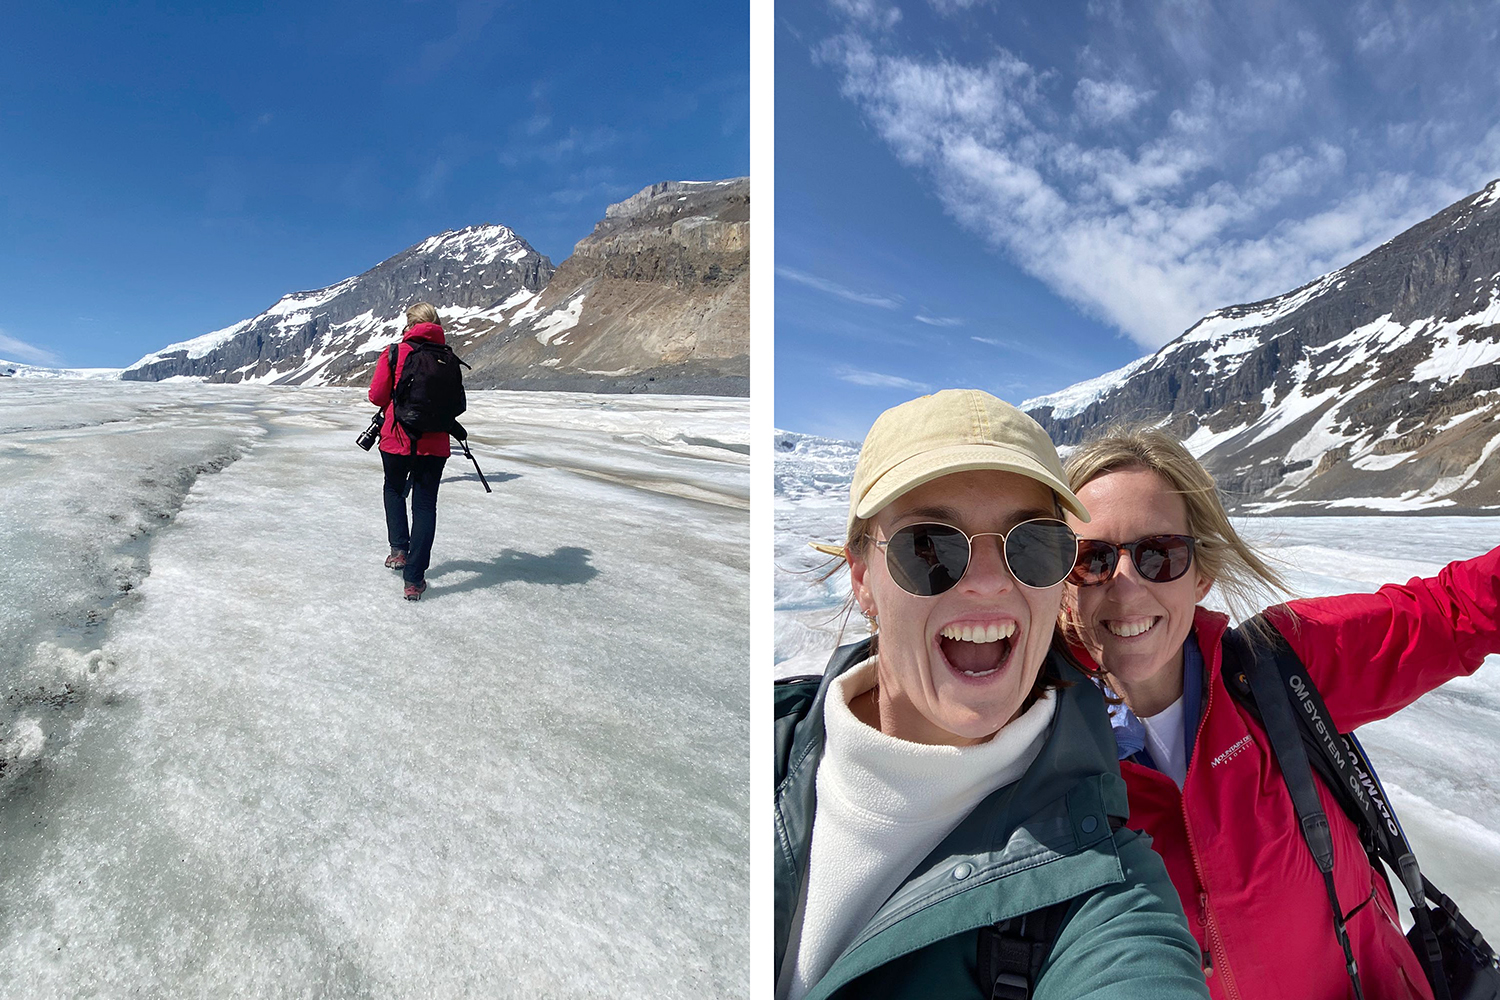
You can walk upon the glacier itself which is something I wholeheartedly recommend anyone does if you’re comfortable hiking for roughly 5km. It’s this experience I want to share with you today from my recent adventure with IceWalks on their half-day classic tour.
Just to note, while safe in the presence of a trained guide, walking solo on a glacier is extremely dangerous with hidden crevasses, collapsible sections, and potentially fast-moving sections creating a maze of obstacles, mostly invisible to the untrained eye. It’s always advised to walk on a glacier with a trained expert, preferably a mountaineering guide that’s had years of experience exploring these treacherous yet stunningly beautiful environments.
The team at IceWalks have been walking upon Athabasca Glacier since 1985 under the leadership of Peter Lemieux, an ACMG (Association of Canadian Mountain Guides) ski guide. After 36yrs on the ice, Peter transitioned ownership of the company to another member of the ACMG and long-term IceWalks guide Corin Lohmann, and his wife Megan. It’s Corin I had the pleasure of walking with a few weeks back on the opening weekend of their tours in 2023.
It’s one thing to look at a glacier and be amazed by its size, detail, and sheer beauty, it’s another to learn and hear stories from someone who has dedicated their life to this landscape.
Actually, I’m jumping ahead now…let’s go back to the start of the day.
When booking a tour with IceWalks, they’ll equip you with everything needed to ensure your safety on the glacier. Hiking boots are recommended, but if you don’t have any, they’ve got a van filled with all sizes to kit you out. There’s a pair of crampons for everyone, gloves, jackets, and even waterproof pants if you need them. Of course, you can wear your own gear too, I only used a pair of crampons as I had the rest with me.
There are two times offered for the half-day classic tour, I opted for the 10am tour as we were staying in Jasper and it was just a short drive down the parkway. Alternatively, you can also stay at the nearby campgrounds in summer, or the Glacier View Hotel where I also stayed a night and loved the view and very comfortable beds! In addition to this there’s a 2pm tour, or if you’re after a full-day deluxe tour these kick off at 9:30am. Indigenous-led tours are also offered on specific dates throughout the season, be sure to check their website here.
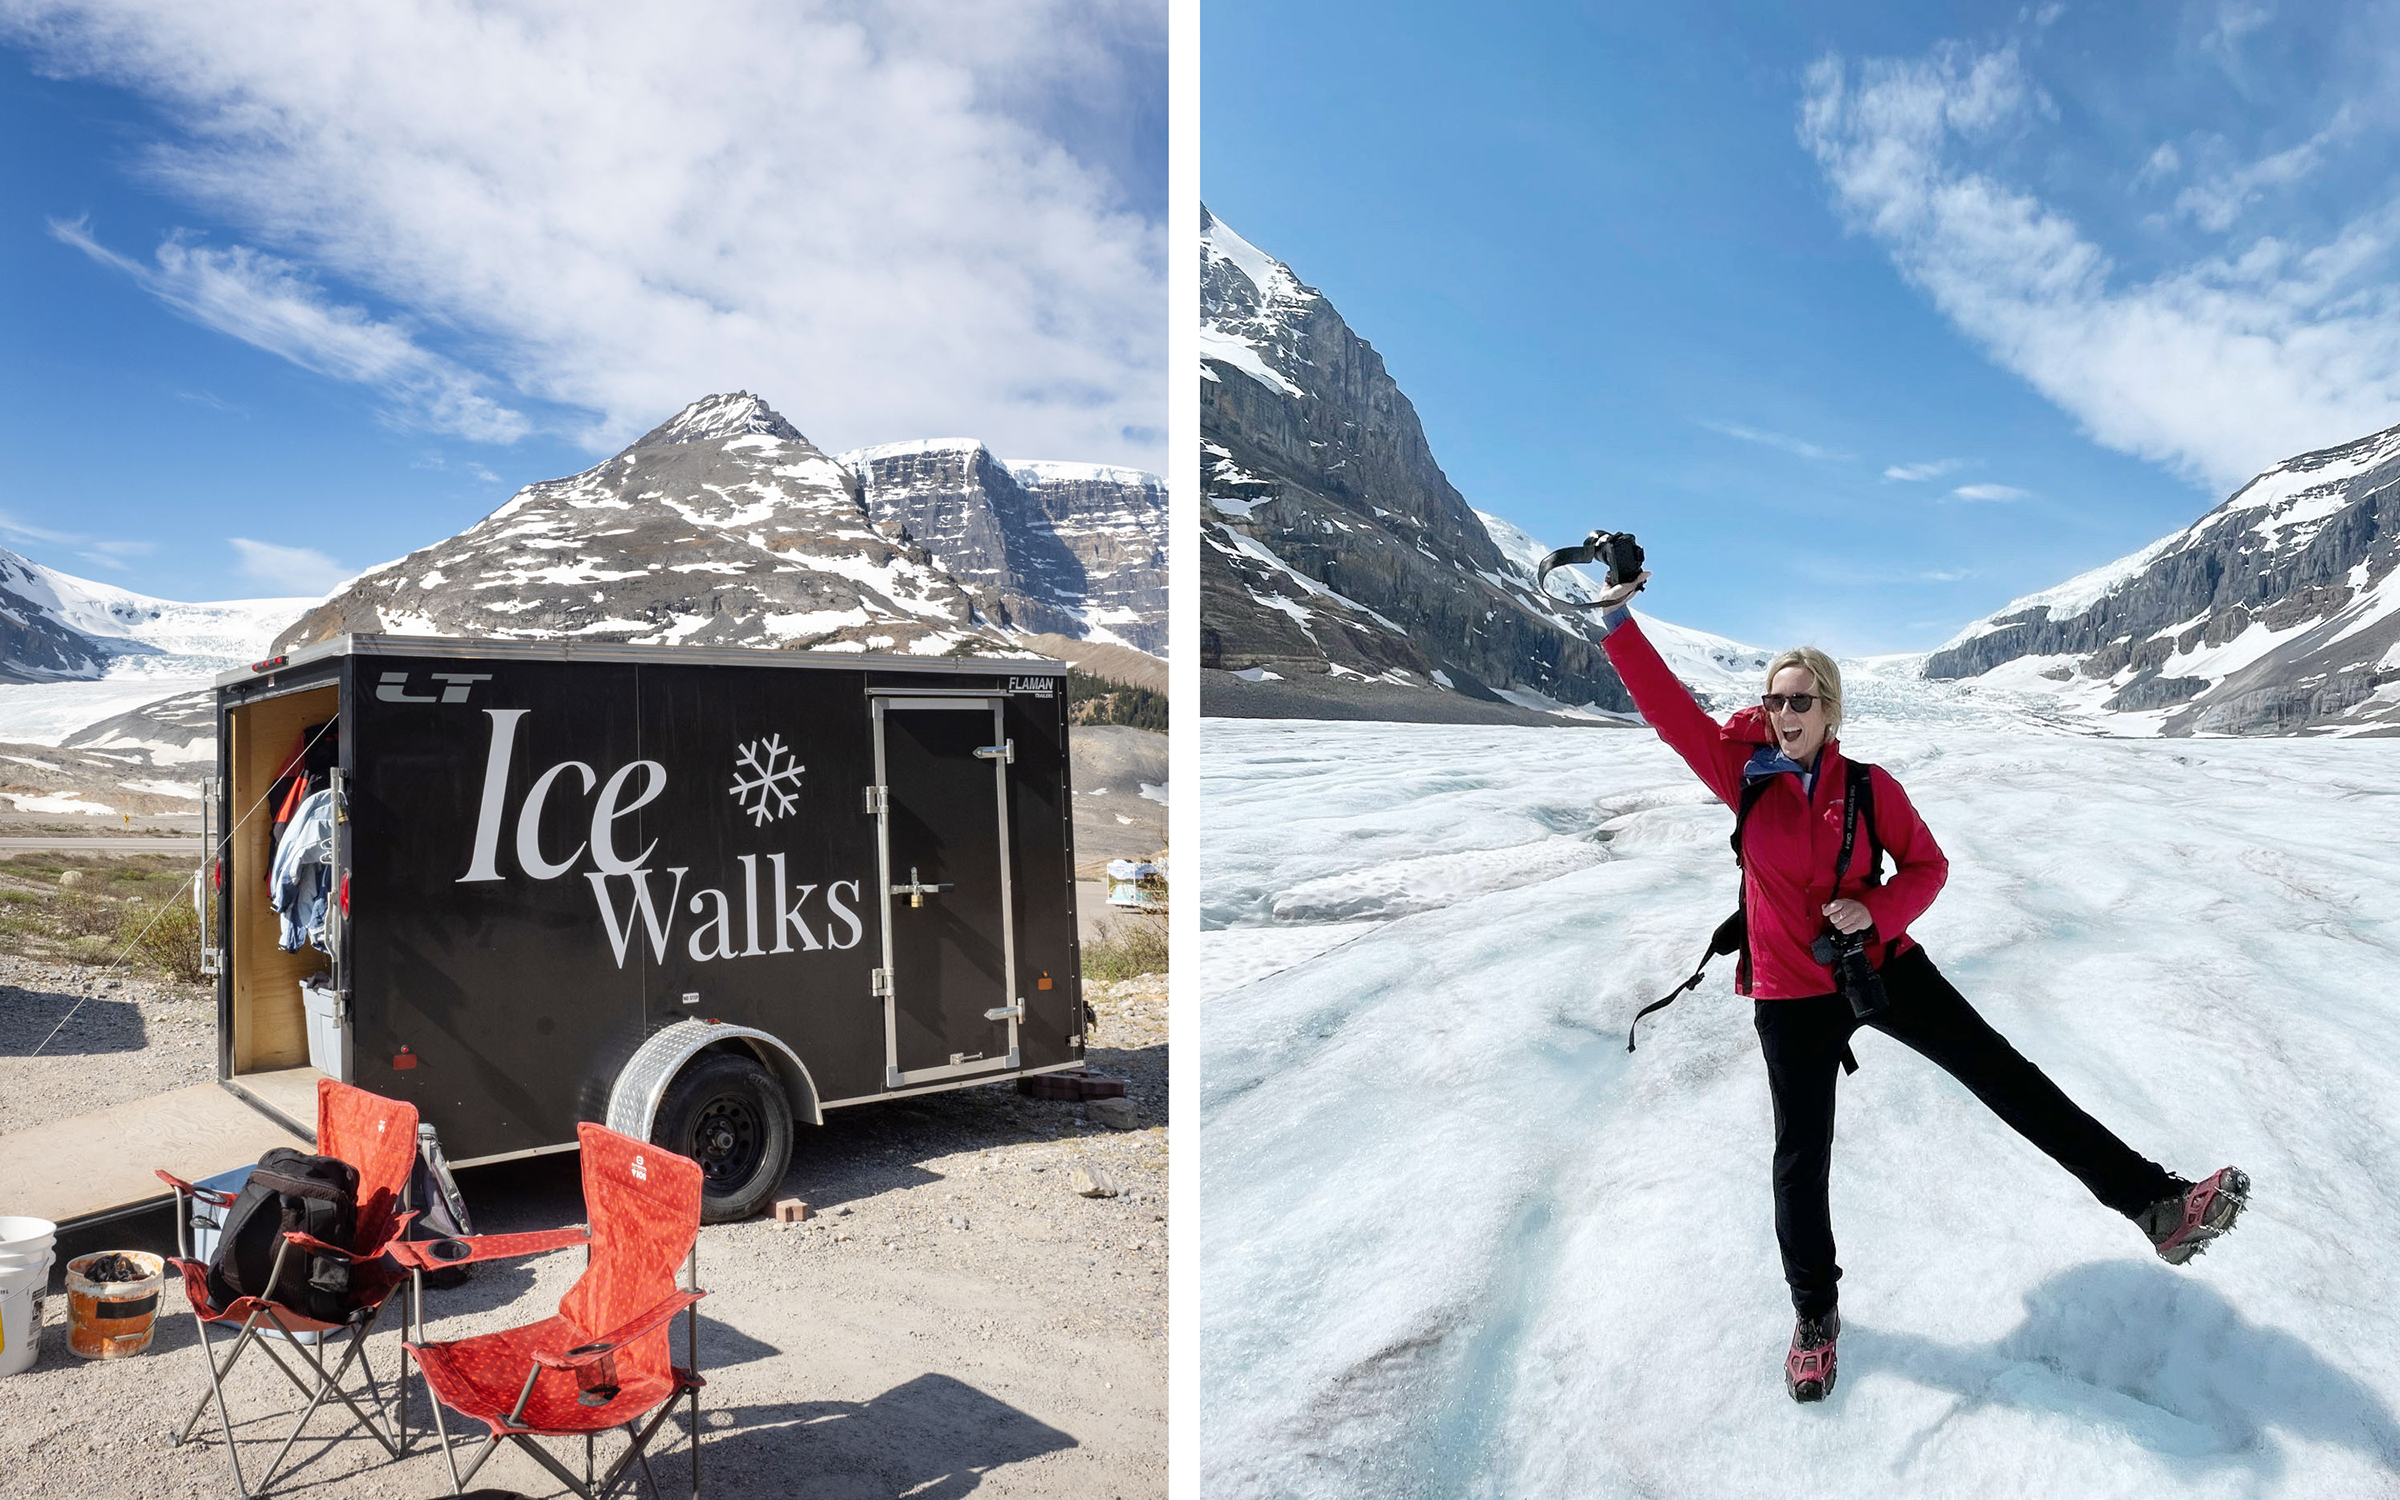
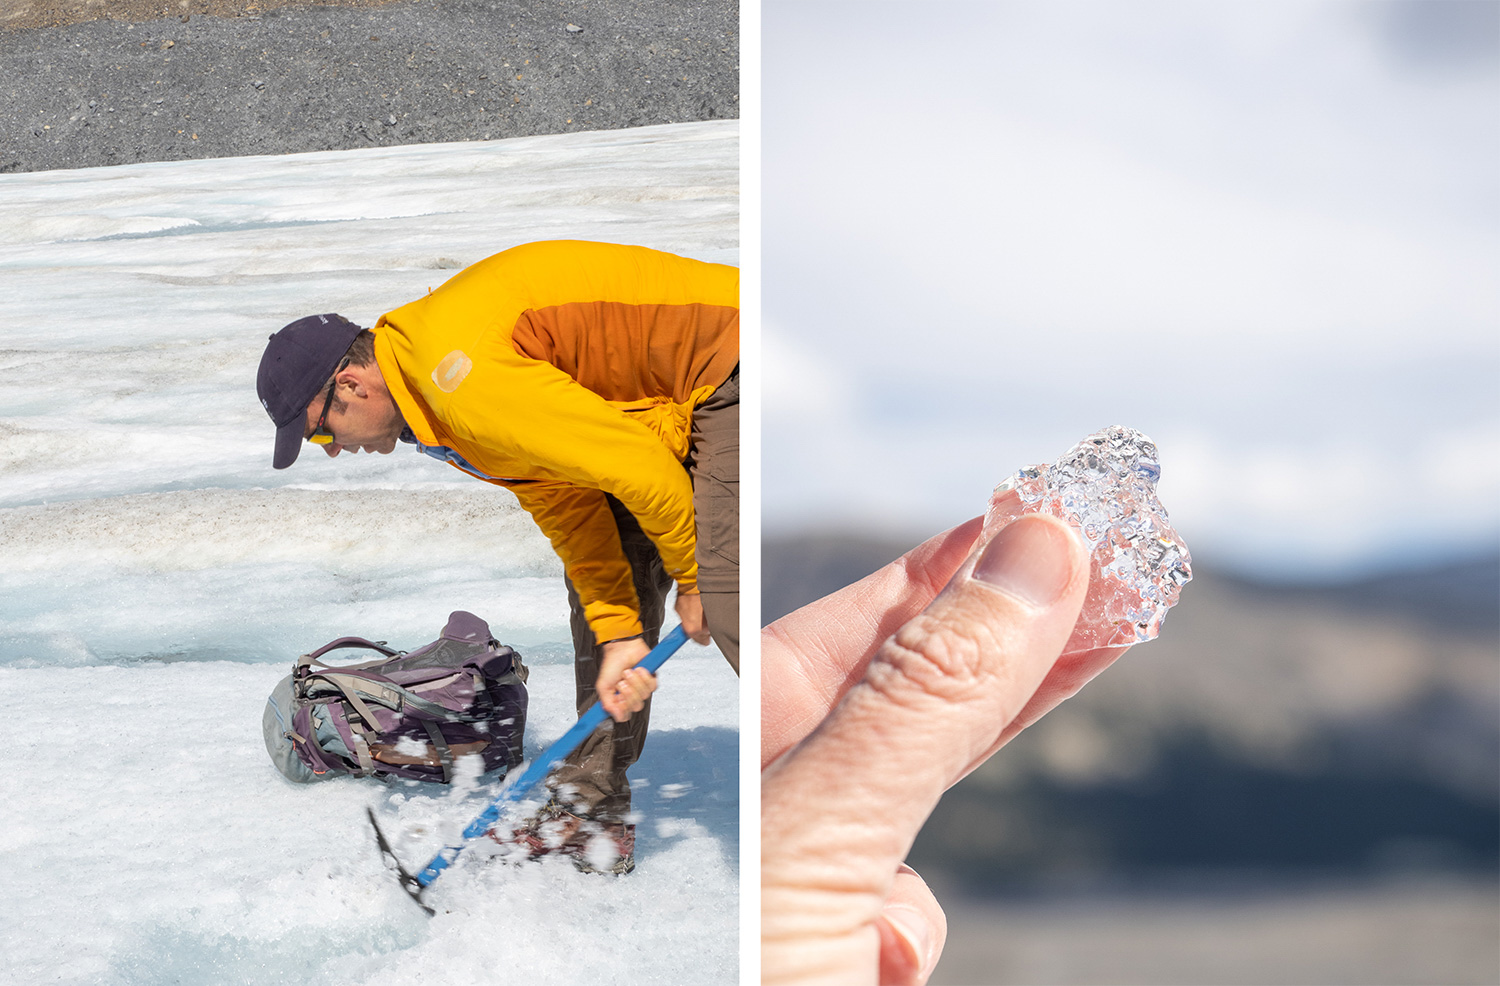
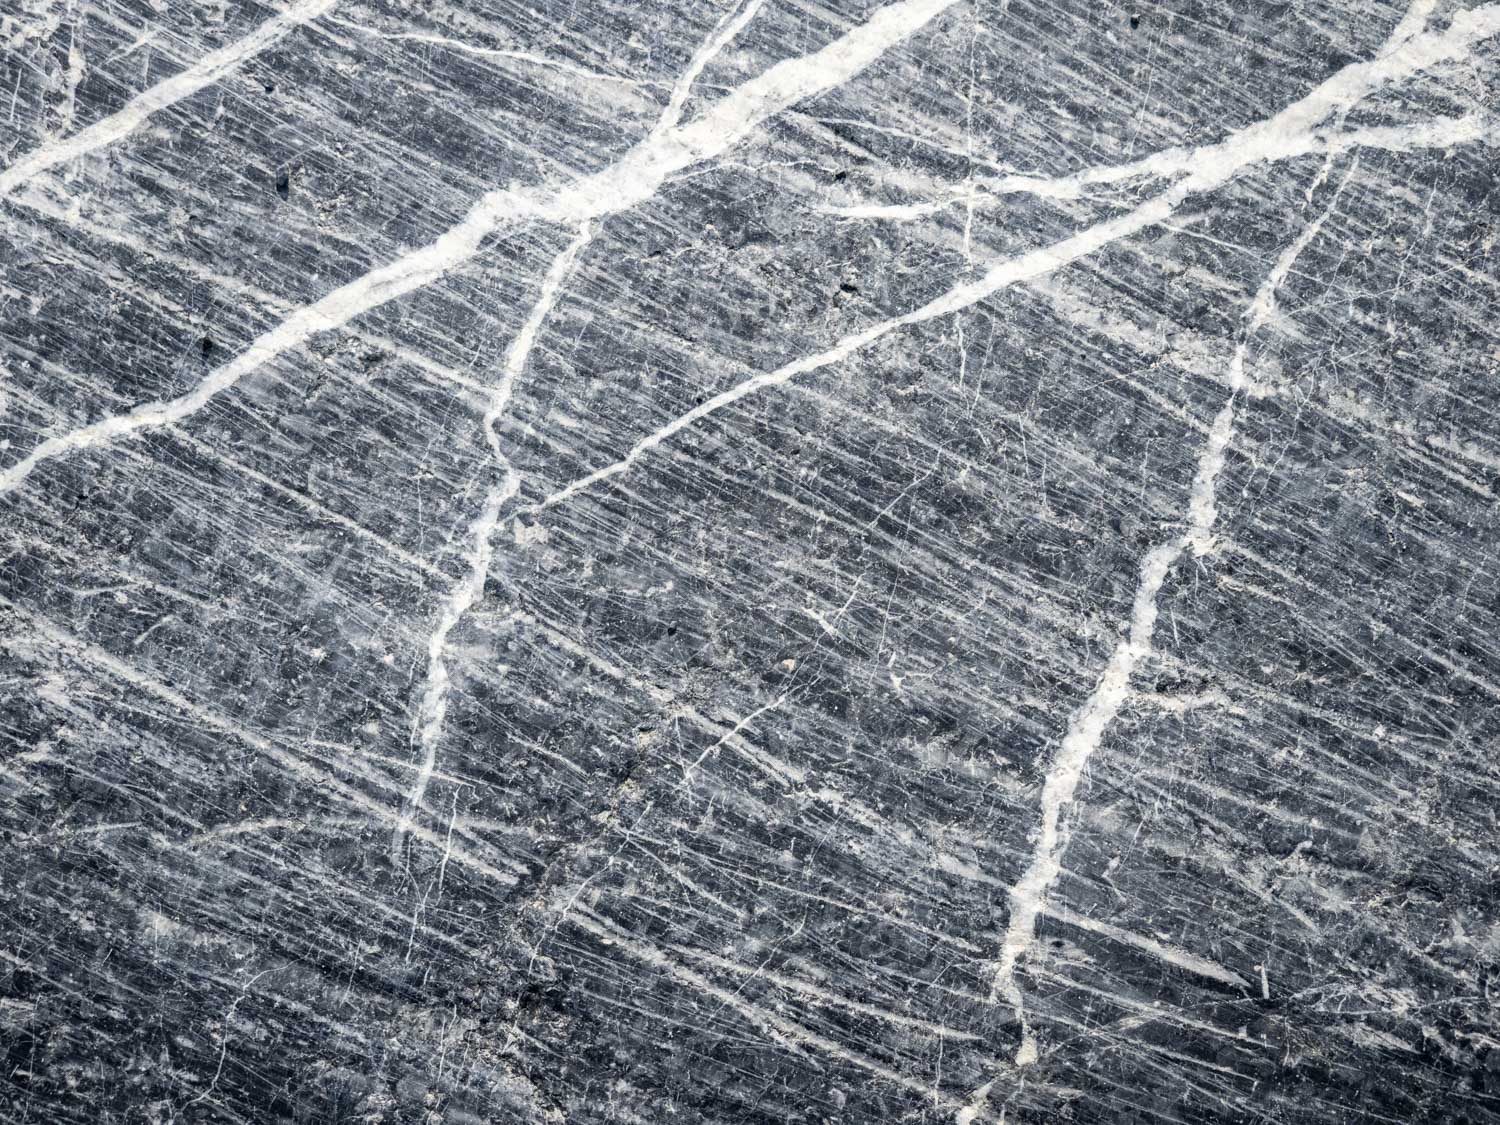
The tour begins with a short shuttle ride down to the trailhead by Sunwapta Lake. From here, a 15-min walk takes you toward the toe of the glacier, where the lowest point meets rocky terrain and lateral moraines. Stopping at a polished chunk of limestone, Corin shared how the movement of the glacier impacts the surrounding rock. Layers revealing centuries of change are evident, and as I wrote earlier, it’s made all the better to have someone share the scientific and geological facts about what you’re seeing.
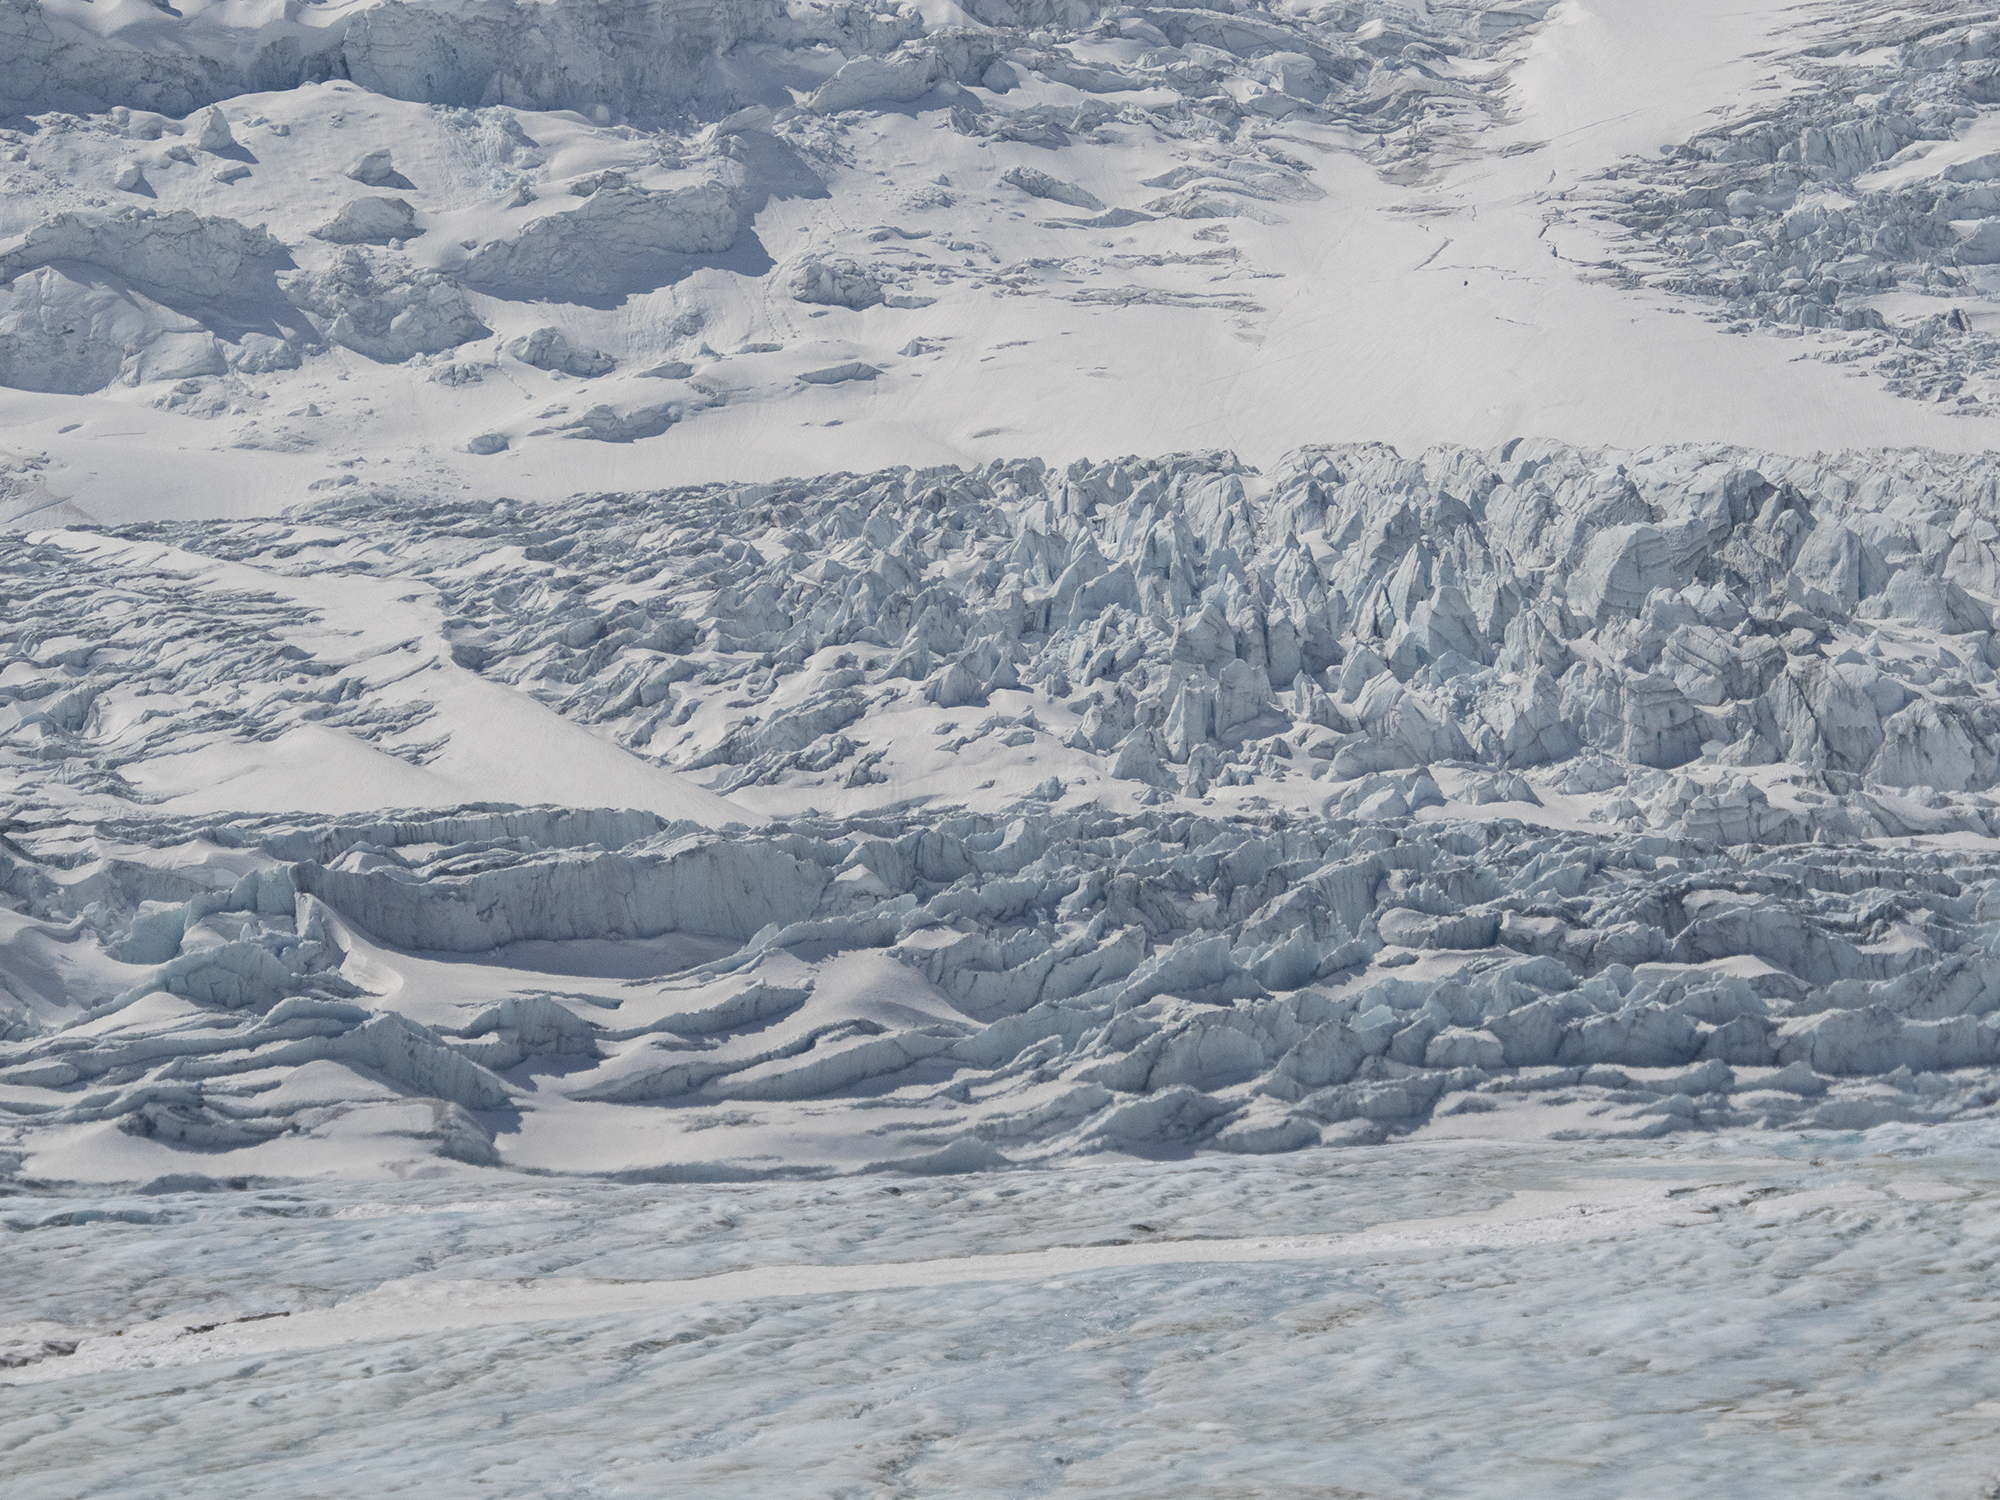
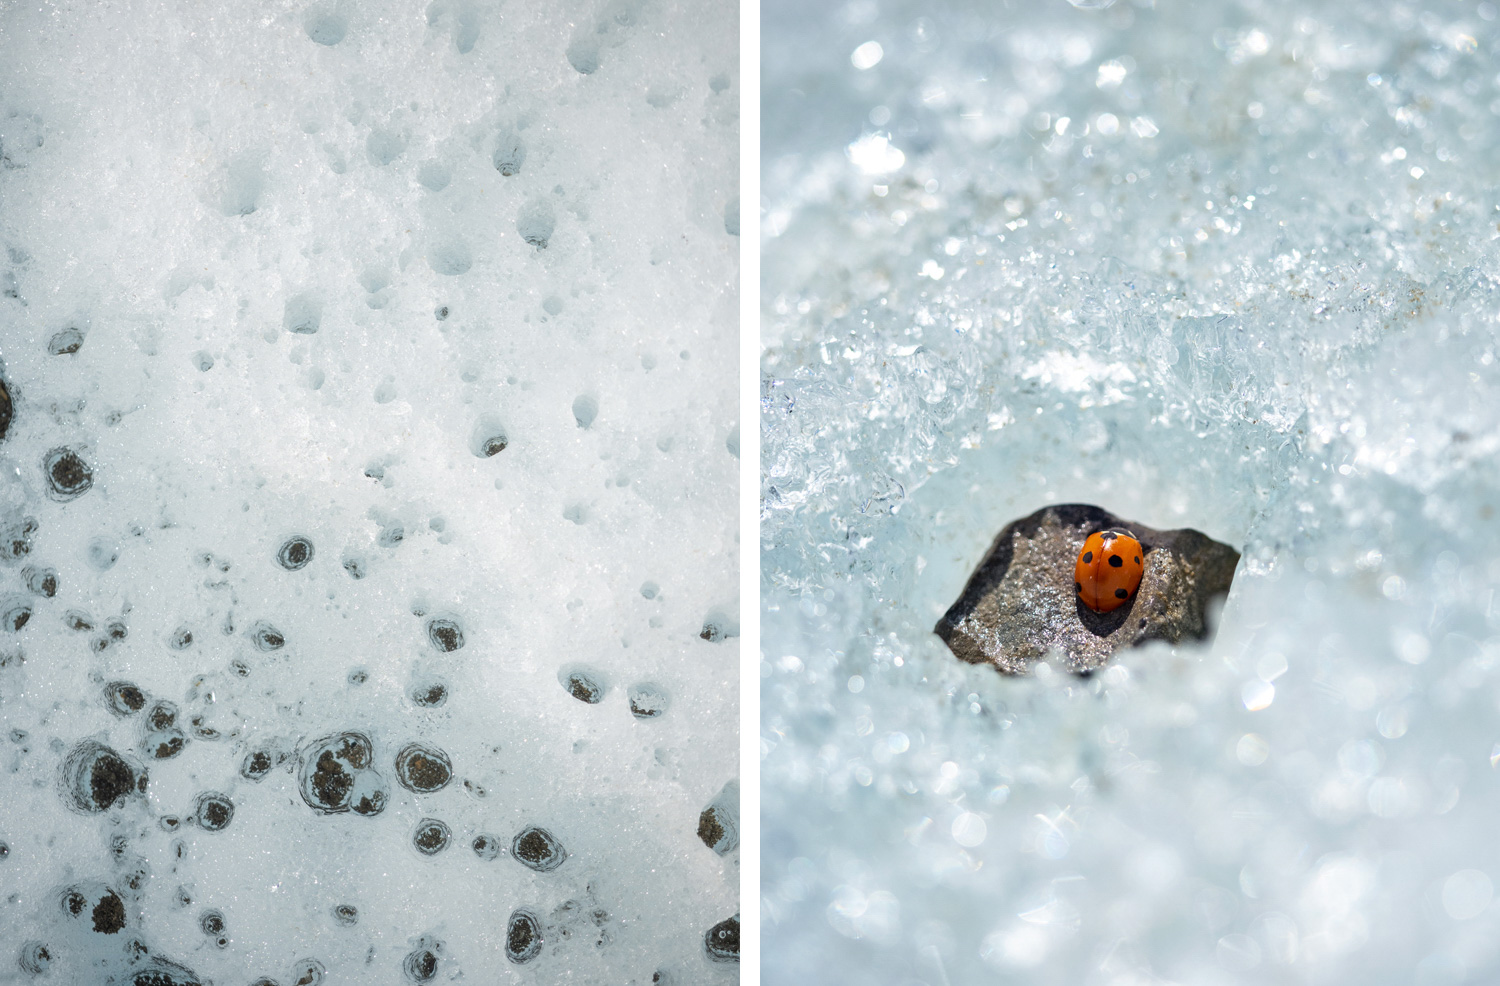
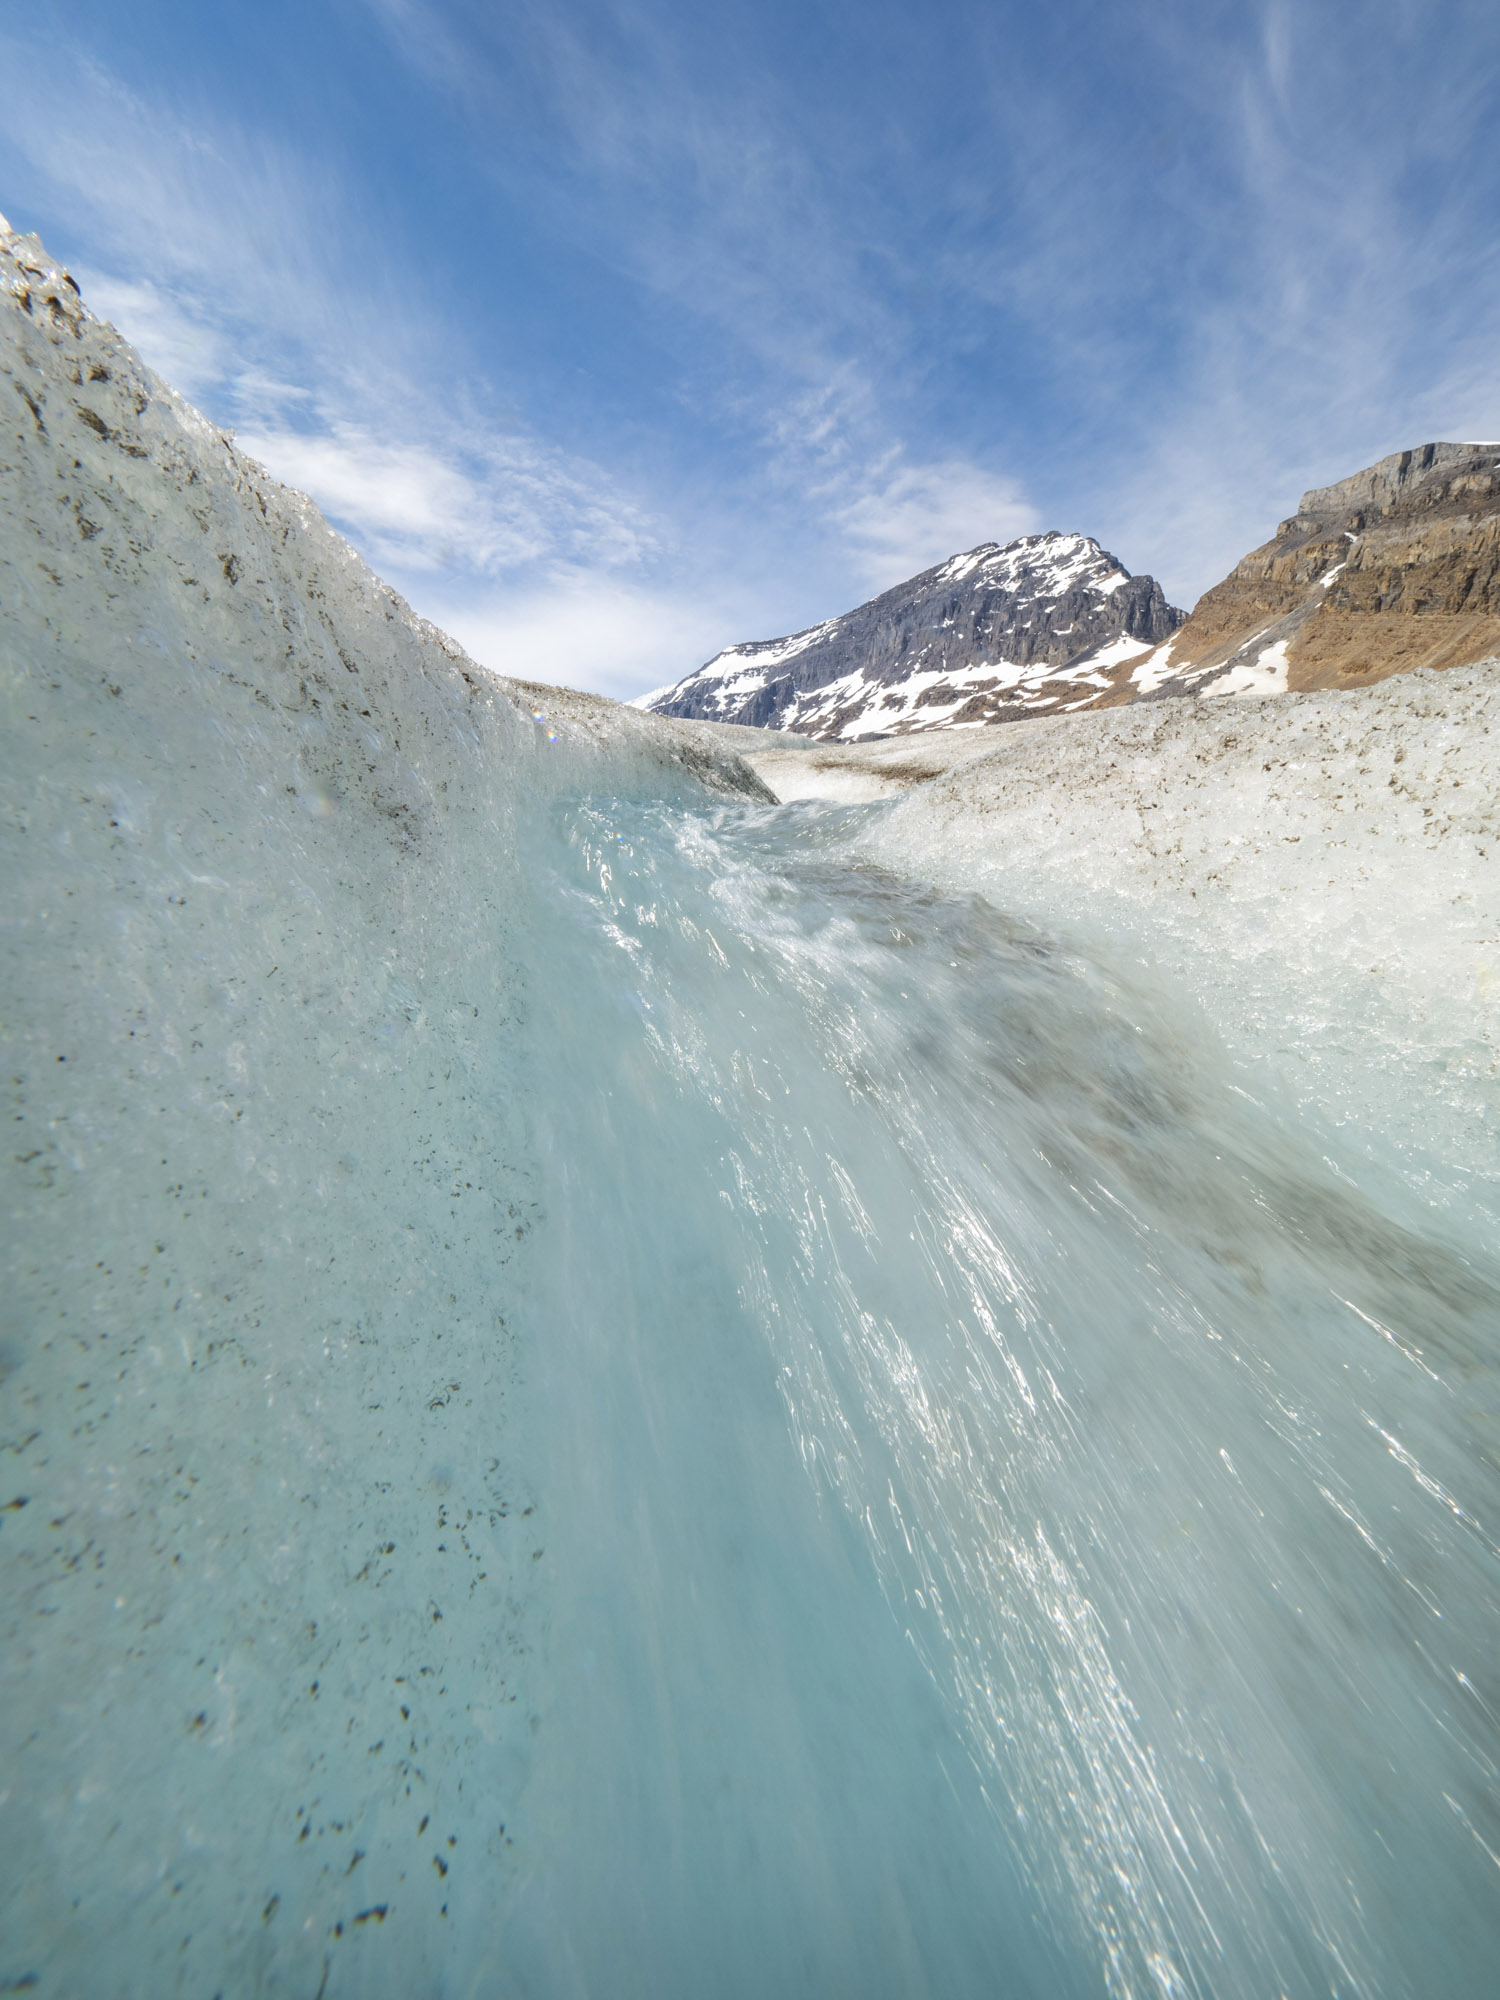
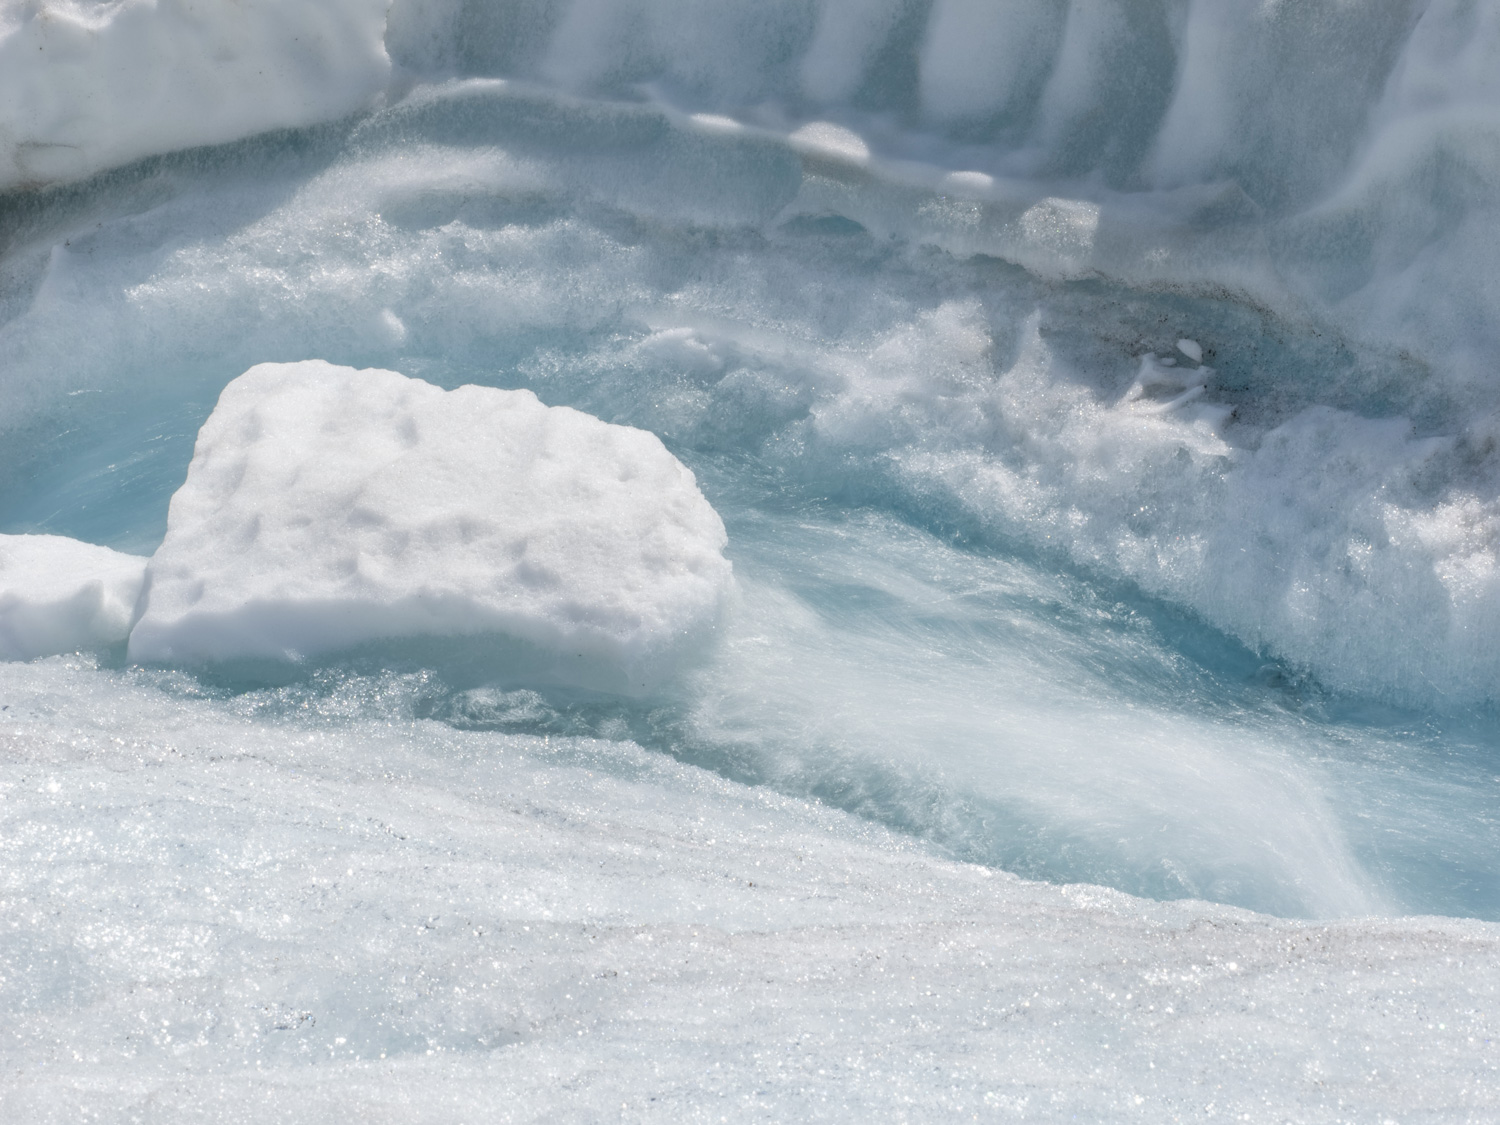
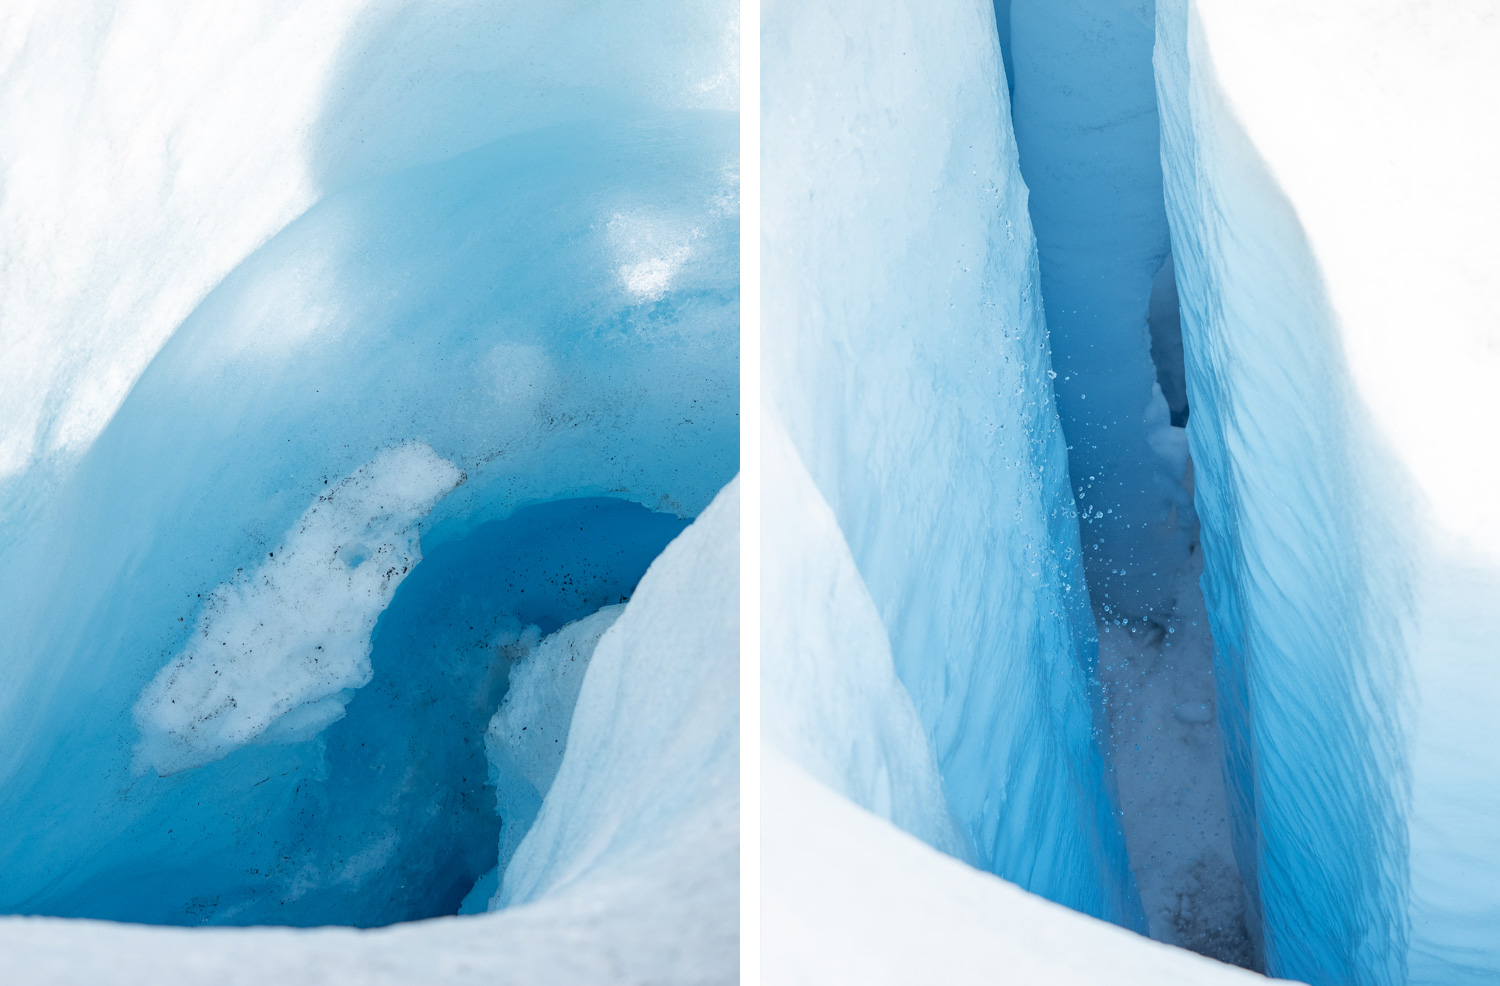
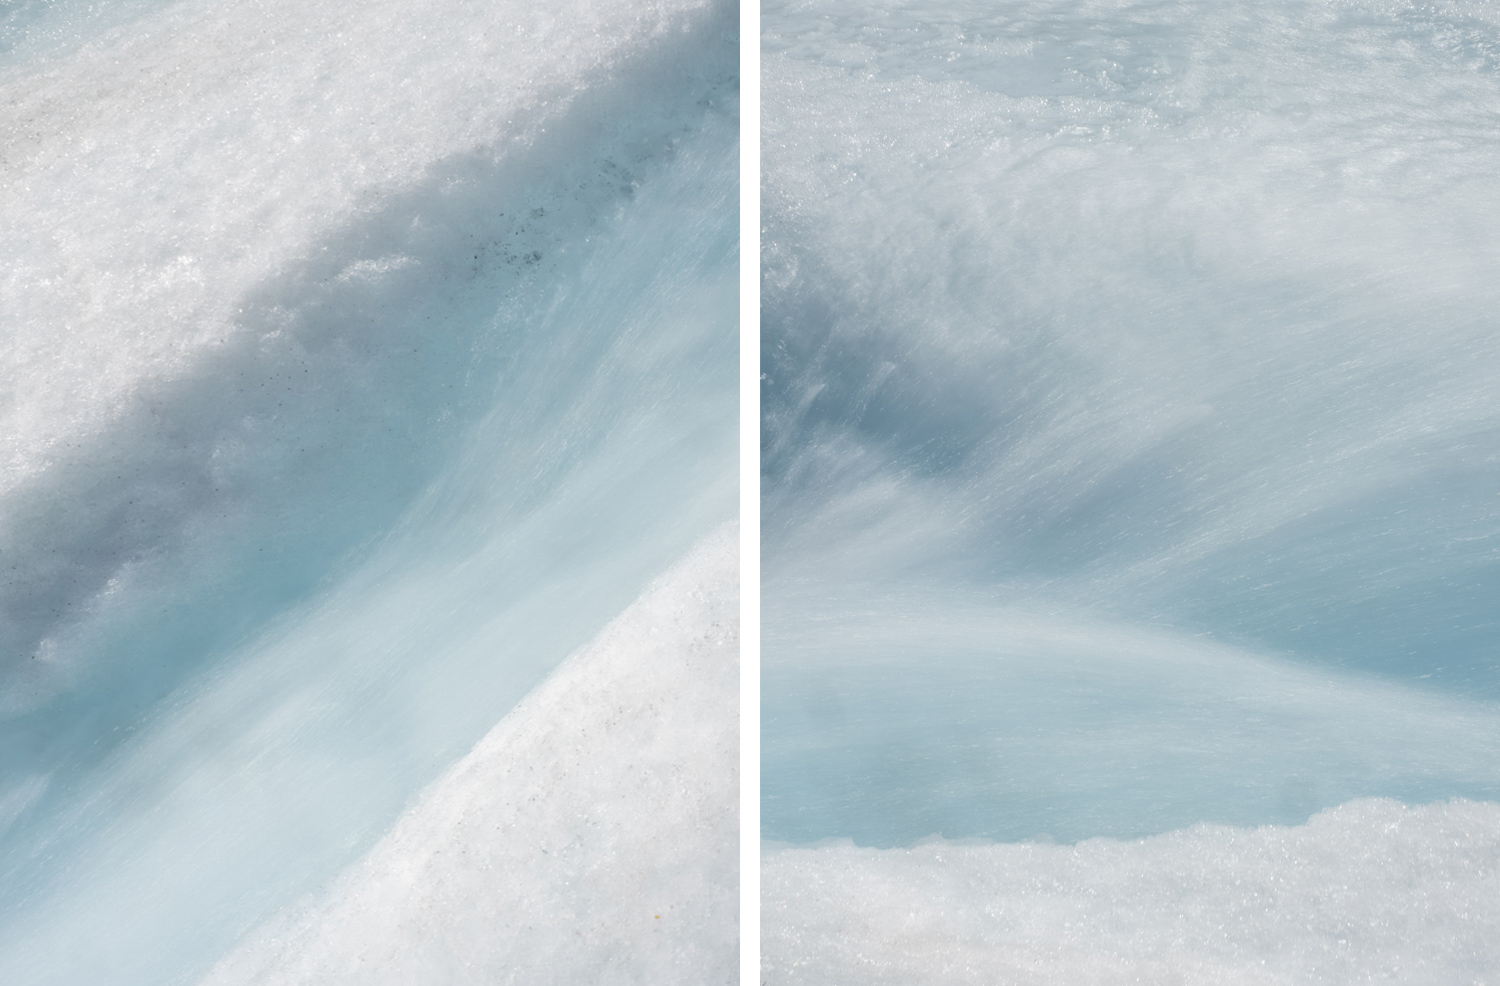
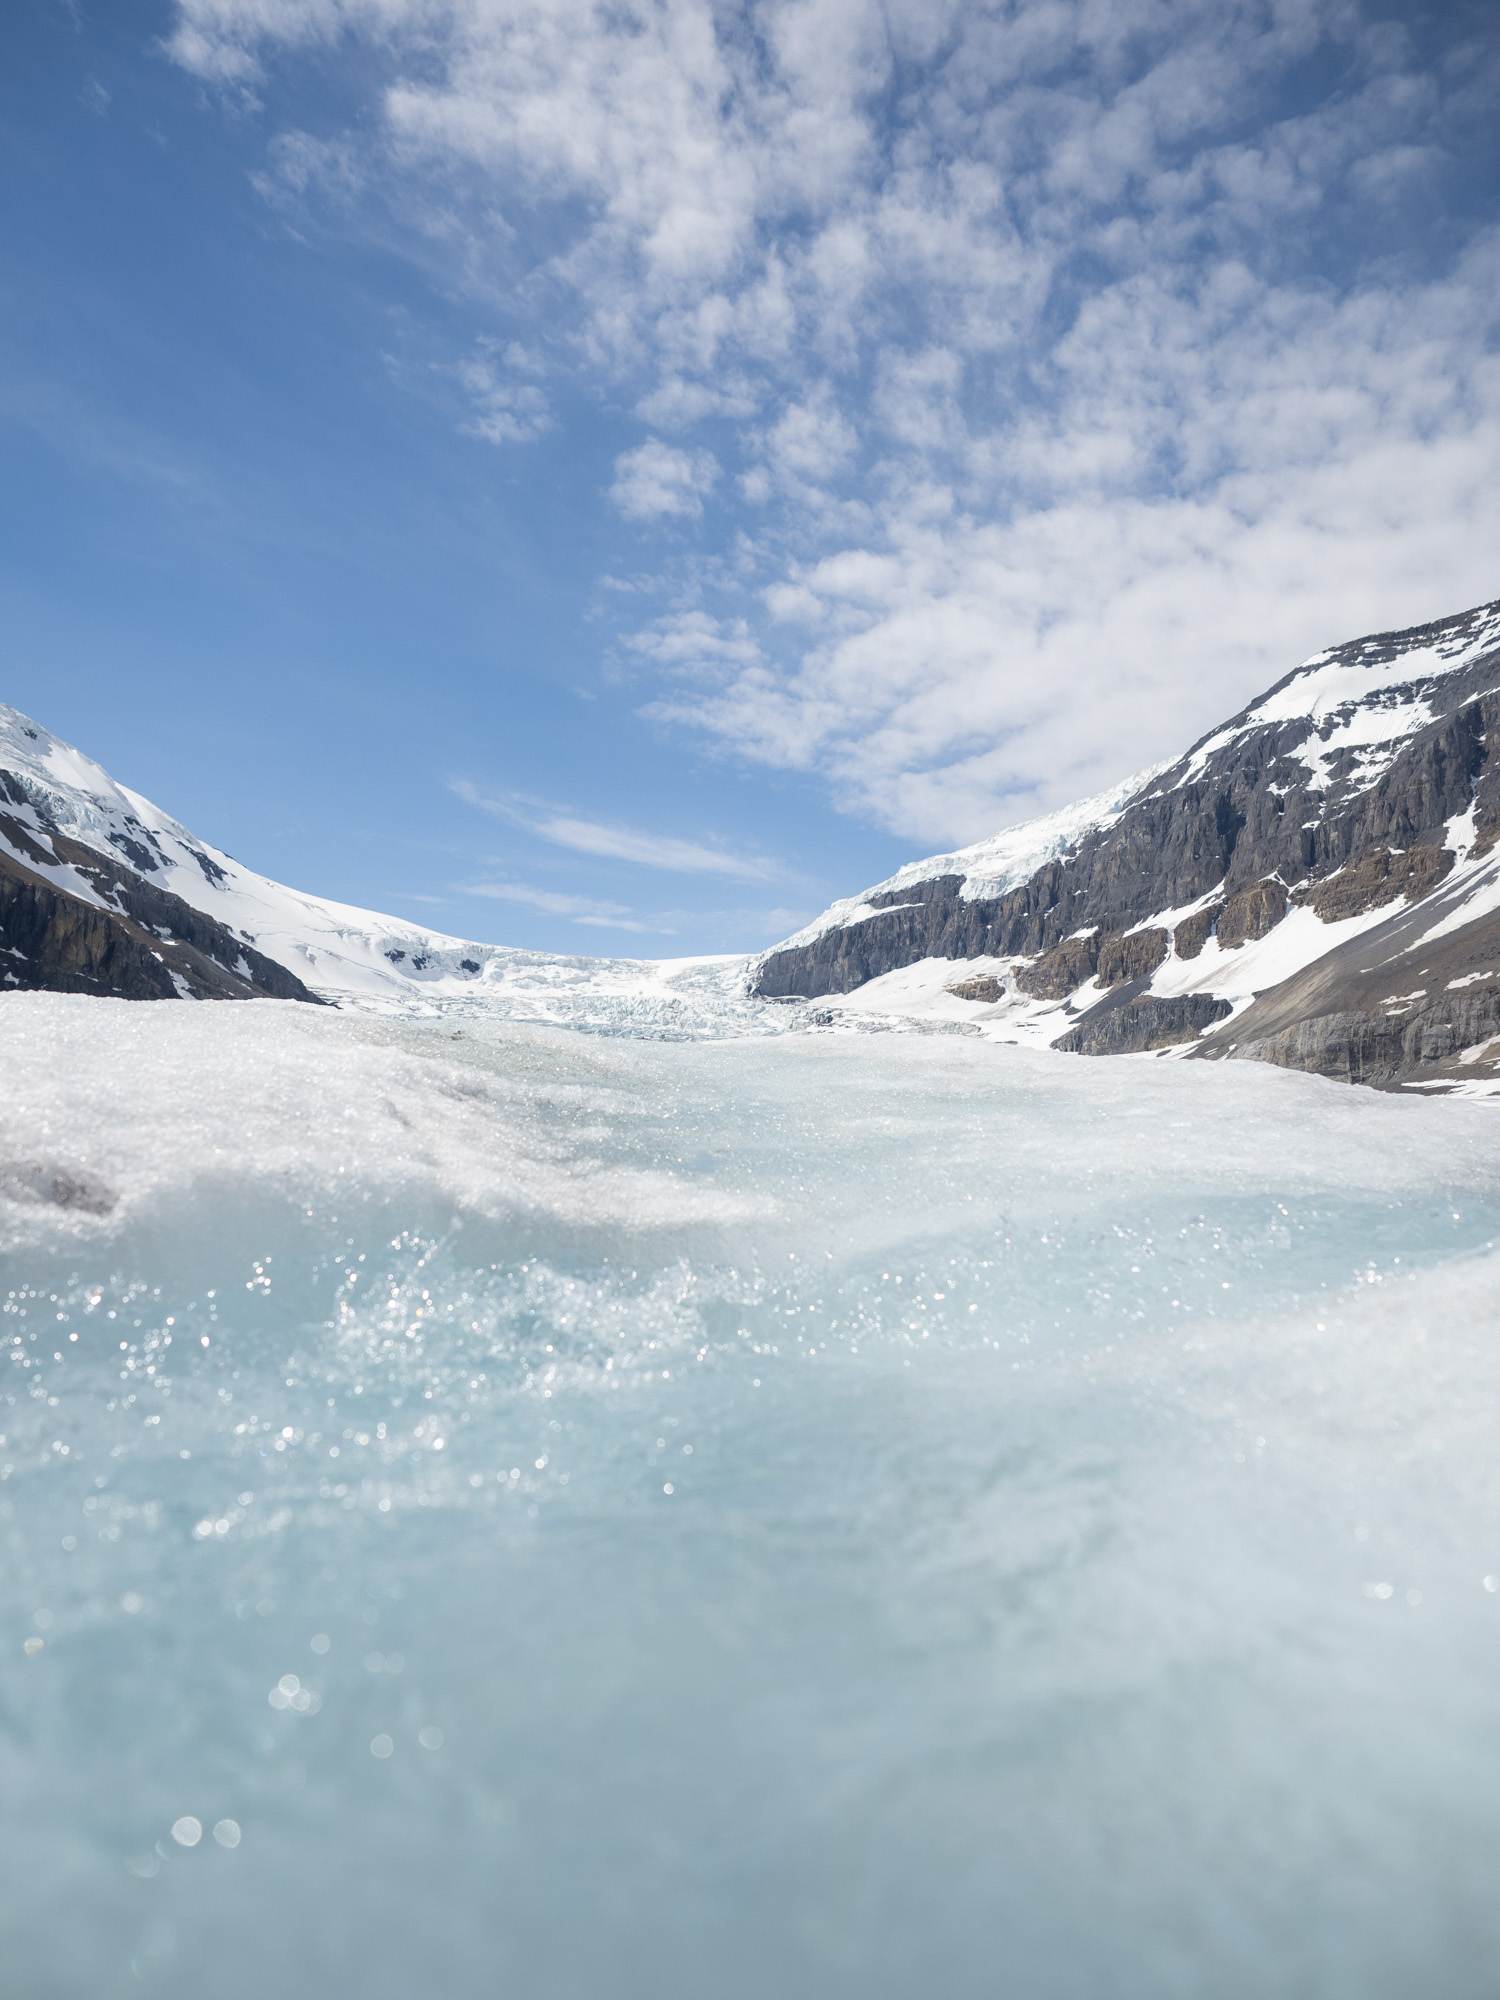
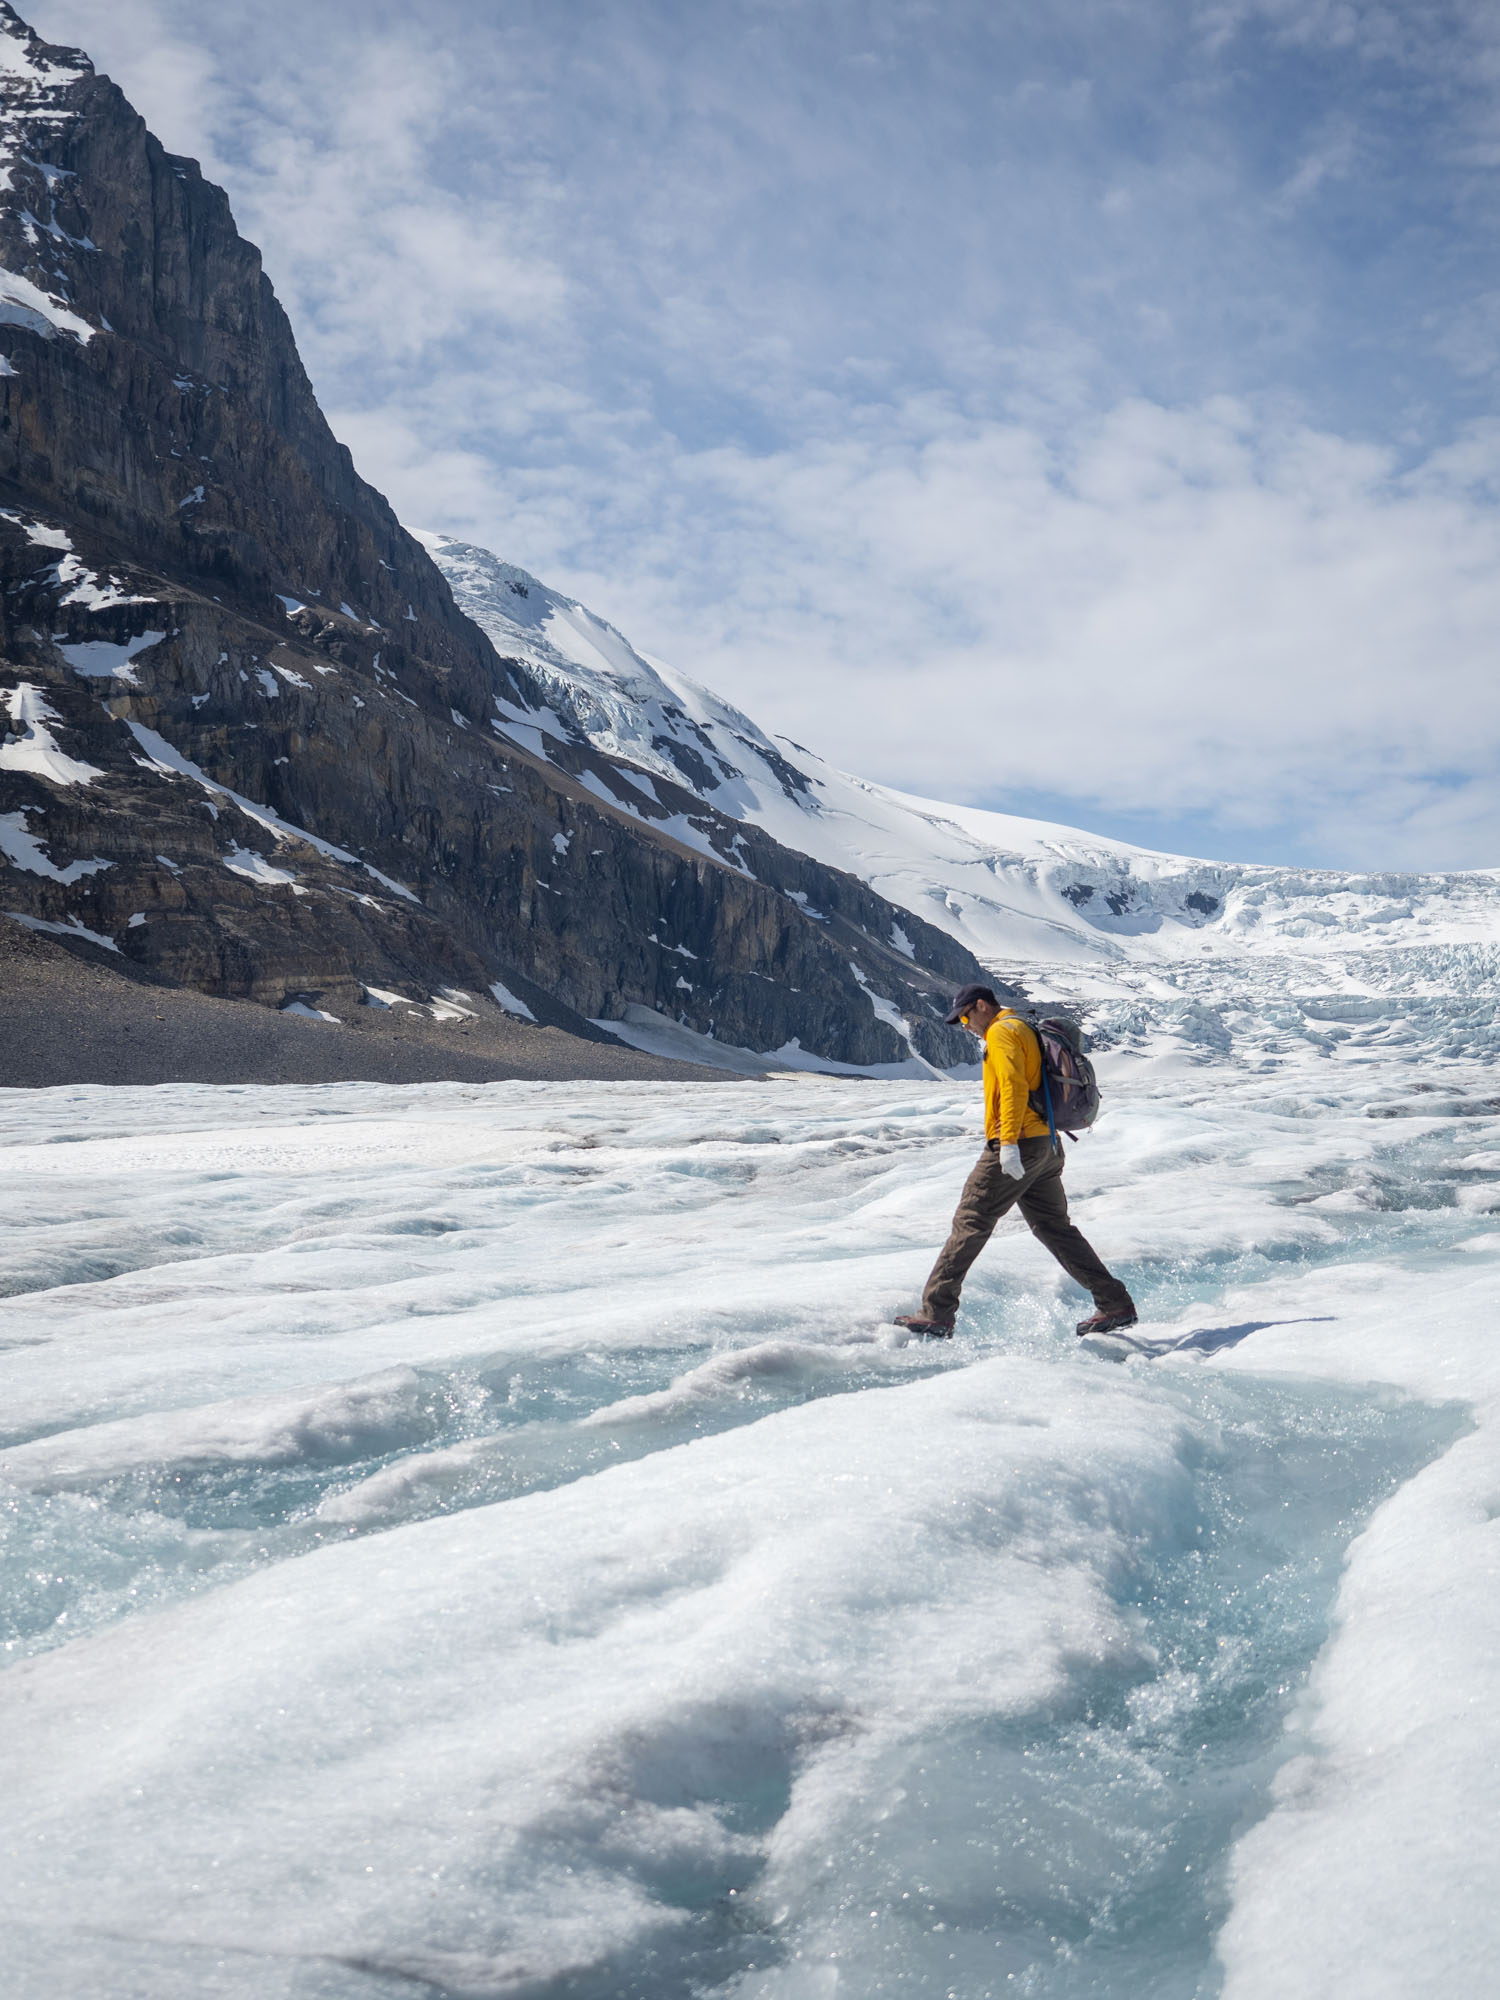
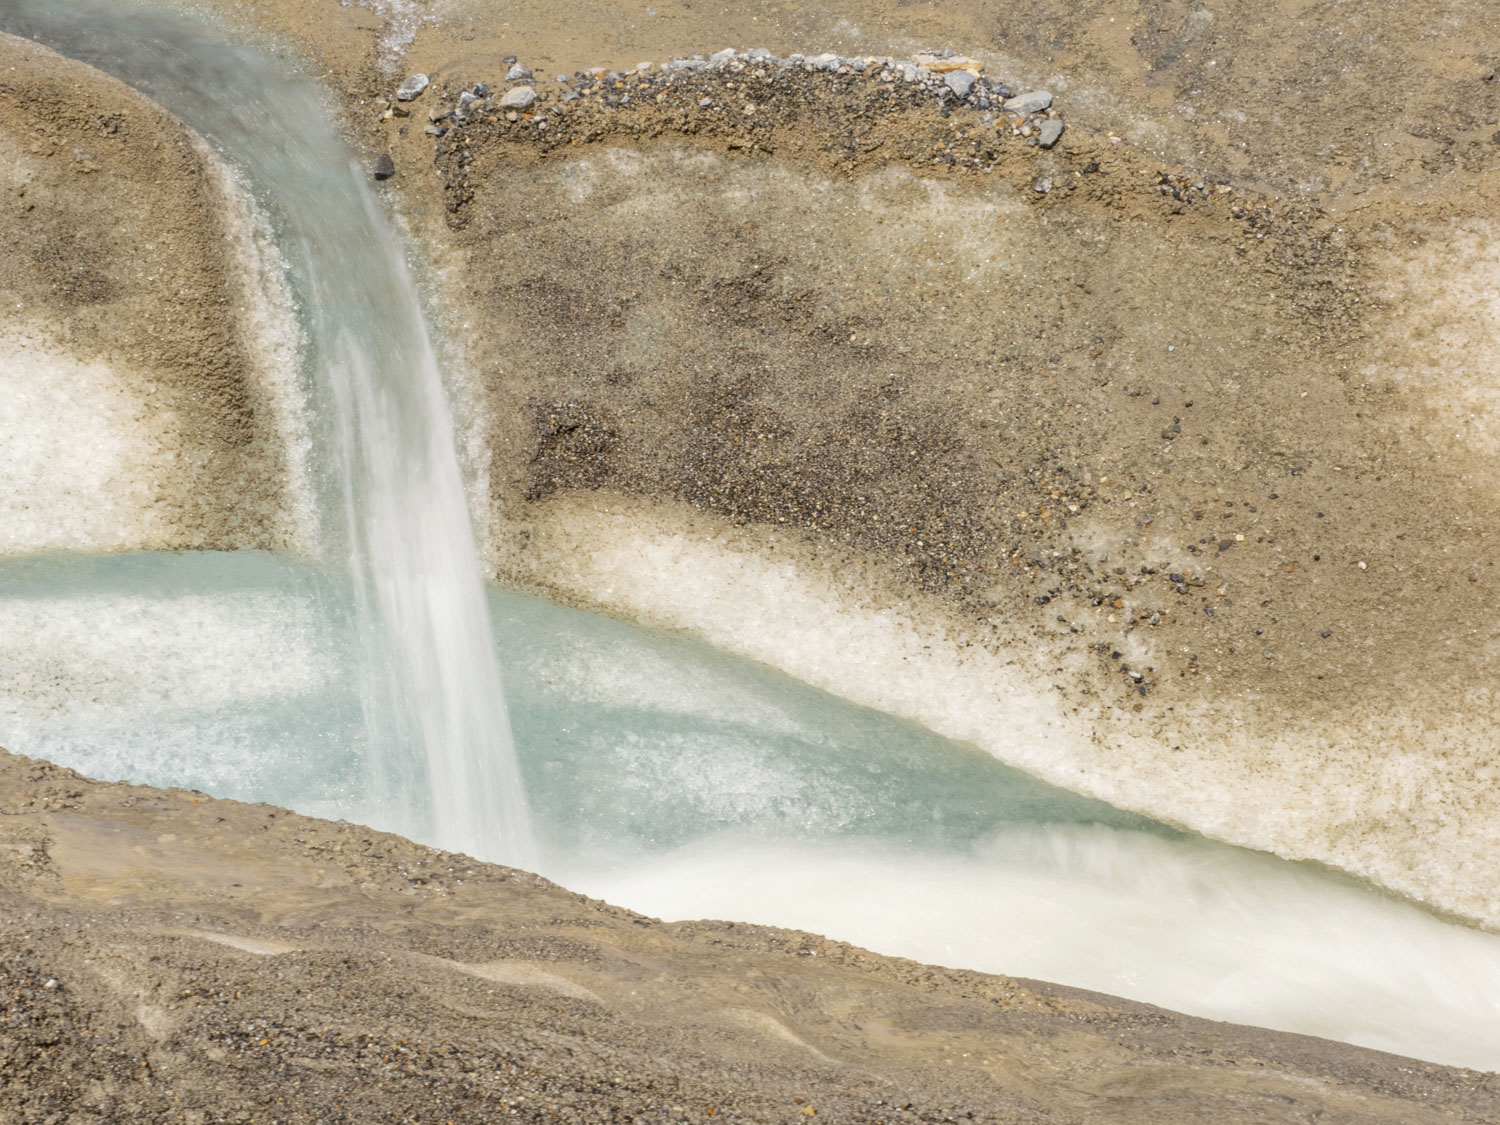
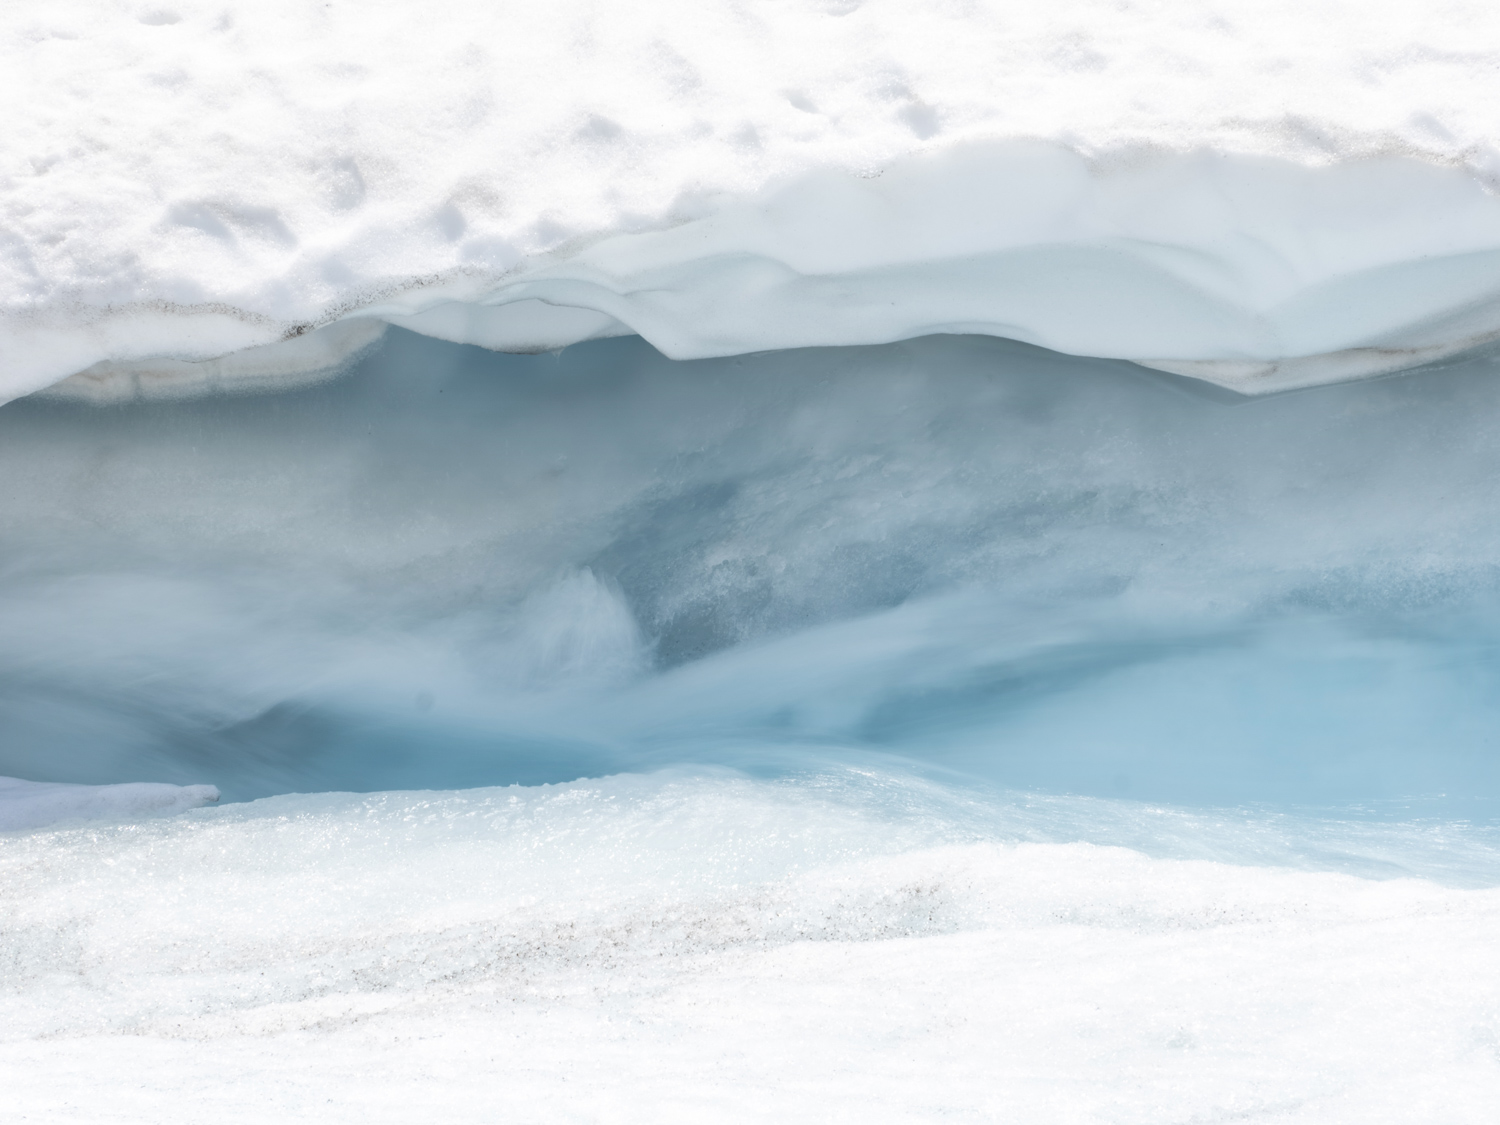
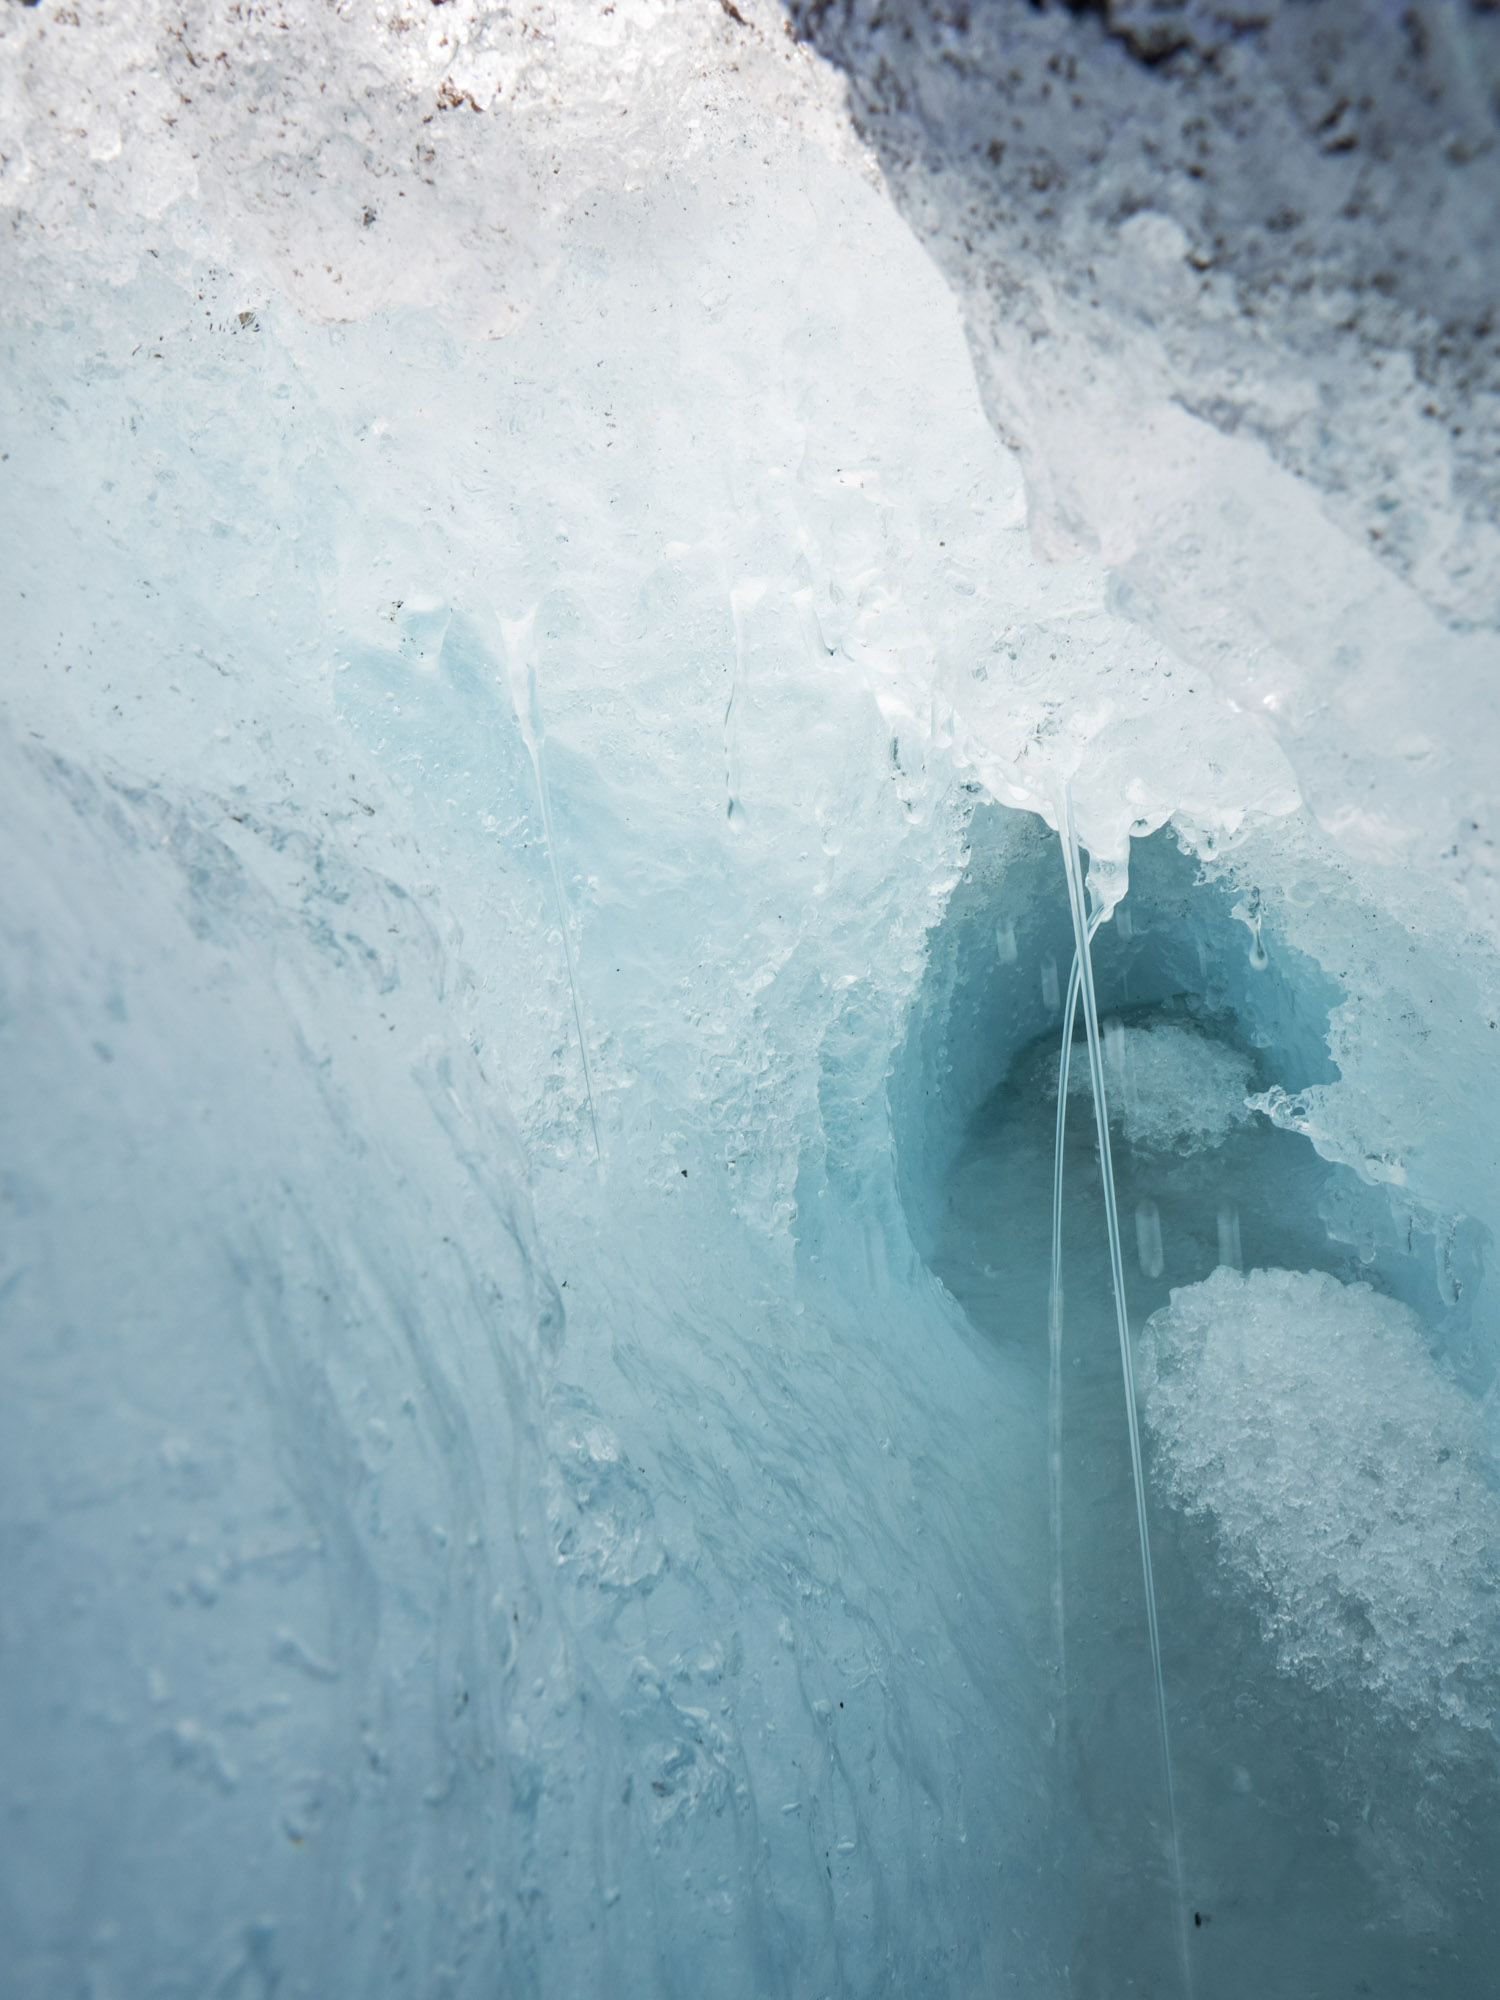
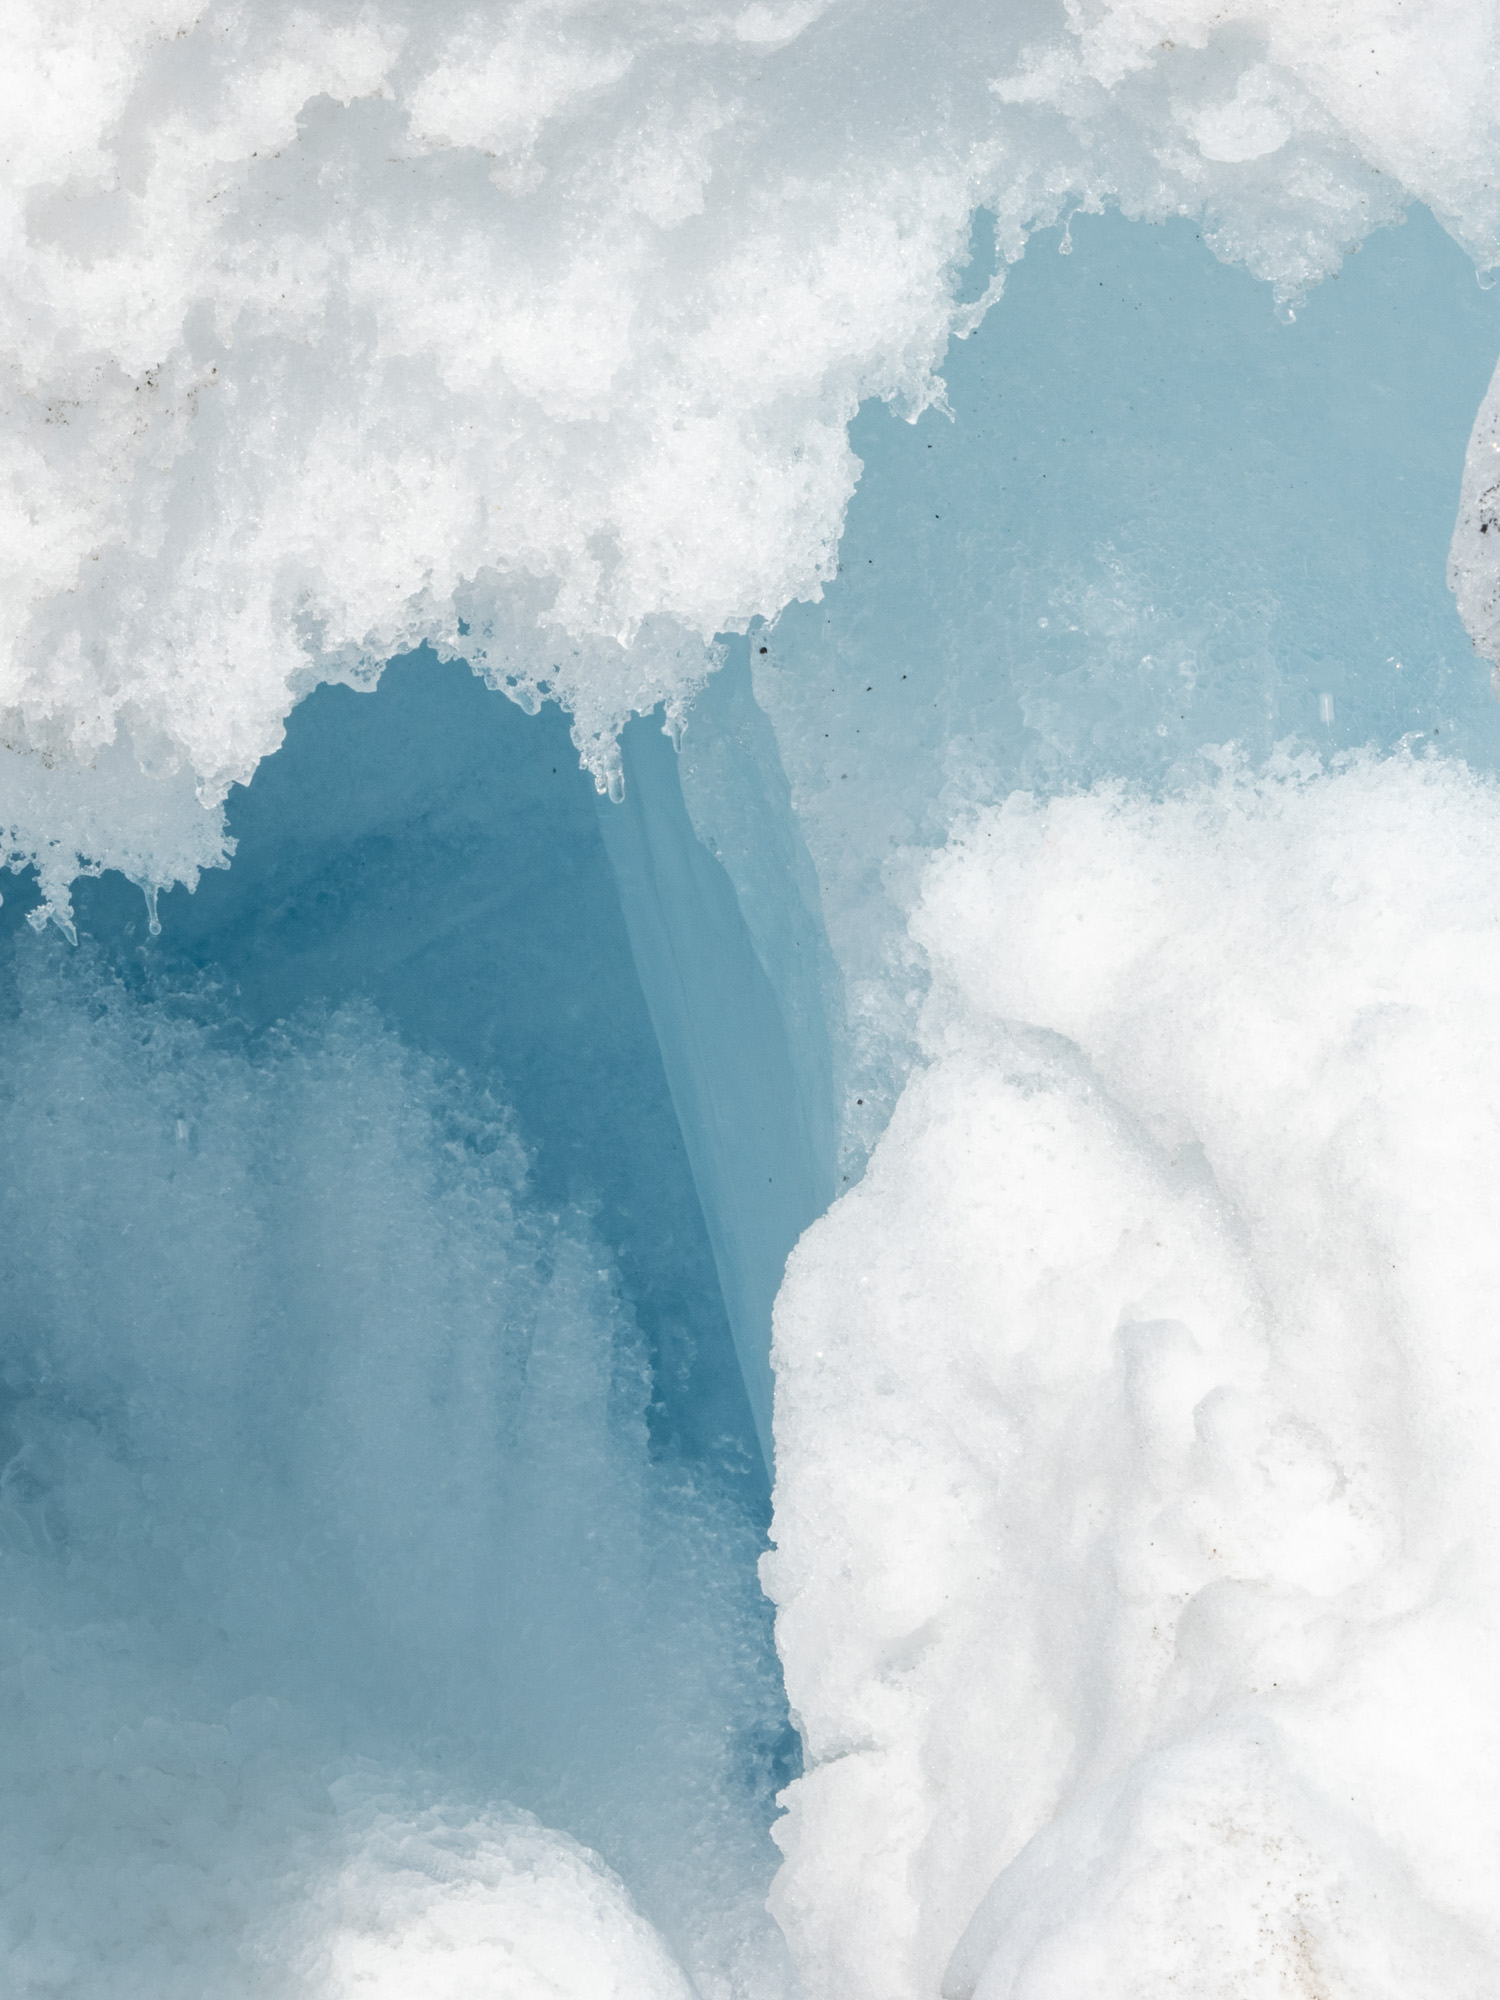
Onward, we cross a meltwater stream and within minutes are on the ice. Despite ‘glacial blue’ being the most associated colour of glaciers, they surprisingly feature a spectrum of hues, ranging from deep white, brown, and black to an array of icy blues, light to deep. A mixture of dust, ash, sedimentary rocks and minerals are layered within the ice, then as in photography, light plays a key role in what we see on the ice. One very visible process of how light, rock and ice work together is seen in tiny pockets and holes across the glacier. Due to the darker hue of the rock, sometimes as small as a pebble, the heat of the sun warms the rock, in turn melting the ice around it.
Another interesting colour fact is how rock flour creates the vibrant blue colour we see and are drawn to photograph in glacial lakes. Rock flour is created when the glacier advances across the bedrock, dragging rocks and boulders, grinding them down into a fine flour substance. The flour then gets into the water system and when hit with sunlight, absorbs all the colours of the rainbow and only reflects the blues and the greens.
Photographing on the Ice –
I’m a strong believer in enjoying any outdoor experience before attempting to take photos. Soak it all in, look around, and then consider how you want to capture the scene. Now, I say that, but if anyone saw me in action, I was one snap-happy photographer up on the Athabasca Glacier, although I had spent a few hours the day prior just staring and conjuring up photo ideas.
To capture great images on the ice, it’s important to consider your composition, the weatherproofing of your gear, and lens choices to ensure you’re ready to have some fun. You’ll also want to be mindful not to lag behind too much while on the glacier, mainly due to safety reasons and following the path your guide makes. It’s not really the place to set up your tripod and take your time, it’s a snap-on-the-go type of activity, but there are breaks which allow you to slow down a little.
Composition Tips when capturing the Athabasca Glacier/Glacial Landscapes:
- Look for elements like ice and water to include within your image, get up close (if safe to do so) to the glacial meltwater streams and incorporate them in your shot.
- Leading lines are a great feature when shooting glaciers, use them to compose your image and have the lines of the glacier lead the viewers eye into the frame.
- Keep an eye out for details, sparkling ice, tiny holes, patterns, colours and the contrast between rock and ice.
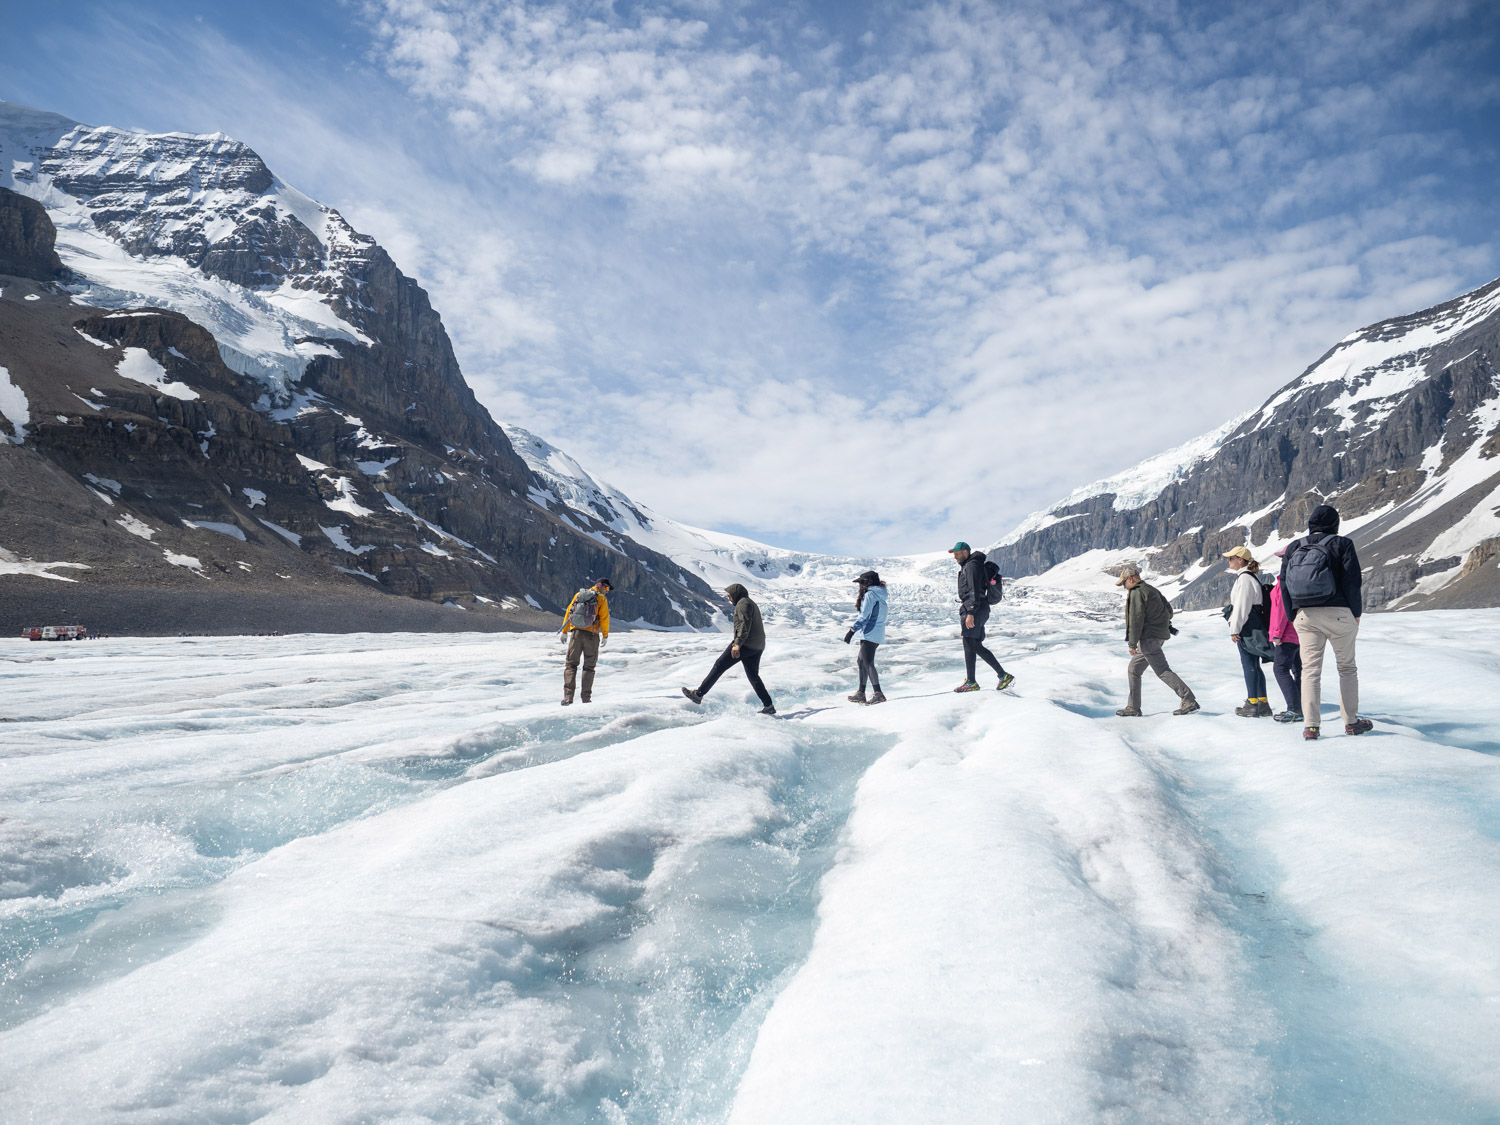
- Including people in your shot is a great way to showcase perspective and visually represent just how vast a glacial landscape is. On the day of my hike, we could see a distant group of mountaineers, apparently, they were a few hours’ walk ahead of us, kilometers away in fact, which gave further proof of just how immense the Athabasca Glacier is.
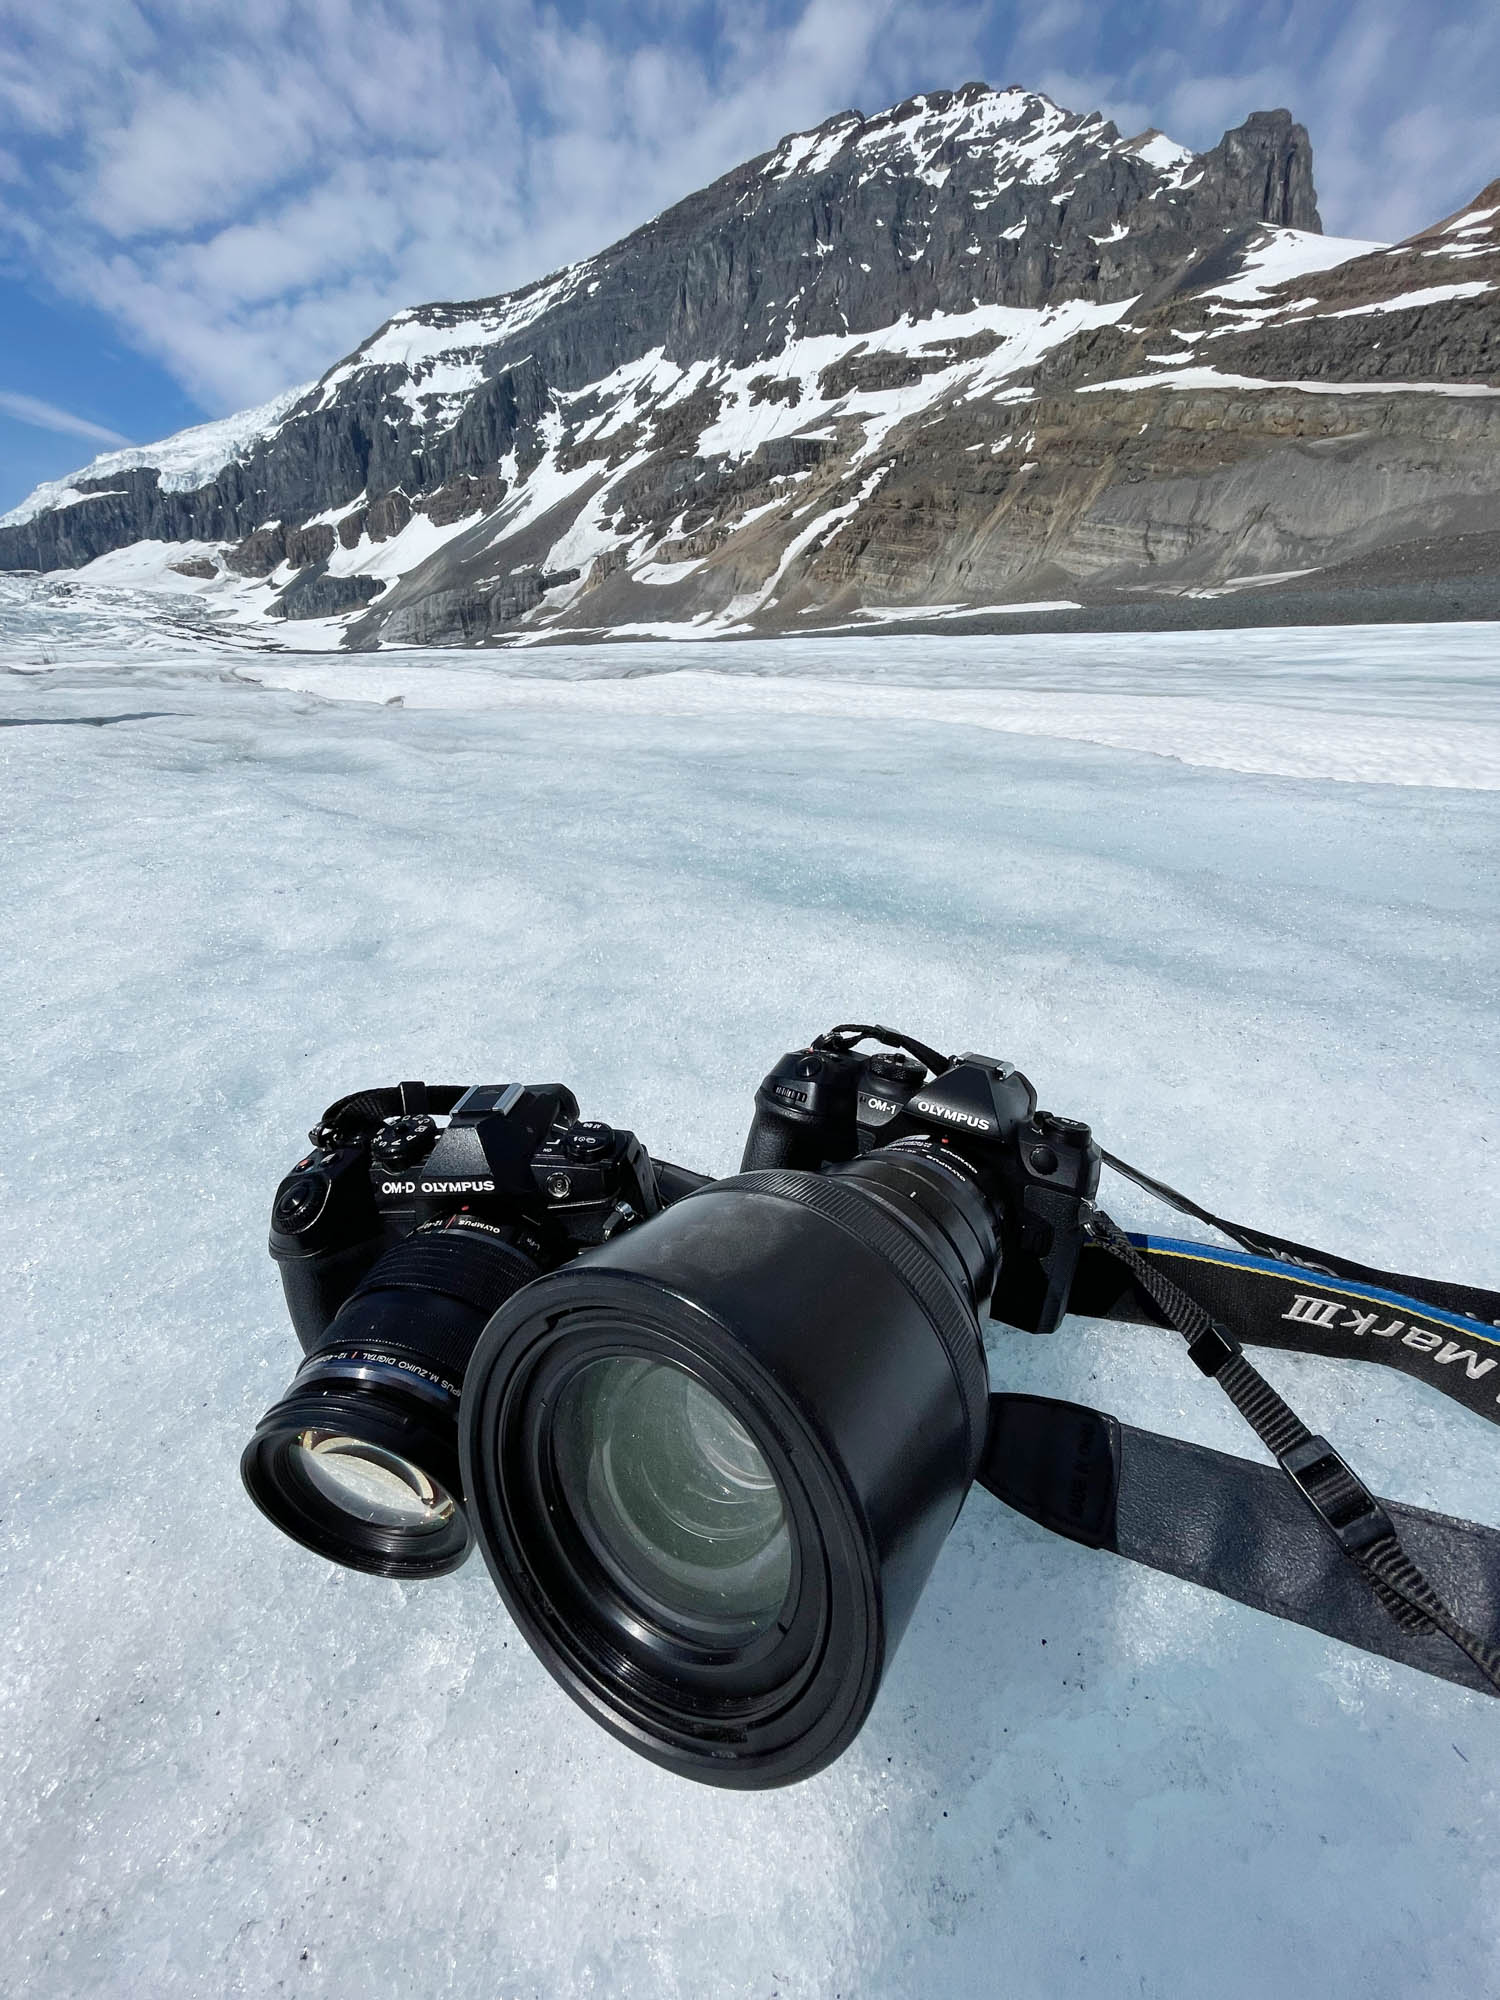
- If your camera has the ability, switch over to the handheld high-resolution mode (both my OM-1 and E-M1 MKIII have this) to ensure you’re creating image files filled with the intricate details of the glacier.
What Gear I Photographed With –
I took two cameras and three lenses with me on the half-day ice walk. When hiking, I prefer to use two bodies and pop on versatile lenses so I can easily shoot throughout the day without changing lenses or fiddling too much, especially if there’s no where to really stop.
Body 1: The OM SYSTEM OM-1 with the 40-150mm f2.8 pro lens.
Body 2: The OM SYSTEM/Olympus OM-D E-M1 MKIII with the 12-40mm f2.8 pro lens.
Once I’d captured a variety of images, for the walk back down the glacier, I switched out the 12-40mm lens and relaced it with the 7-14mm f2.8 pro lens to capture some wider shots of the landscape. This worked really well to get up close to the meltwater streams and because the camera has incredible weatherproofing, I knew a few splashes wouldn’t do any harm.
You can see below what a difference in focal lengths make.
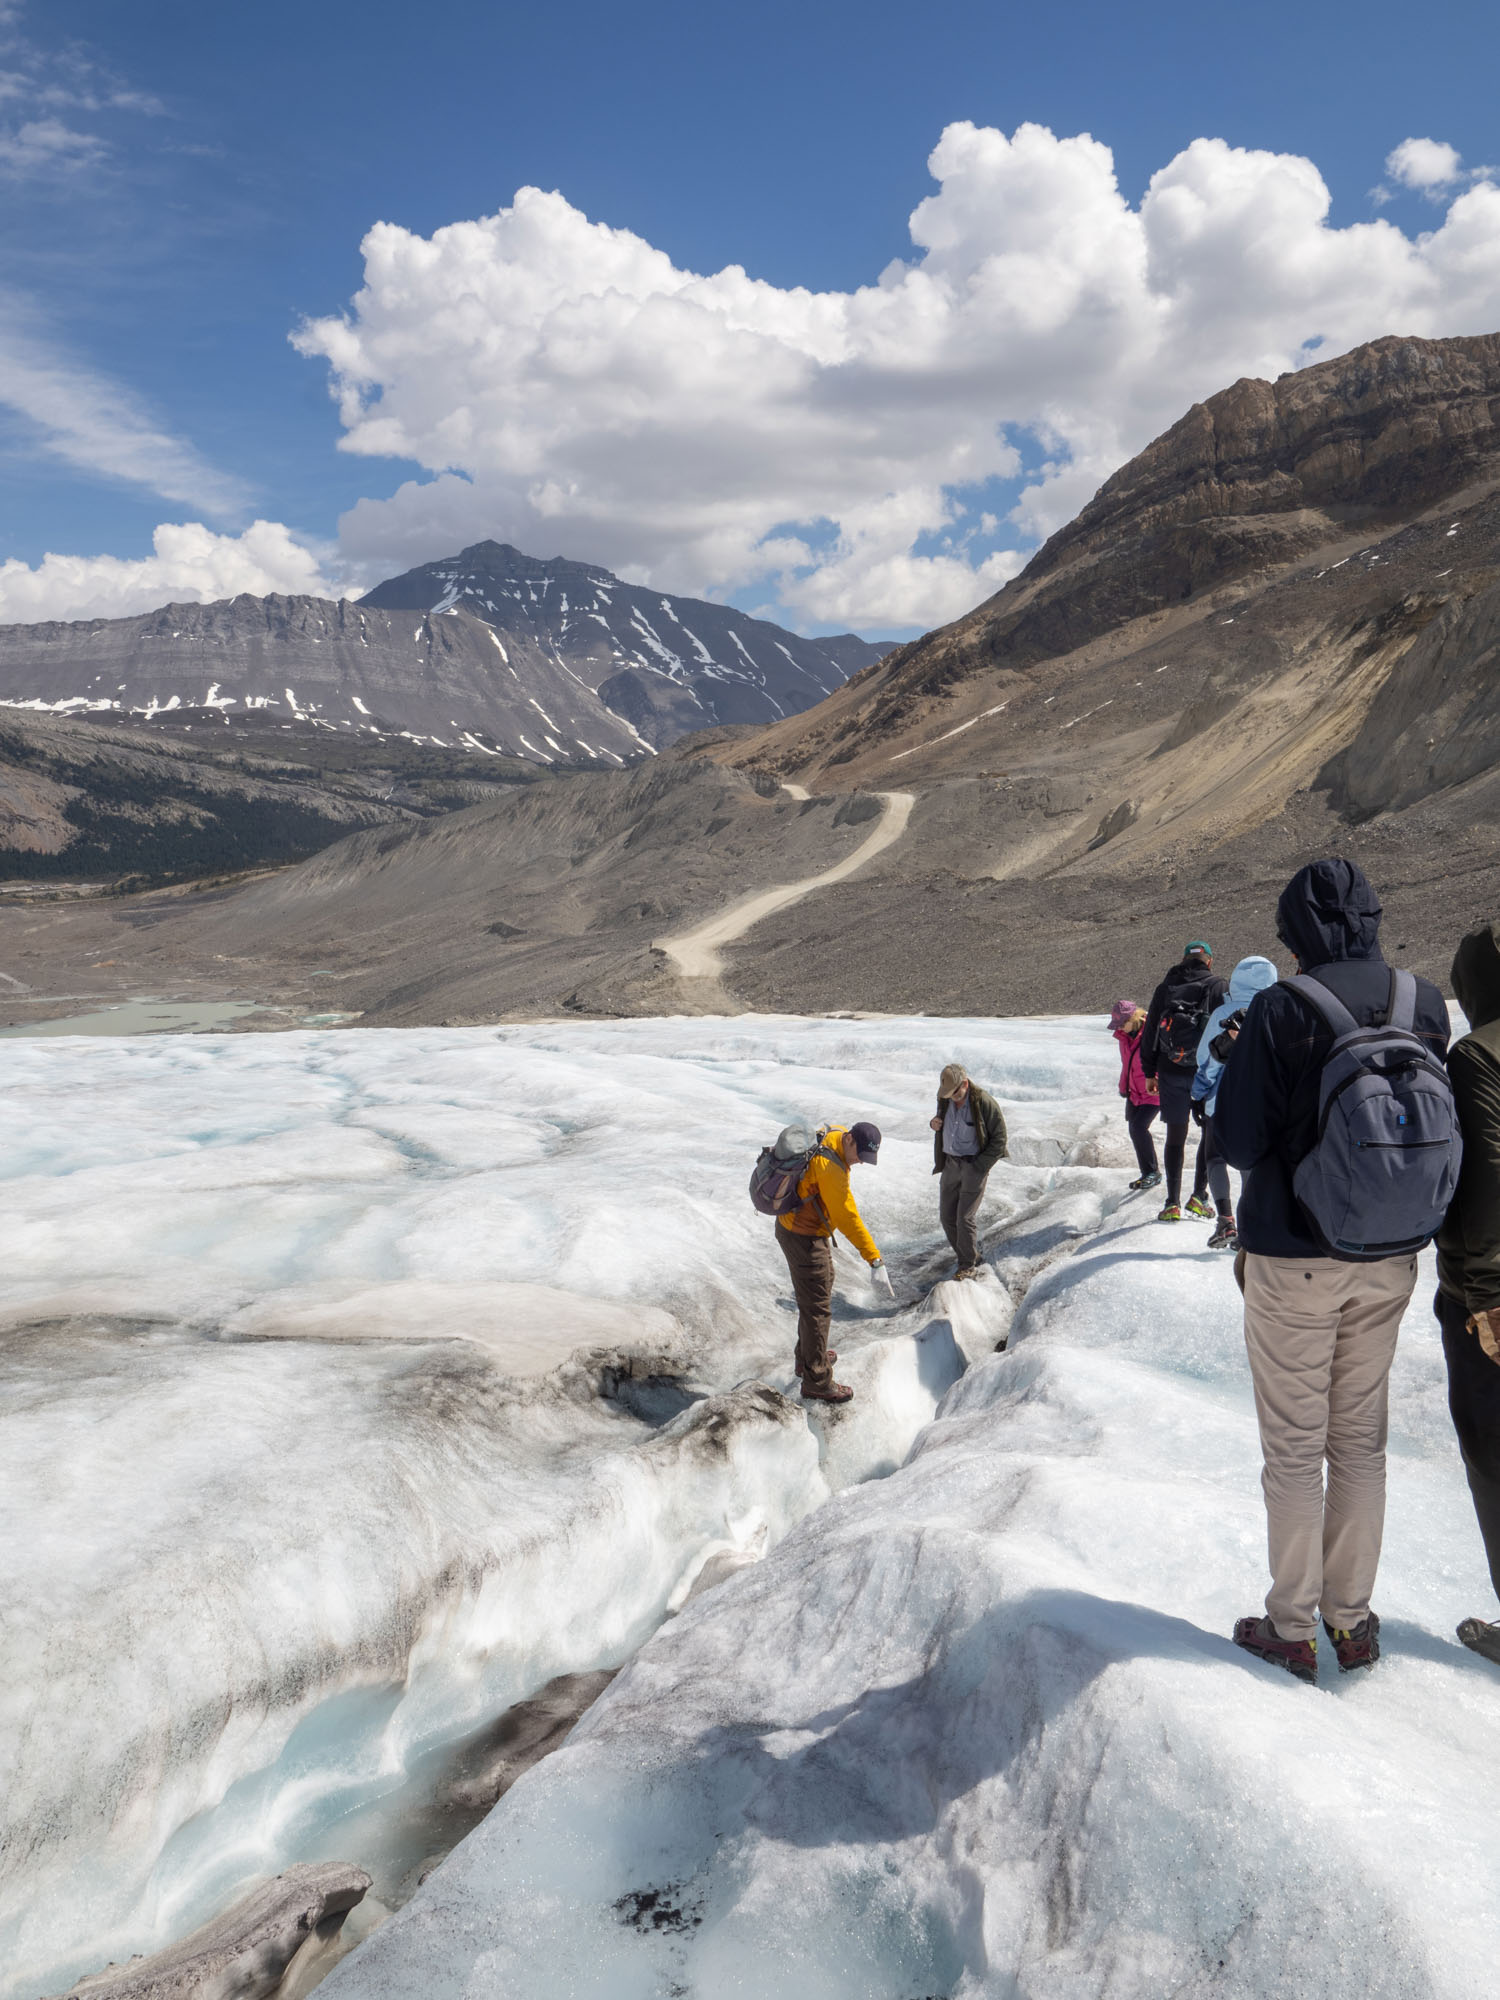
Image taken with the 12-40mm f2.8 lens at a focal length of 40mm. Note the road in the background and compare it with the next image.
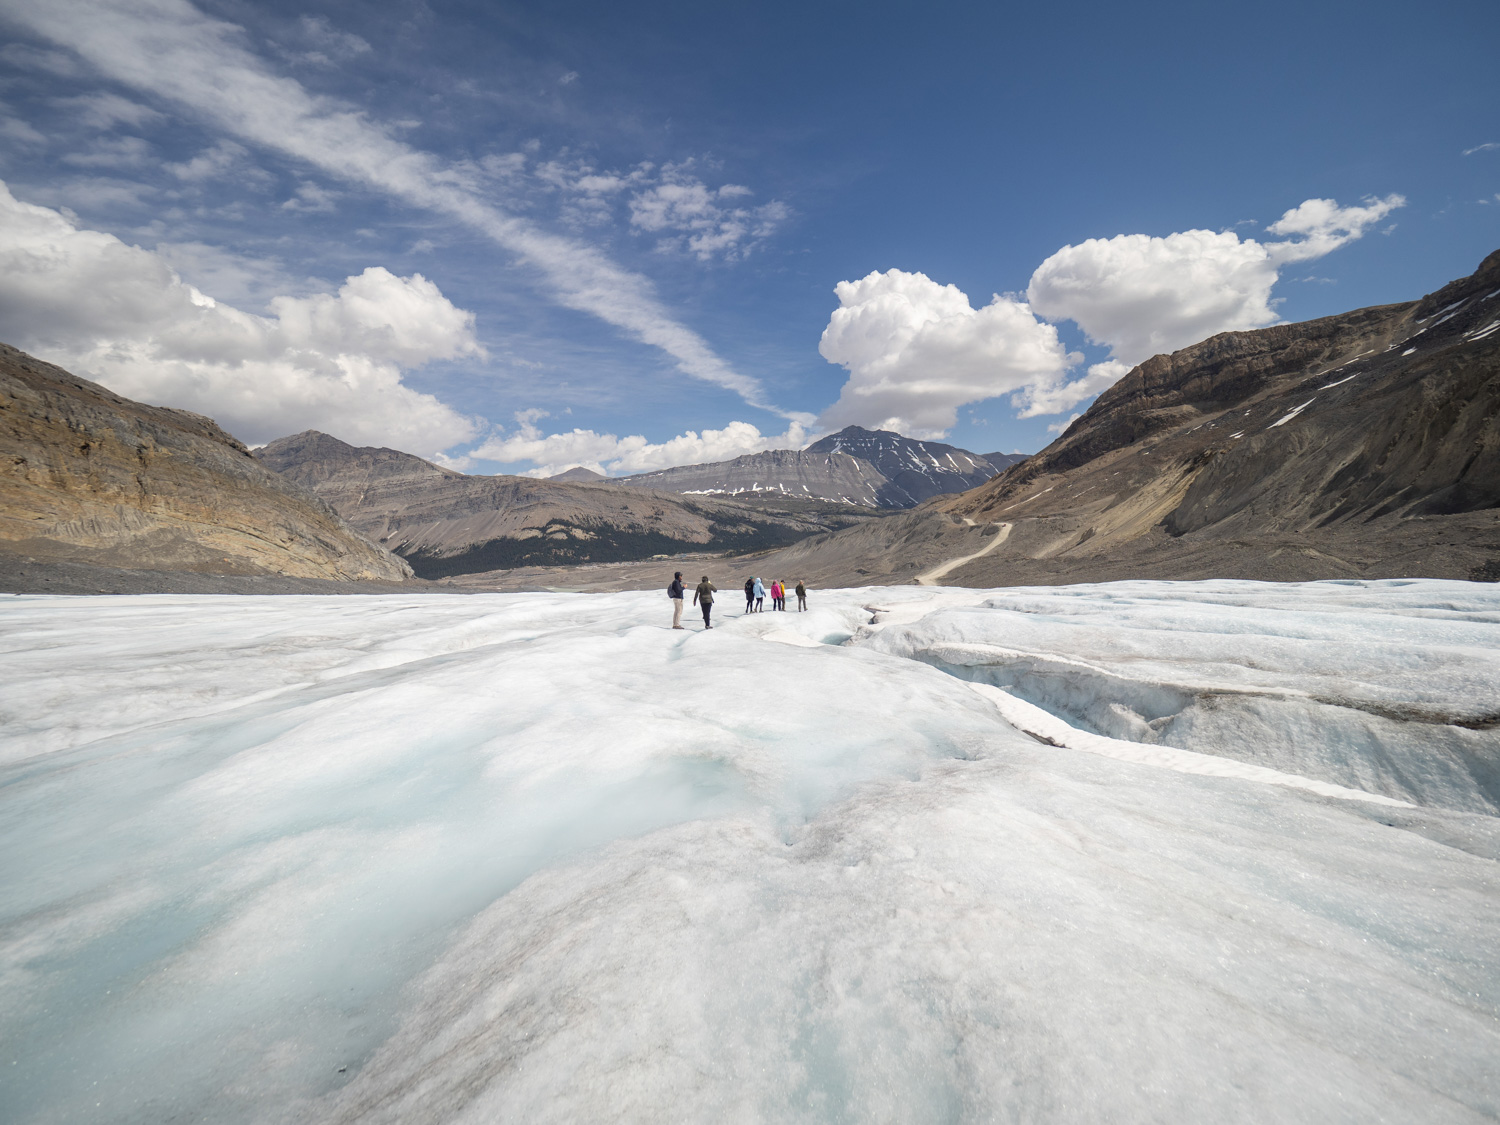
Image captured with the 7-14mm f2.8 wide angle lens, offering a much wider view of the landscape and making people appear far smaller.
Who can do this hike?
If you’re capable of walking around 5km on sometimes uneven terrain with a slight incline, you can do this hike. I’m not a super fit explorer, just a regular gal who loves photographing outdoors and tries to stay fit (by walking/swimming, ain’t no running/gym sessions here). All up, the half-day hike was around 3 hours and you’re out on the ice for most of this.
Should I be worried about safety on the glacier?
As with all outdoor adventures, the conditions play a part and sometimes nature can be unpredictable, but I promise the moment you meet your guide, you’ll be put at ease by their professionalism and knowledge. The team at IceWalks are trained in all aspects of mountain operations from avalanche risk assessment and rescue to crevasses rescue, with the expertise to know where to walk, and of course, where not to walk! You can read about their story and see guide profiles here.

What about other tour operators at the Columbia Icefields?
When visiting the Columbia Icefields center, you’ll see a host of tour options available. I opted to hike with IceWalks (only bookable online) because they’re a small, family-run business who focus on group tours with a limited capacity, ensuring you’re getting a more in-depth and personalised experience.
I did see large buses driving alongside the glacier nearby, and while they do also walk on the glacier and would be ideal for anyone who can’t manage the longer walk due to health concerns, it only appears to provide access in a small area and you’re alongside a lot of other visitors.
How to book your tour with IceWalks –
Jump on to their website and browse the options to select a suitable date and time for your adventure, as I noted earlier, I was on the half-day classic tour. They’re also offering an ‘Ice and Water’ combination if you’re keen to blend a little glacier walk with a rafting trip the following day, or vice versa.
The tours are offered in the spring/summer months once it’s safe to access the glacier on foot. This year the season kicked off on May 20th, however due to seasonal weather patterns, it’s always worth checking their website to see which date the season will start in 2024.
One thing to note – I can’t imagine anyone leaving this experience and not considering it one of their favourite days outdoors. While I’ve been fascinated with glaciers since my time in Greenland, my sister was also with me on this hike and noted it was possibly the best experience she’s ever had in the mountains.
Lastly, a huge thank you to Corin and the IceWalks team for hosting us on this half-day tour. It was so insightful, inspiring and fun. You made our time in the Canadian Rockies so memorable and we’ll absolutely be back again to step it up a notch and do the full-day trip.
Before you go, if you’re interested in related content, click on through to these guides –
Glacier Lodge Eqi – Sleep Beside a Calving Glacier in Greenland
Photographing Inside an Ice Cave, Vatnajokull Glacier, Iceland
Landscape Photography – Capturing Details within a Scene
Alternatively, learn with The Wandering Lens via the collection of eBooks, creative photography workbooks and online courses.

*Please note, this article does include 1 x affiliate link for the Glacier View Hotel. I was a paying guest of this hotel and am simply recommending it because it was a beautiful room, ideally located for access to the glacier and exploring with IceWalks! Any affiliate commission goes toward making this site and all free content shared possible!

Hello! I’m the founder and photographer behind The Wandering Lens.
With 19+yrs experience as a professional travel and landscape photographer, all advice found on this site is from my personal experience, or that of contributors, on the road. I hope it’s useful for your own travels and would love to hear in the comments about your trips and experiences around the world.
Blog Comments
Emily
July 7, 2024 at 8:19 am
Hi, great review! I’d love to know if you felt like the half day tour was plenty or if you think the full day tour would be worth it? Did you feel like you were well removed/separated from all of the bus tours? Thanks in advanced!
Lisa Michele Burns
March 15, 2025 at 7:52 pm
Hi Emily, apologies for the delayed reply here, I loved our half-day tour, and would’ve signed up for another full day out there if we didn’t have to get back to Canmore the following day. Either option would be incredible depending on how much time you have. If you’re opting for the full-day tour, I’d probably recommend staying nearby. We definitely felt like we were away from the main bus tours! It’s a small group, and you’re out on the glacier with your experienced guide, not just on the edge like the bus tours are. An experience I can recommend a million times over 🙂