
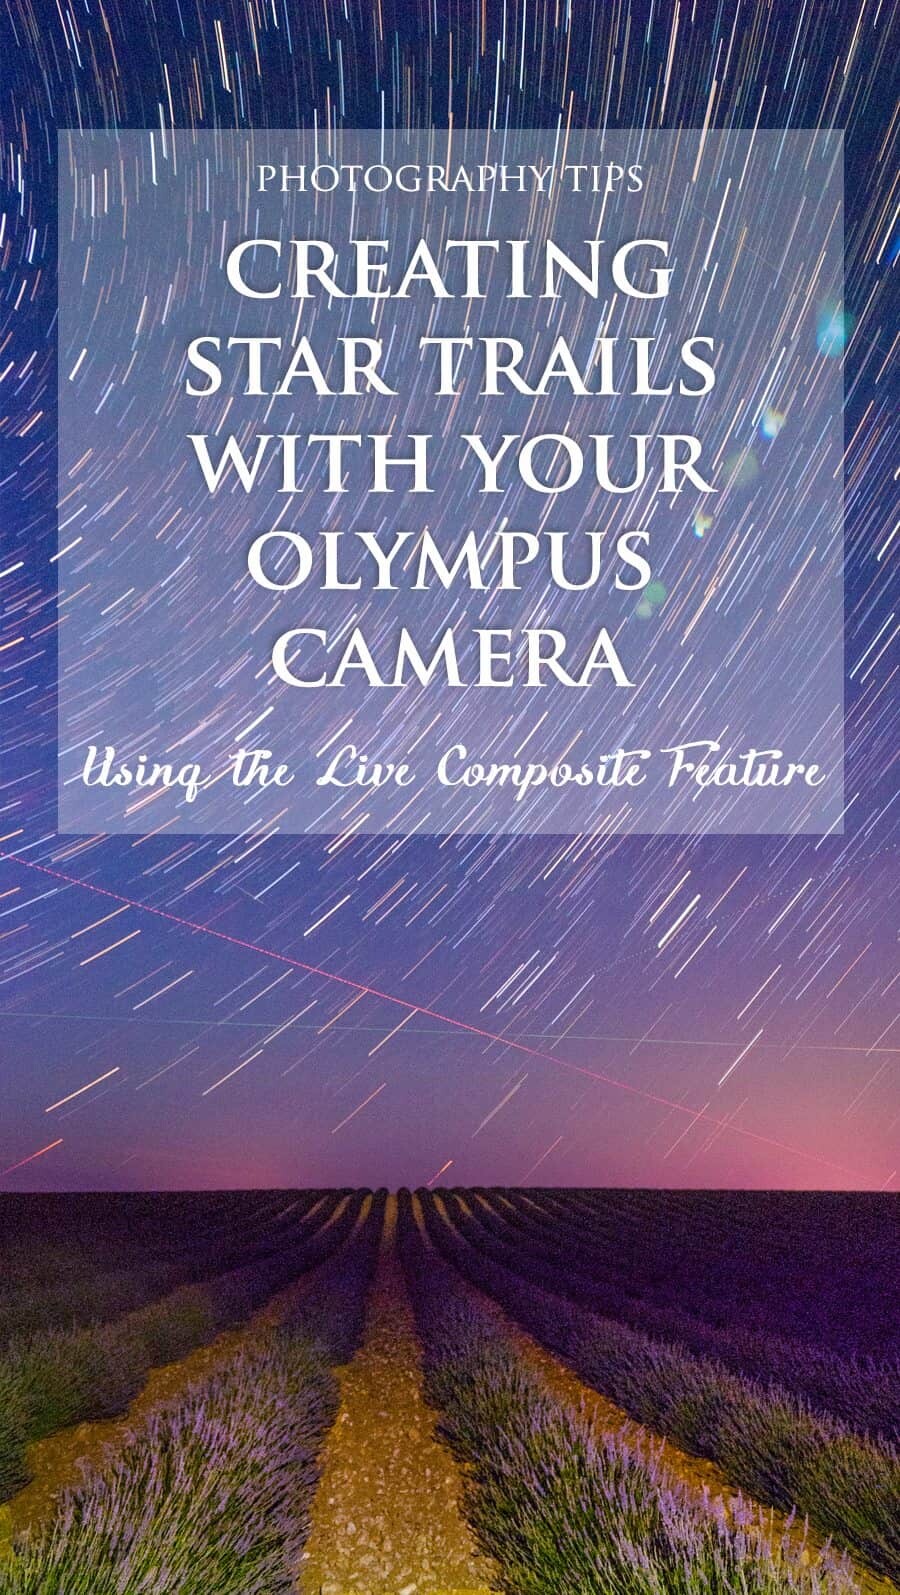
How to Take Star Trails
The magic that exists once you learn how to capture astrophotography and star trails is immeasurable.
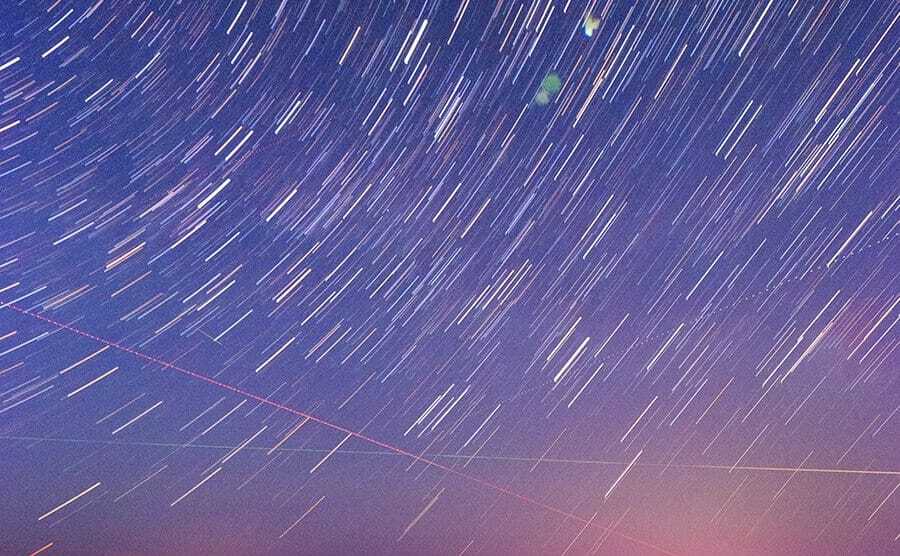
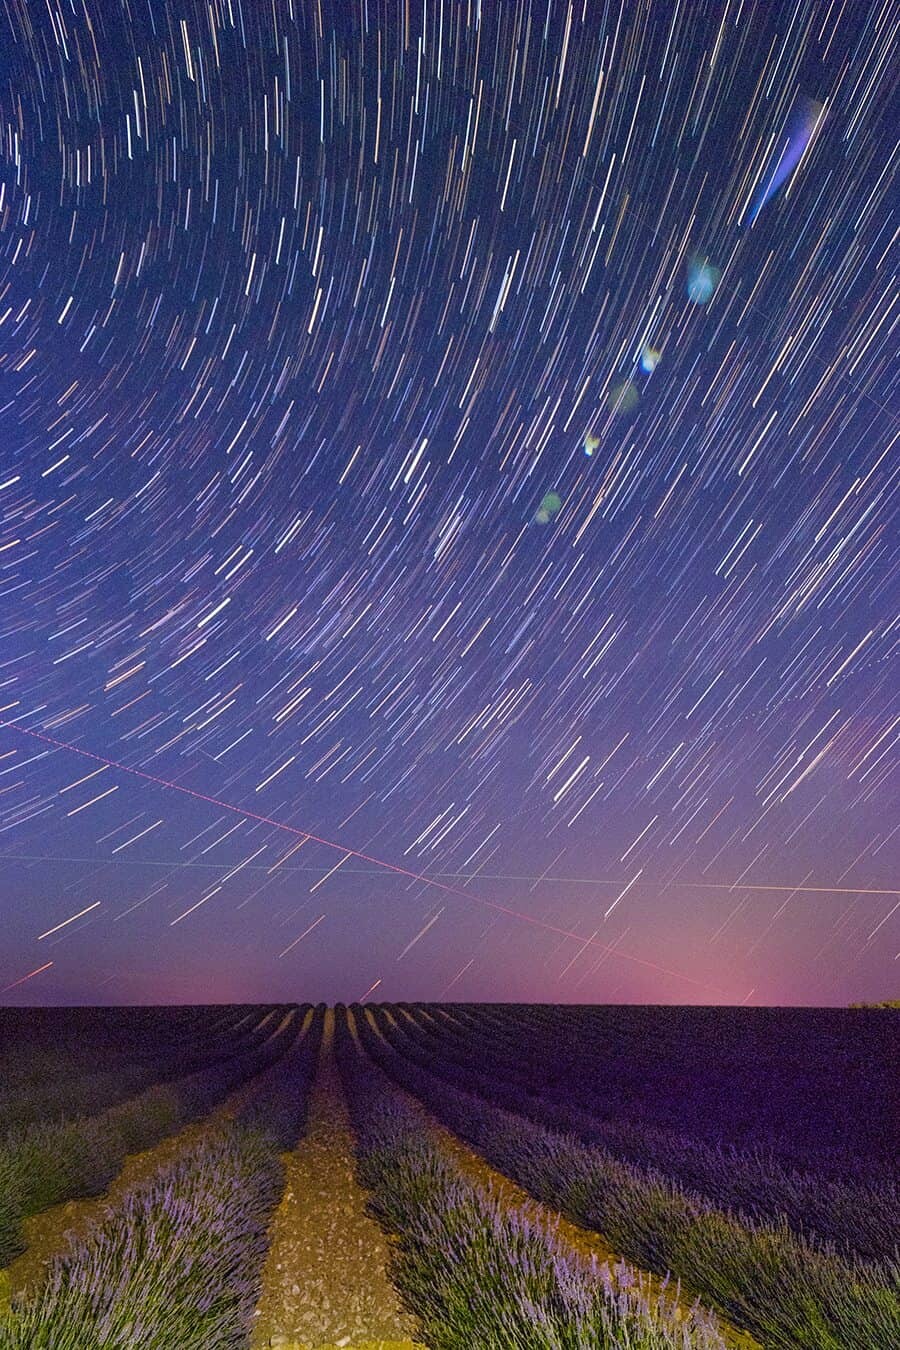
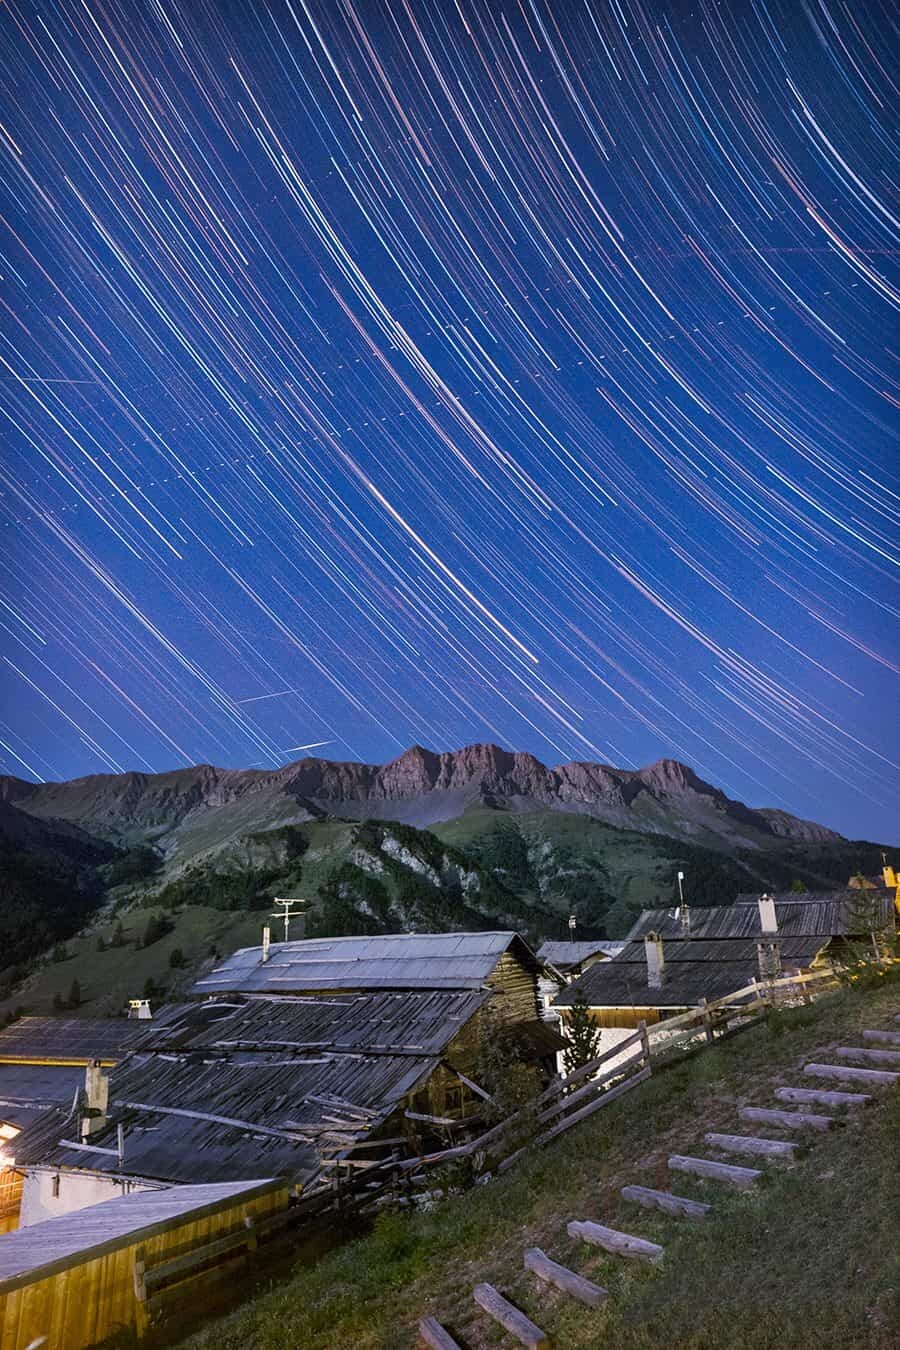
Astrophotography is about capturing long exposures that bring out the available light and showcase stars and world above. Star trails go one step further, blending long exposures together to actually capture the movement of the stars in relation to the earth’s rotation.
Photographing astrophotography is something that took me a while to get the hang of because it’s so very different from photography during the hours of sunlight. It also requires a lot of patience, research and technical skill in order to capture clear and striking images of the night sky.
For this month’s Setting the Scene I’m going to share how to capture star trails using the Live Composite mode found on Olympus OM-D cameras. It’s one of, if not the best feature I’ve discovered since shooting with my OM-D E-M1 Mark II and has changed the way I photograph at night.
Long exposures are one thing, but blending these exposures together to form an image that incorporates a series of light trails and movement is SO addictive.
Let’s get started…
Planning the Shoot
One thing that will make or break your shot is the sky. To capture star trails you need clear sky with of course, visible stars. That means you’ll need to find a place with minimal light pollution to be able to see the stars clearly.
If you’re out in the mountains, country or on the coast and away from cities you’ll be fine. It doesn’t have to be zero light pollution but the less you have, the better.
Also, depending on the result you’re hoping to achieve, the moon will play a big part in how your shot turns out. A New Moon phase (darker skies) will mean your foreground probably won’t be lit very well and may be a silhouette against the sky, the stars though will be sparkling. A Full Moon however will produce the opposite, lighting up the landscape but in turn, the stars will appear less apparent.
I find capturing star trails fun regardless of what the moon is doing but if you mix a little light pollution with a full moon, it may just make things a little more difficult to capture.
Because you’ll be capturing a series of long exposures for approximately an hour or more, you also need decent conditions so your tripod doesn’t shake in gale force winds.
Even if the sky is clear, you still need your camera to be super still the entire time so keeping an eye on the weather is essential to creating a successful star trails image.
See – Weather Forecasting for Landscape Photographers for all the info on what I use to track the weather and plan shoots.
Another thing to take into account is the direction you’ll be facing. Polaris (the North Star) is something to find because from there you can predict how your image will turn out. Facing Polaris will result in those beautiful spiral shots where it looks like the world is spinning around one star. Facing in any other direction will see your stars gradually turn from circular to more linear.
What Gear You Need
Usually you’ll hear me recommending that you don’t always need a tripod, this isn’t one of those times. Having a sturdy tripod to shoot long exposures is essential to capturing star trails.
Be sure your tripod doesn’t shake or wobble under the weight of your camera, sometimes when I put my 40-150mm zoom lens on my travel tripod it can’t handle the weight, so whichever lens you’re using, just make sure your tripod is strong enough.
To use the Olympus Live Composite feature you’ll need an Olympus OM-D E-M10, E-M1 Mark II, E-M5 II or an E-M10 II. I’m assuming any Olympus camera produced from now on will also include this feature but it’s definitely worth asking before purchasing because it’s such a game changer!
To capture beautiful star photographs you’ll also need a relatively fast lens. The faster the better actually! I’ve personally be using the M.Zuiko 7-14mm f2.8 PRO lens for all of my night shots because the wide angle allows you to capture more of the sky and it’s been working amazingly well.
If you’re using another brand of camera to capture long exposures and are blending them together in Bridge or Photoshop, the larger the aperture the better (the smaller the f-stop number).
What is Live Composite Mode?
Olympus introduced this feature with the OM-D E-M10 and it enables photographers to blend a series of long exposures together into one frame in the camera. There’s no need for post processing to stack images together, it’s all done in camera.
The way it avoids incorrect lighting or blown out areas is that it only uses the first exposure to record the available light in both the background and foreground.
After that, the camera only records any change in light or only those pixels that appear brighter than the first exposure.
In other words, as the stars move, they will light up the pixels throughout the image and be recorded as they progress. The foreground and sky will remain at the original exposure they were captured unless of course a car drives through your foreground with its headlights on.
Once you’re live composite has finished recording it will produce your star trails in one image…it’s magic! I’ll talk more about settings below…
The Best Settings for Star Trails
To begin shooting a live composite, I find it best to work out the best astro settings first. Before you even go into live composite mode, take some test shots to see what exposure time you’re happy with.
I tend to opt for anything between 15-30 seconds in order to make the image as bright as possible, but this will all depend on the available light wherever you are.
Next step is to turn off your auto focus and switch to infinity focus. As you would do normally for astro shots, this step is absolutely essential when taking star trails because auto focus can get stuck or fail to focus part of the way through your shot. Because you’ll be taking over 80 sequential shots, they need to all have the same focal point and have no delay between shots while your camera is searching for a focal point.
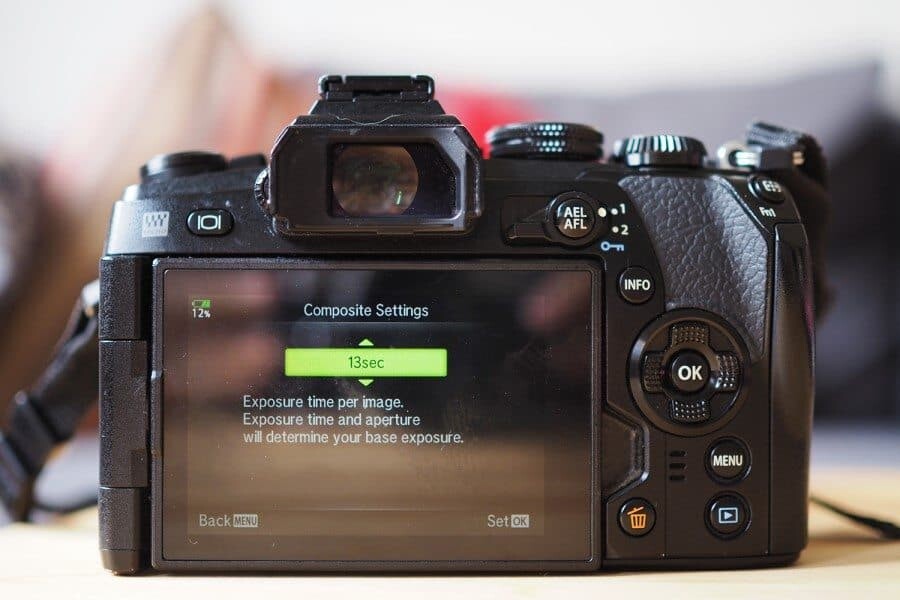
To find the Live Composite feature, switch to Manual mode and then turn the dial all the way past 20”, 30”, Bulb, Live Time until you come across Live Composite, it’s the last option available.
Once you’ve selected this, press your shutter once to bring up the live composite menu.
Here you can set the time, opt to record each individual shot or just have the final image stored on your memory card.
Once all that is set, press the shutter once again and the live composite shot will begin.
You can then follow the progress of the star trails as your preview screen (if turned on) will actually show the moving stars as the exposures progress. It means you can walk away, go have a shower, read a book, eat dinner and continuously check on the progress to see how it’s going.
Ideally I like to start with the following exposure settings however this of course needs to be adjusted depending on your own camera, lens and conditions at the time.
ISO 800
20” – 30” second exposure time
f/2.8
See how you go with these to start with and then if it’s not working, increase or decrease the ISO or adjust your exposure time to fit the scene.
Composition Tips for Star Trails
– Seek out a foreground subject that will help make your shot stand out. It could be a lone tree, a house, a row of pointed pines, a lake…just something in the foreground to compliment the star trails.
– Obviously the sky will take up the majority of your image so aim for something around 80% sky, 20% foreground to balance your image.
– If you can find Polaris (the North Star), pointing in its direction will create a more spiral effect as the stars around Polaris seem to move less.

Hello! I’m the founder and photographer behind The Wandering Lens.
With 19+yrs experience as a professional travel and landscape photographer, all advice found on this site is from my personal experience, or that of contributors, on the road. I hope it’s useful for your own travels and would love to hear in the comments about your trips and experiences around the world.
Blog Comments
Melissa C.
December 19, 2017 at 12:29 am
This is super, thanks! Just one question… how do I switch to infinity focus? Also, my lens choices are the 14-42 3.5 EZ and the 14-150 4.0 mk II. Presumably the kit would be better since it can open up to 3.5 and is also more balanced on my tiny travel tripod?
John Miller
August 2, 2019 at 11:18 pm
This is all new to me. It has only taken me 50 yrs to get around to trying this. And it’s the most fun i have had in all those yrs with my camera. I still have a lot to learn. Thank you.
Jeanne
September 27, 2020 at 11:48 am
Hi, I just read your article on star trails. I am seriously thinking of switching from canon to the Olympus em1 mark 3. Do you have any tips on how to learn the menu system. Its a little intimidating. Lol. I love your instagram . I appreciate any advice you can give me. PS I mostly shoot landscape and wildlife , birds etc. Which lens would you recommend to buy with the kit? Jeanne
Lisa Michele Burns
October 8, 2020 at 12:02 am
Hi Jeanne, that’s really exciting you’re thinking of switching!
The features available on the E-M1 MKIII for landscape photography are really, really impressive. The live composite mode is one thing but the Live ND filter, stability and Hand-held High Res mode is so handy!
Don’t worry too much about the menu system, like everything, once you start to use it you’ll navigate it until it becomes second nature. There are definitely a lot of features within the Olympus menu system but personally I only access these when needed, most of the functions are available via the info screen and all accessible on the back screen.
I love the 40-150mm f2.8 pro lens, it’s my go to for landscapes and wildlife photography. If you’re photographing birds and wildlife you can then add the MC20 2x tele converter which provides amazing reach! The 12-40mm lens is also a great option, as is the 12-100mm!
Have fun if you decide to opt for a new camera!
Joshua Lee
April 11, 2022 at 7:04 am
Your third paragraph in, you make it sound like you need to be a technical photographic maven to shoot astro. It’s really not that hard at all, not even a little bit.
Good luck on your photographic journey!
Lisa Michele Burns
April 11, 2022 at 4:17 pm
Thanks Joshua for sharing! I’ve personally always found astro harder than any other style of photography and after teaching it, find others feel the same. You’re right though, once you’ve got the skills and settings it isn’t as hard as it first feels. Navigating in the dark for me makes it appear more difficult too, I’m a daylight fan all the way!