

Learn to Edit Photos in Photoshop
How to edit in Photoshop to create Pastel Colours
Learn how to create pastel skies in Photoshop and transform your photographs with dreamy tones.
Pastel skies and Photoshop are a match made in photography dreams. The tools are there to transform regular sunsets into pastel wonders with tiny adjustments that create a natural looking effect.
You definitely don’t need to be a tech whiz to get started and below I’ll talk you through how to make your photos beautiful with a little pastel power.
If you prefer to watch rather than read, skim to the bottom of the post for my YouTube Video – Creating Pastels in Photoshop…
Taking the Photo
Having the correct settings when capturing the shot will allow you to do much more when editing your image. If your photo is too dark or too overexposed, it will be difficult to bring back the detail required to create pastel colouring in Photoshop or Lightroom.
A correctly exposed image is much easier to work with and if you’re hoping to print the photo, it’ll mean a much better print quality.
Over exposing a tiny bit will on most occasions make creating pastel tones in Photoshop much easier. You still need colour in the sky though so don’t overexpose so much that the sky is all white and blown out. Usually adjusting your exposure to +0.7 is enough.
Starting settings for pastel tones at sunrise/sunset:
ISO 200 – 400
Exposure +0.7
Aperture f/2.8 (or as low as your camera will go)
Shutter Speed 1/80sec – 1/250sec
Set the White Balance
Sunrise, sunset or dusk is when the pastel tones are most naturally evident which allows for you to photograph them, ready to enhance in post processing later. To do so, set your cameras white balance to ‘cloudy’ or ‘shade’ mode which will bring out the rich golden tones and prepare your image for pastel power mode (because it needs a fancy name right!?).
JPEG vs RAW
If you shoot in RAW your image file will have a lot more detail stored within its structure which in turn means you can edit it more. JPEG’s however don’t have as much detail and you’ll notice a big difference when editing because you can’t usually push JPEG’s as far as RAW files. That said, for the first five years of my career I photographed only in JPEG because my computer couldn’t handle the size of the RAW files and I had no idea the world of RAW existed because I was creating pastels without any worry.
There’s absolutely nothing wrong with shooting in JPEG, it just means that it’s more important to capture the image with the right settings. If you shoot in JPEG and then find your image is really dark and you need to increase the brightness of shadows, more often than not it will end up really pixelated and blotchy.
If your camera has the option of shooting in both JPEG Fine + RAW then this is a safe option, you can use the JPEGS for quick edits on the go, then the RAW files for more detailed editing work. Choosing this option means you’ll need a larger memory card.
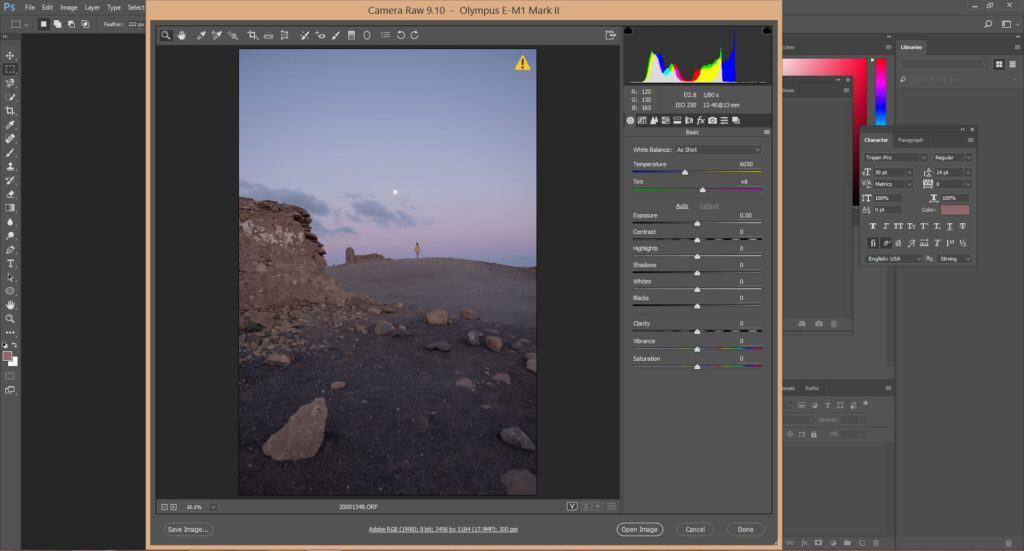
OPEN IN PHOTOSHOP
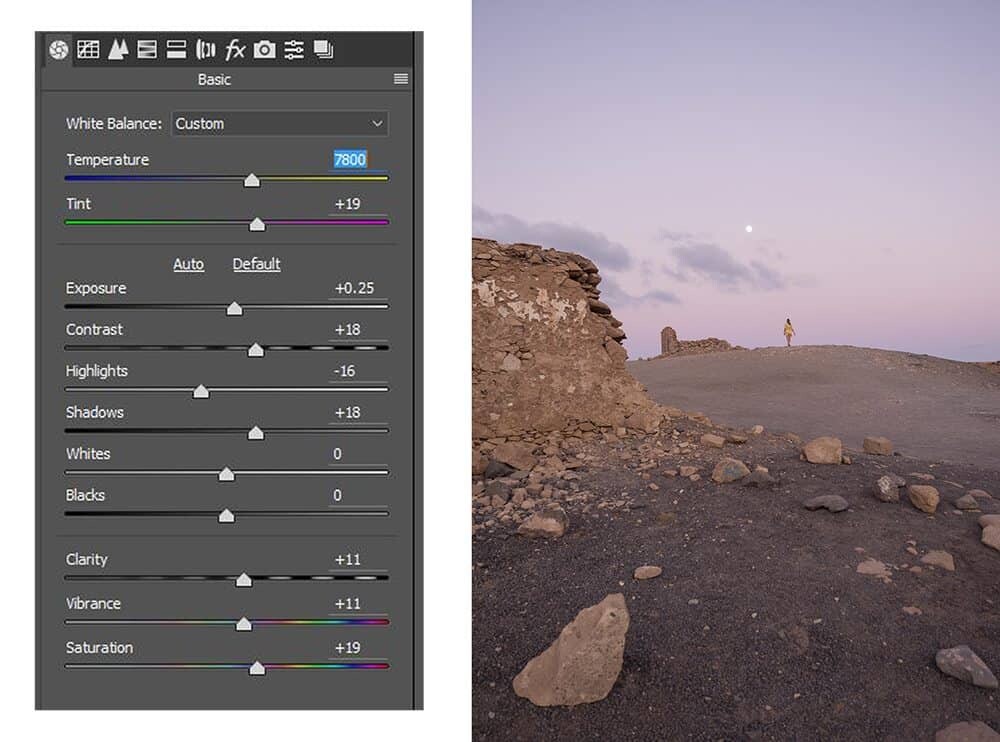
Once you’ve opened Photoshop, drag your image across or import it so it’s sitting and waiting to be edited. If you’re working with a RAW file, do the same but you will find a window opens with ‘Camera Raw’. Camera Raw allows you to do some little adjustments before you open the RAW file so feel free to increase the exposure, contrast, shadows etc. until the image is nice and bright, ready to be worked on.
With JPEG files you will need to do a little playing around with the individual tools to achieve the same result but it is nice and easy.
Below you’ll see the options that open up if you’re using Camera Raw. Using the toggle to adjust the temperature of the image can also be a big help in creating pastels. Moving the slider up to increase the warmth will provide more pastel tones to work with once you start enhancing.
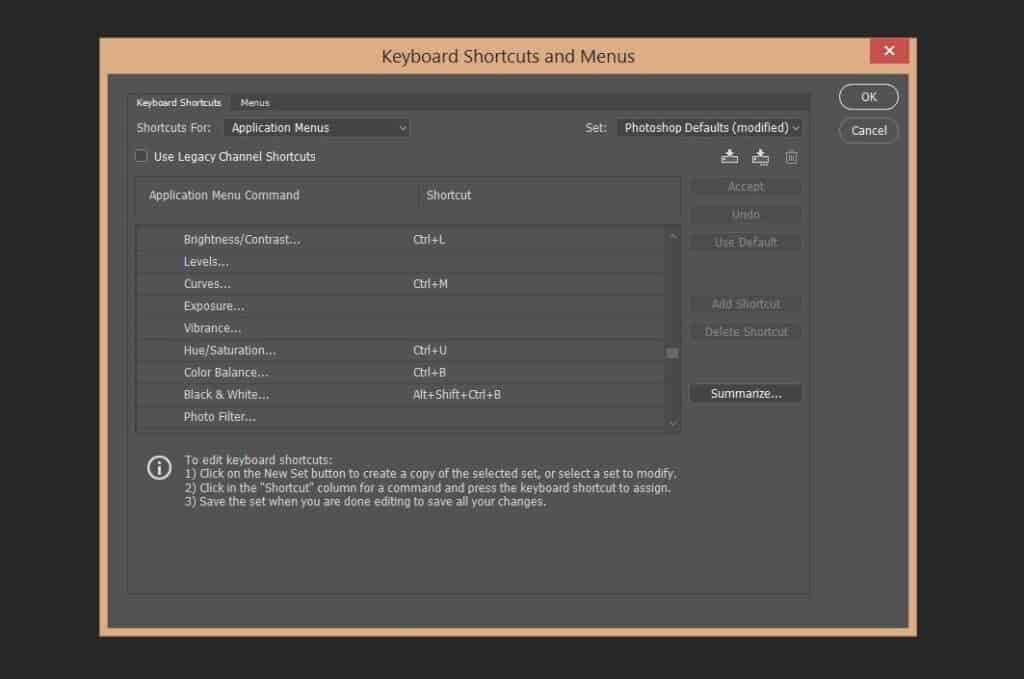
HELPFUL SHORTCUTS ON PHOTOSHOP
Before we get started, the below keys can be used to easily open up tools so you don’t have to go into the menu each time. The keys mentioned are typically set by default so if you haven’t adjusted them manually, they should work.
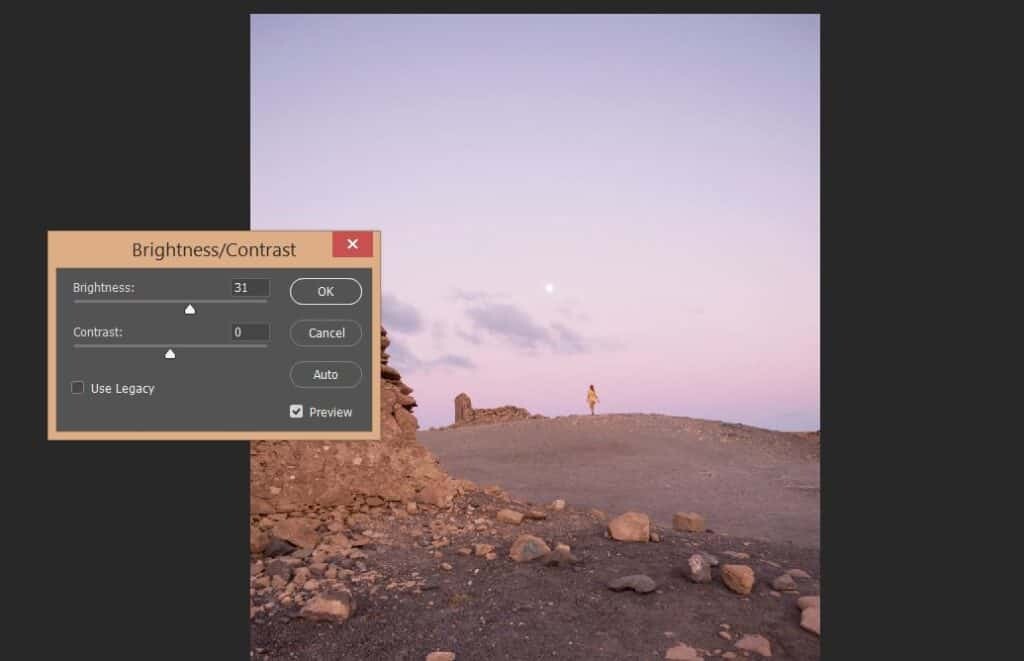
Ctrl + L = Brightness/Contrast
Ctrl + M = Curves Tool
Ctrl + U = Saturation/Vibrance
Ctrl + D = Deselect
Ctrl + S = Save
Ctrl + (- or + keys) = zoom/zoom out
For other tools and techniques take a peek at my guide ‘ How to Edit Your Travel Photos in Photoshop‘
If you would like to set your own shortcuts you can do so by going into the ‘Edit’ menu and then at the bottom you’ll find the option titled ‘Keyboard Shortcuts’. Located here is every available tool and function which you can assign to whatever key you wish to make editing easier in the long term.
FIRST STEPS TO CREATING PASTELS
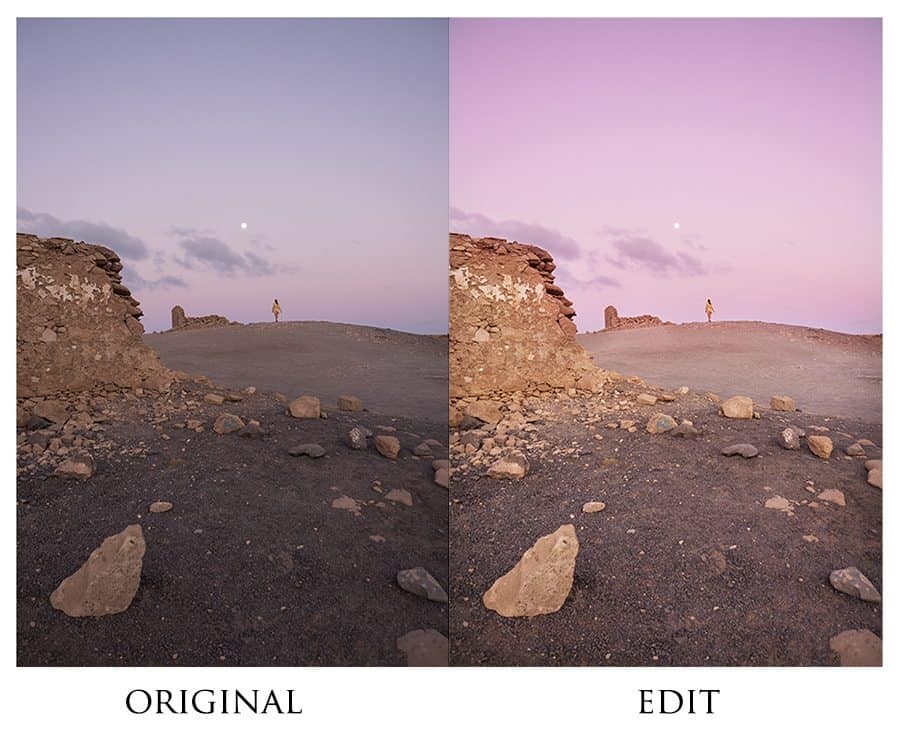
To begin editing I like to start with an image that’s warm and bright. You can of course create a dark pastel image but I find once blacks come into play, it takes away from the possibilities of beautiful soft dreamy tones.
To increase brightness the default keys are ‘Ctrl+L’ which will open up the tools for increasing/decreasing brightness and/or contrast. Don’t increase it so much that there’s no colour left, but just enough that it dulls any darkness.
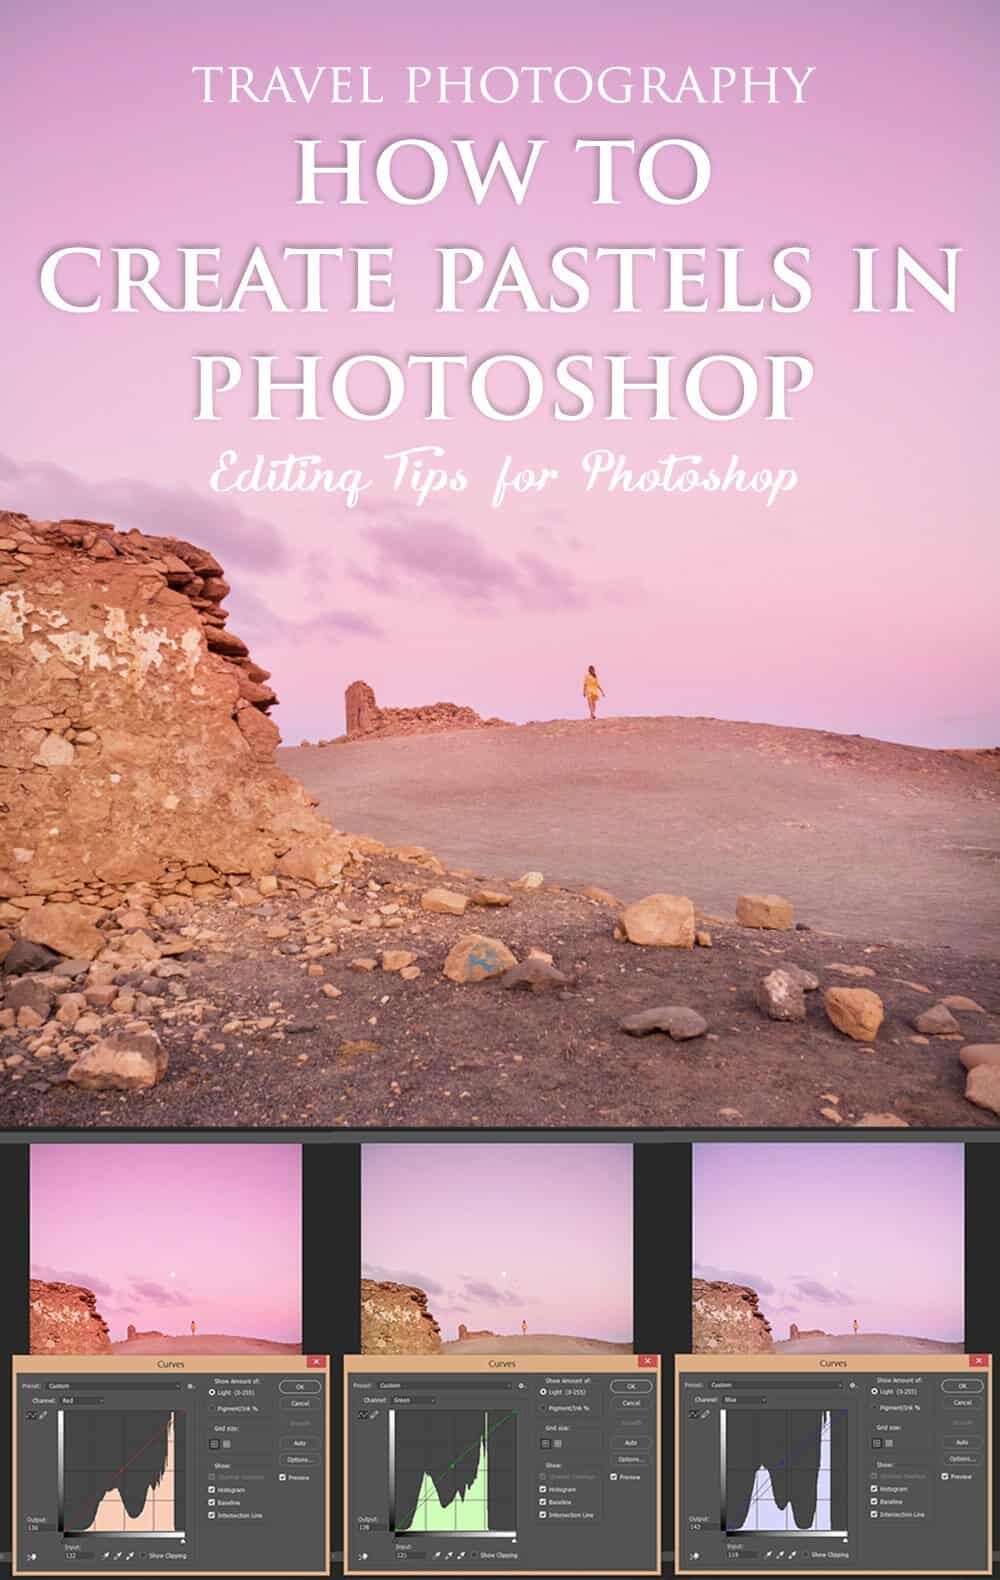
USING CURVES TO CREATE PASTELS
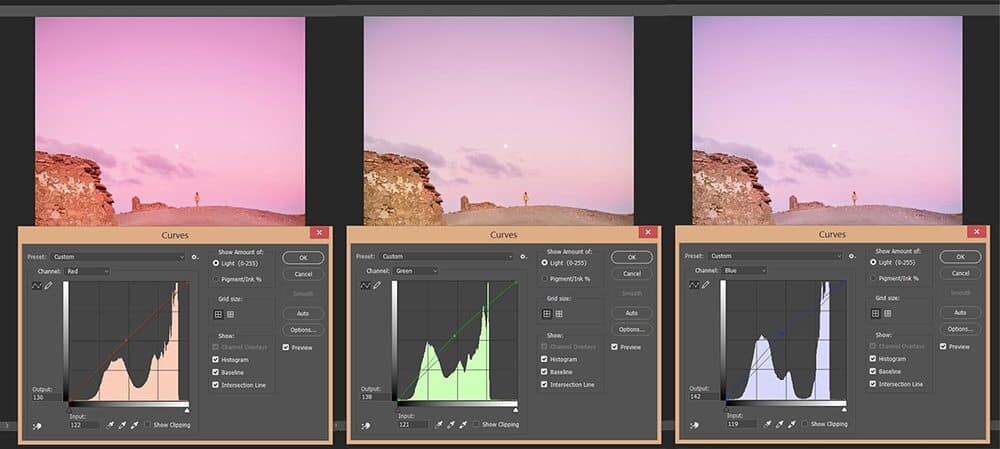
By clicking ‘Ctrl+M’ you’ll open the Curves box which is where the fun begins. Here you’ve got the option to play around with the colour tones, creating your own pastels using a combination of red, green or blue hues. In the centre of the box you’ll see a drop down panel with ‘RGB’, click this and you’ll see the options of the three colours appear.
If you’ve already got a sunset shot like the example below, there will already be some beautiful red, orange of purple tones located in your photo. To enhance them, simply use the select tool to tell Photoshop what area you would like to play with and then adjust using the curve tool.
Alternatively you can adjust the tone of the entire image without using the select tool.
Tip: When selecting an area within your image, holding down the ‘Shift’ key will let you select smaller sections and it will join/blend them all together. Really handy for smaller sections where you need to select little bits at a time.
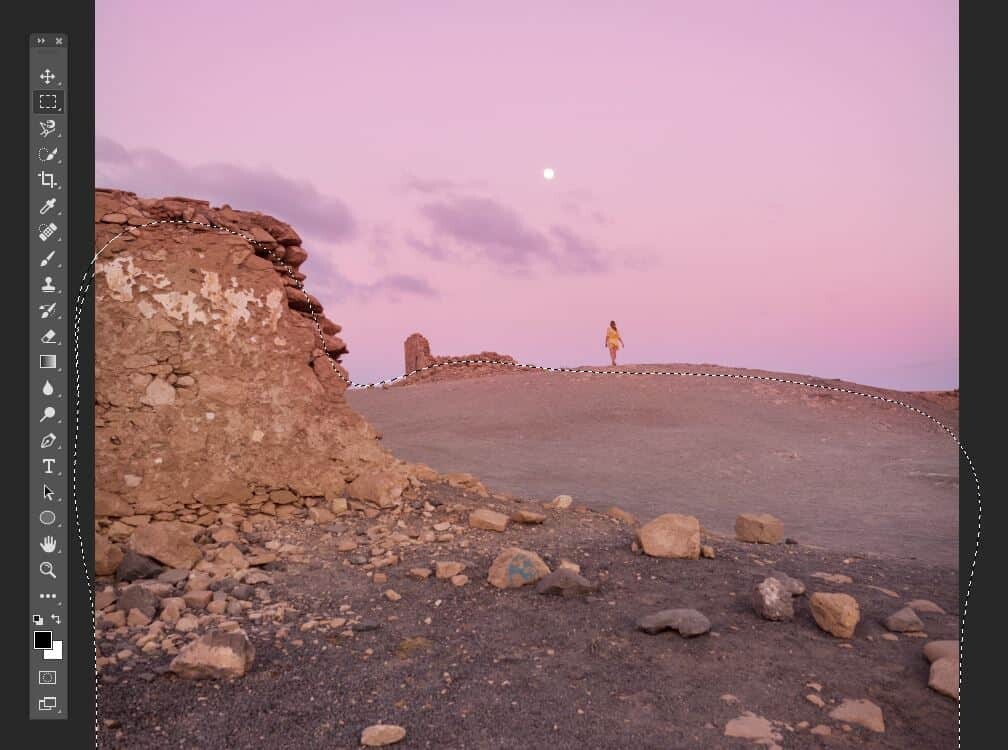
As you’re selecting each area be careful not to select over a subject you don’t wish to adjust the colour of. If you accidentally select the edges of a subject it will turn the edges into the pastel tones and it will be quite obvious that the image has been edited. To avoid this zoom in nice and close when selecting so you can get close to the edges without touching.
So regarding the pastel tones, work in small adjustments to ensure the image isn’t over saturated.
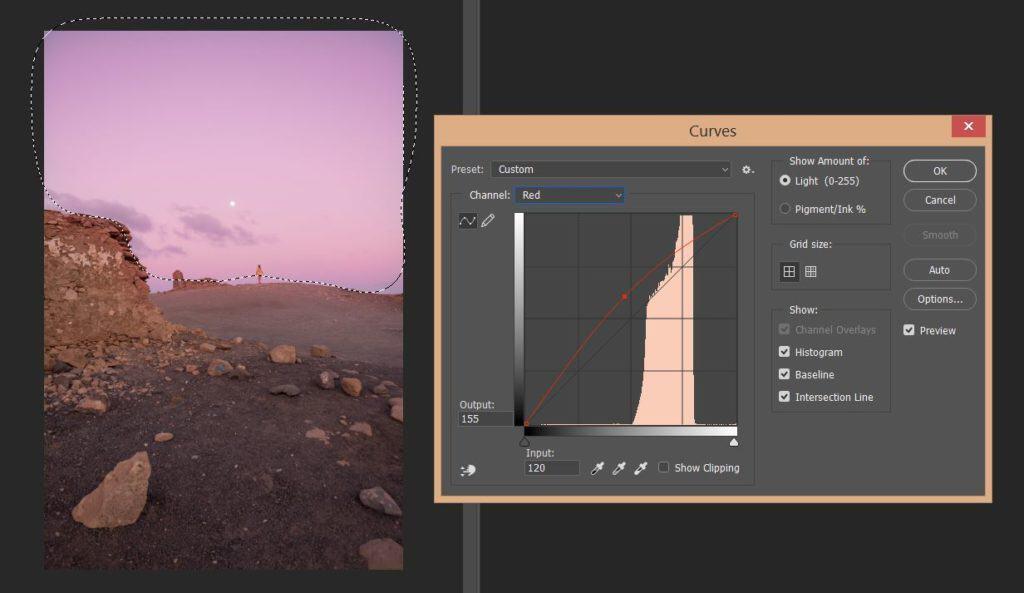
Slowly increase the red hues by clicking on the centre of the graph and gently pulling up the centre of the line. To start out, play around with pulling the line up and down to see what the limits are. You’ll find all the way up is very, very red and of course all the way down is very, very blue.
Then find your happy medium, the tone you’re looking to achieve and gently adjust the red, blue and green hues.
As you progress it may be necessary to adjust the brightness whether that’s to increase it to create a softer effect, or darken the area to bring out the colours more.
A Quick Summer of Pastel Effects:
- Increase the overall image brightness before beginning
- Select the area/sky you wish to work with
- Be careful when working with the edges of your subject
- Adjust the Red, Blue + Green hues to create the desired colour using Curves
- Enhance the saturation or further increase brightness to your preference.
If you’ve tried creating pastels, tag your shots on Instagram with #thewanderinglens or click here to join The Wandering Lens private Facebook group and share it there.
For more Editing Tips + Techniques take a read of my other articles –
Photoshop – The 3 Magic Tools You Need To Know
How to Edit Your Travel Photos in Photoshop

Hello! I’m the founder and photographer behind The Wandering Lens.
With 19+yrs experience as a professional travel and landscape photographer, all advice found on this site is from my personal experience, or that of contributors, on the road. I hope it’s useful for your own travels and would love to hear in the comments about your trips and experiences around the world.
Blog Comments
Teagan O'Brian
July 19, 2017 at 6:38 pm
I have seen so many of your beautiful photos and love that you are sharing how to create them, now to actually take good photos first and then I’ll be set lol.
Michela
July 29, 2017 at 2:20 am
Hi Lisa! Thank you so much for sharing your knowhow. I’ll follow your guidelines since using masks in Lightroom doesn’t allow me to work on every indvidual color channel that’s pretty much interesting! Thanks again 🙂
Emily
August 15, 2018 at 5:39 pm
Wel post! thanks for sharing great information with us.
Alex
April 23, 2019 at 9:32 pm
Hi Lisa,
Hope you are doing great!
Thanks for great information.