
Beach Photos and The Stories and Settings Behind them
Beach photos make us dream of sunnier days, time spent by the sea, holidays and a general warmth and happiness. We’ve all got our favourite beaches, whether that’s close to home and ideal for regular walks, or abroad, somewhere exotic, tropical and glistening.
It’s where many of us who live by the coast learn photography. Using the crashing waves, sand patterns and sunrise or sunset to compose landscape images and practice camera settings and composition.
From island beach photos to long stretches of sand that disappears into the distance, I wanted to share a collection of my favourite shots. Beach photographs that take me back to the moment they were captured, to share a little story behind the image and the details of how it was captured.
I’ll be including camera settings, location information and creative techniques used for each beach photo included below. If you’ve got a favourite beach photo, be sure to share it via Instagram with the hashtag #thewanderinglens or leave a comment at the end of this article to tell me where your favourite beach is!
Let’s hit the beach –
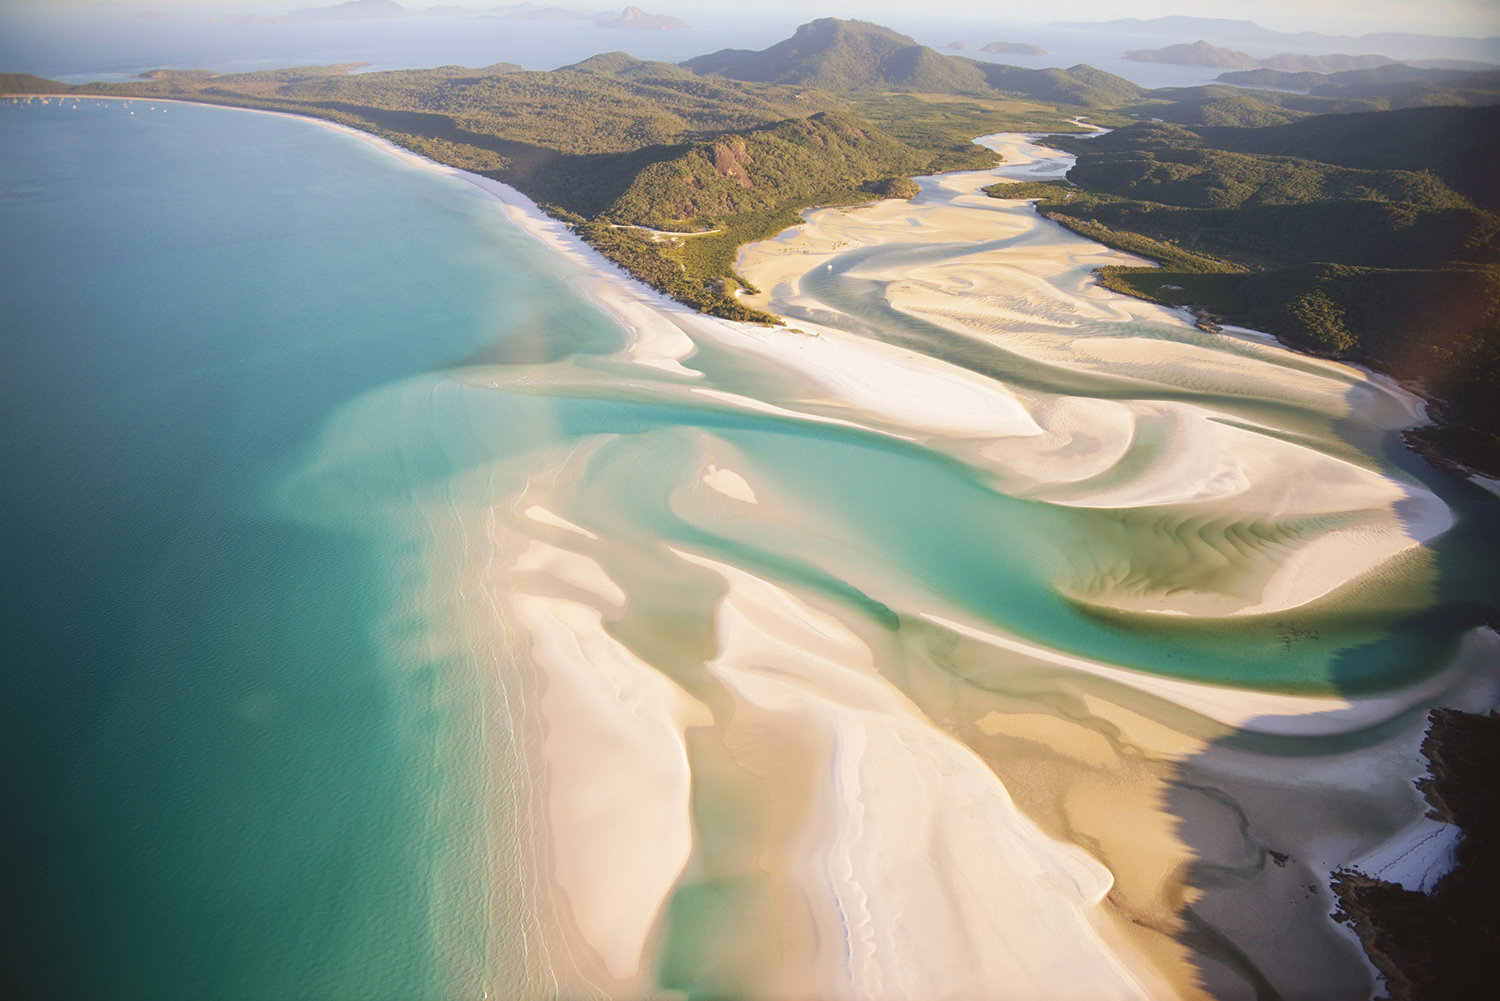
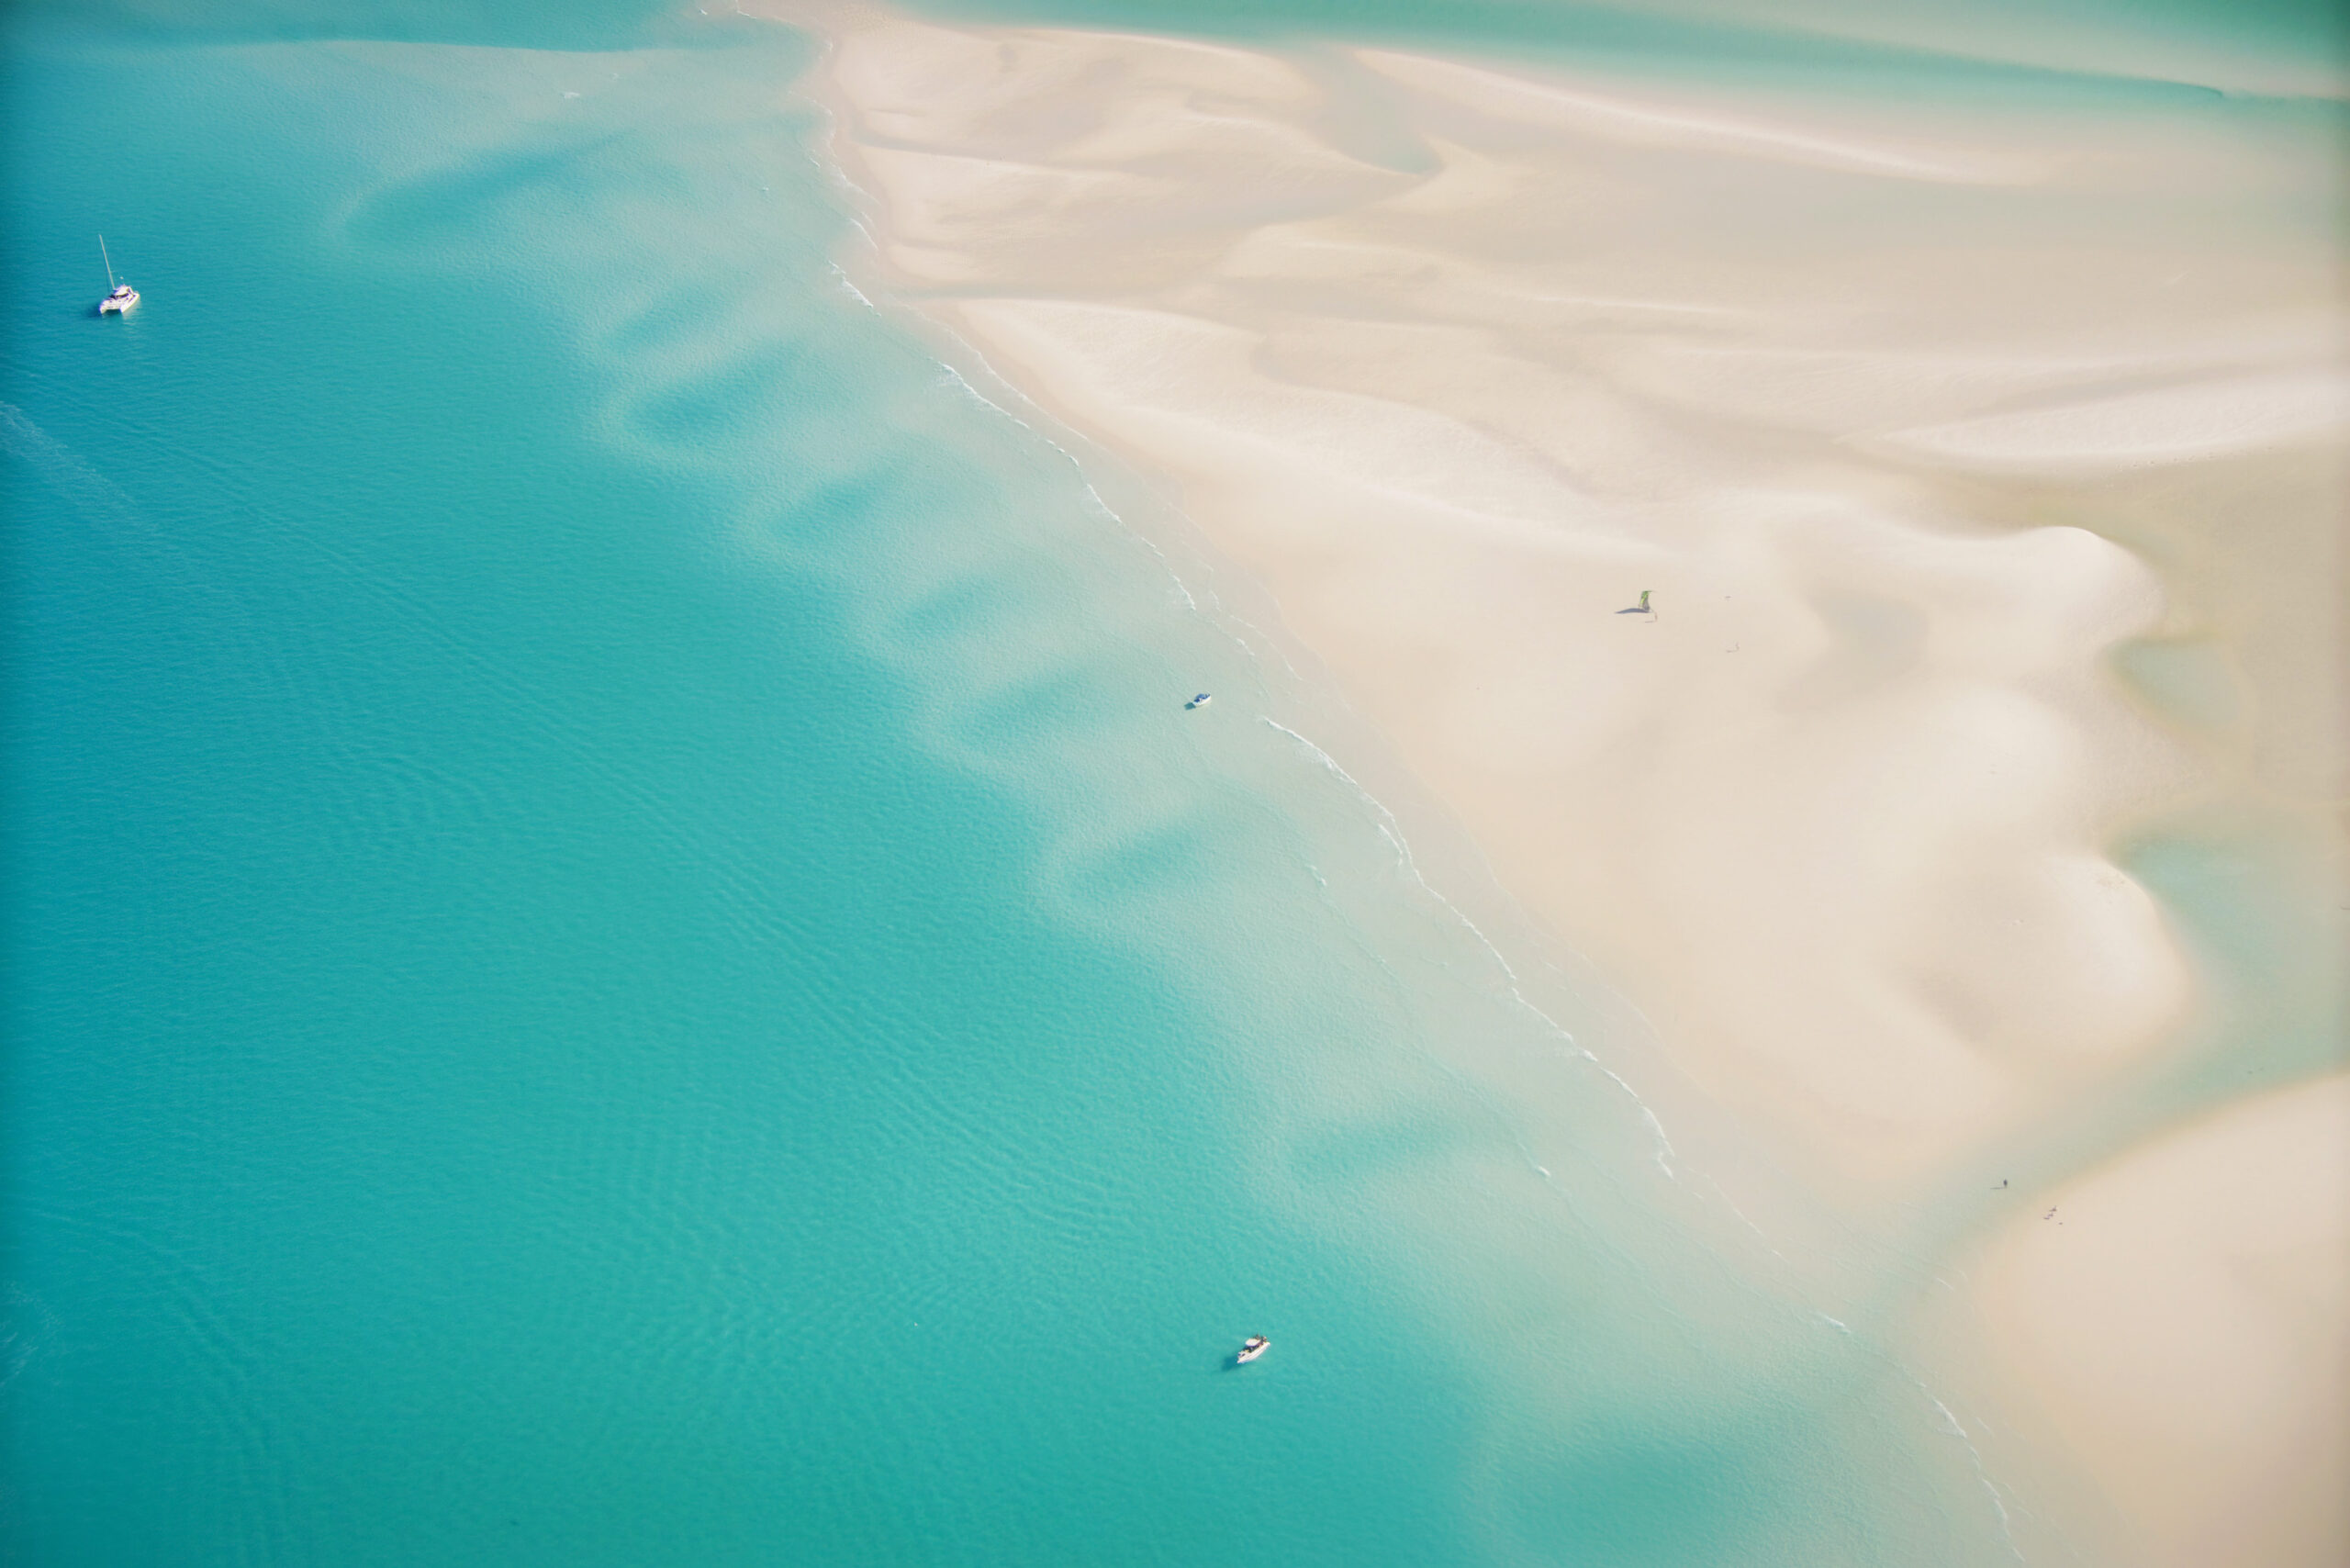
Beach Photo #1 – Whitehaven Beach, Australia
Consistently named as one of the most beautiful beaches in the world, Whitehaven Beach, in particular this little slice at the northern tip called Hill Inlet, is a stunner. A photogenic wonder that looks beautiful from the sea, from the hiking trails and from above, as seen here.
This image was captured from a helicopter as I was on the way to photograph an elopement on the beach below. With the bride and groom on board, we did a loop above Hill Inlet and the tide was ideal for capturing some aerial images to showcase the sand patterns and colours of the Coral Sea.
Camera Settings: ISO 640, 1/2000sec, f/3.5, 28mm, +0.7exp
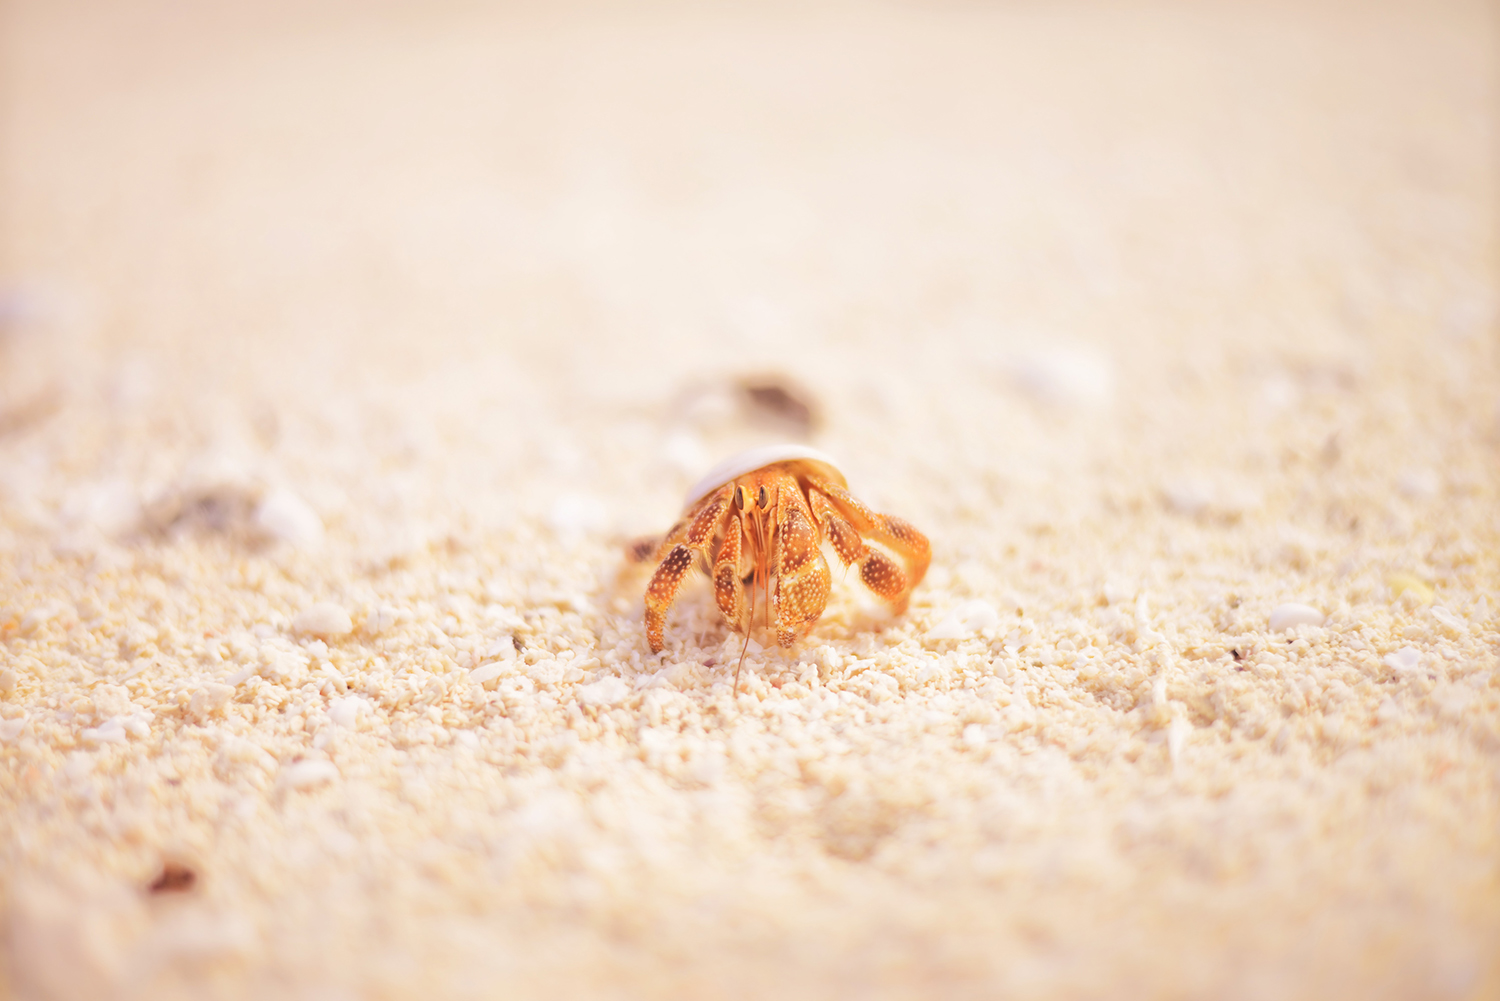
Beach Photo #2 – Tamanu Beach, Vanuatu
Patience, a zoom lens and lying very, very still paid off when photographing this little hermit crab in Vanuatu. The beaches on the southern shores of Efate Island are filled with these cuties as the scurry beneath the palm trees in this tropical paradise.
I’d been watching them for a while before getting my camera out as I wanted to see just how shy they were. It turns out, very shy. The beach I was on didn’t see many people at all, far from the tourist centre of Port Vila, these little crabs hid in their shells the moment any noise or vibration was felt.
I set up the camera settings, positioned myself close to a crab I’d been watching and lay on my stomach with the camera resting on the sand and focused on the shell. I turned the camera to shoot in silent mode so the focus beep didn’t both the crab and waited. Within a few minutes it slowly came out, but a bird overhead scared him back inside.
It took just over 20 minutes for him to stay out long enough for me to snap this quick image and I used a wide aperture to ensure he was sharp and the surroundings were blurred.
Camera Settings: ISO 100, 1/1250sec, f/1.8, 50mm, +1.7exp
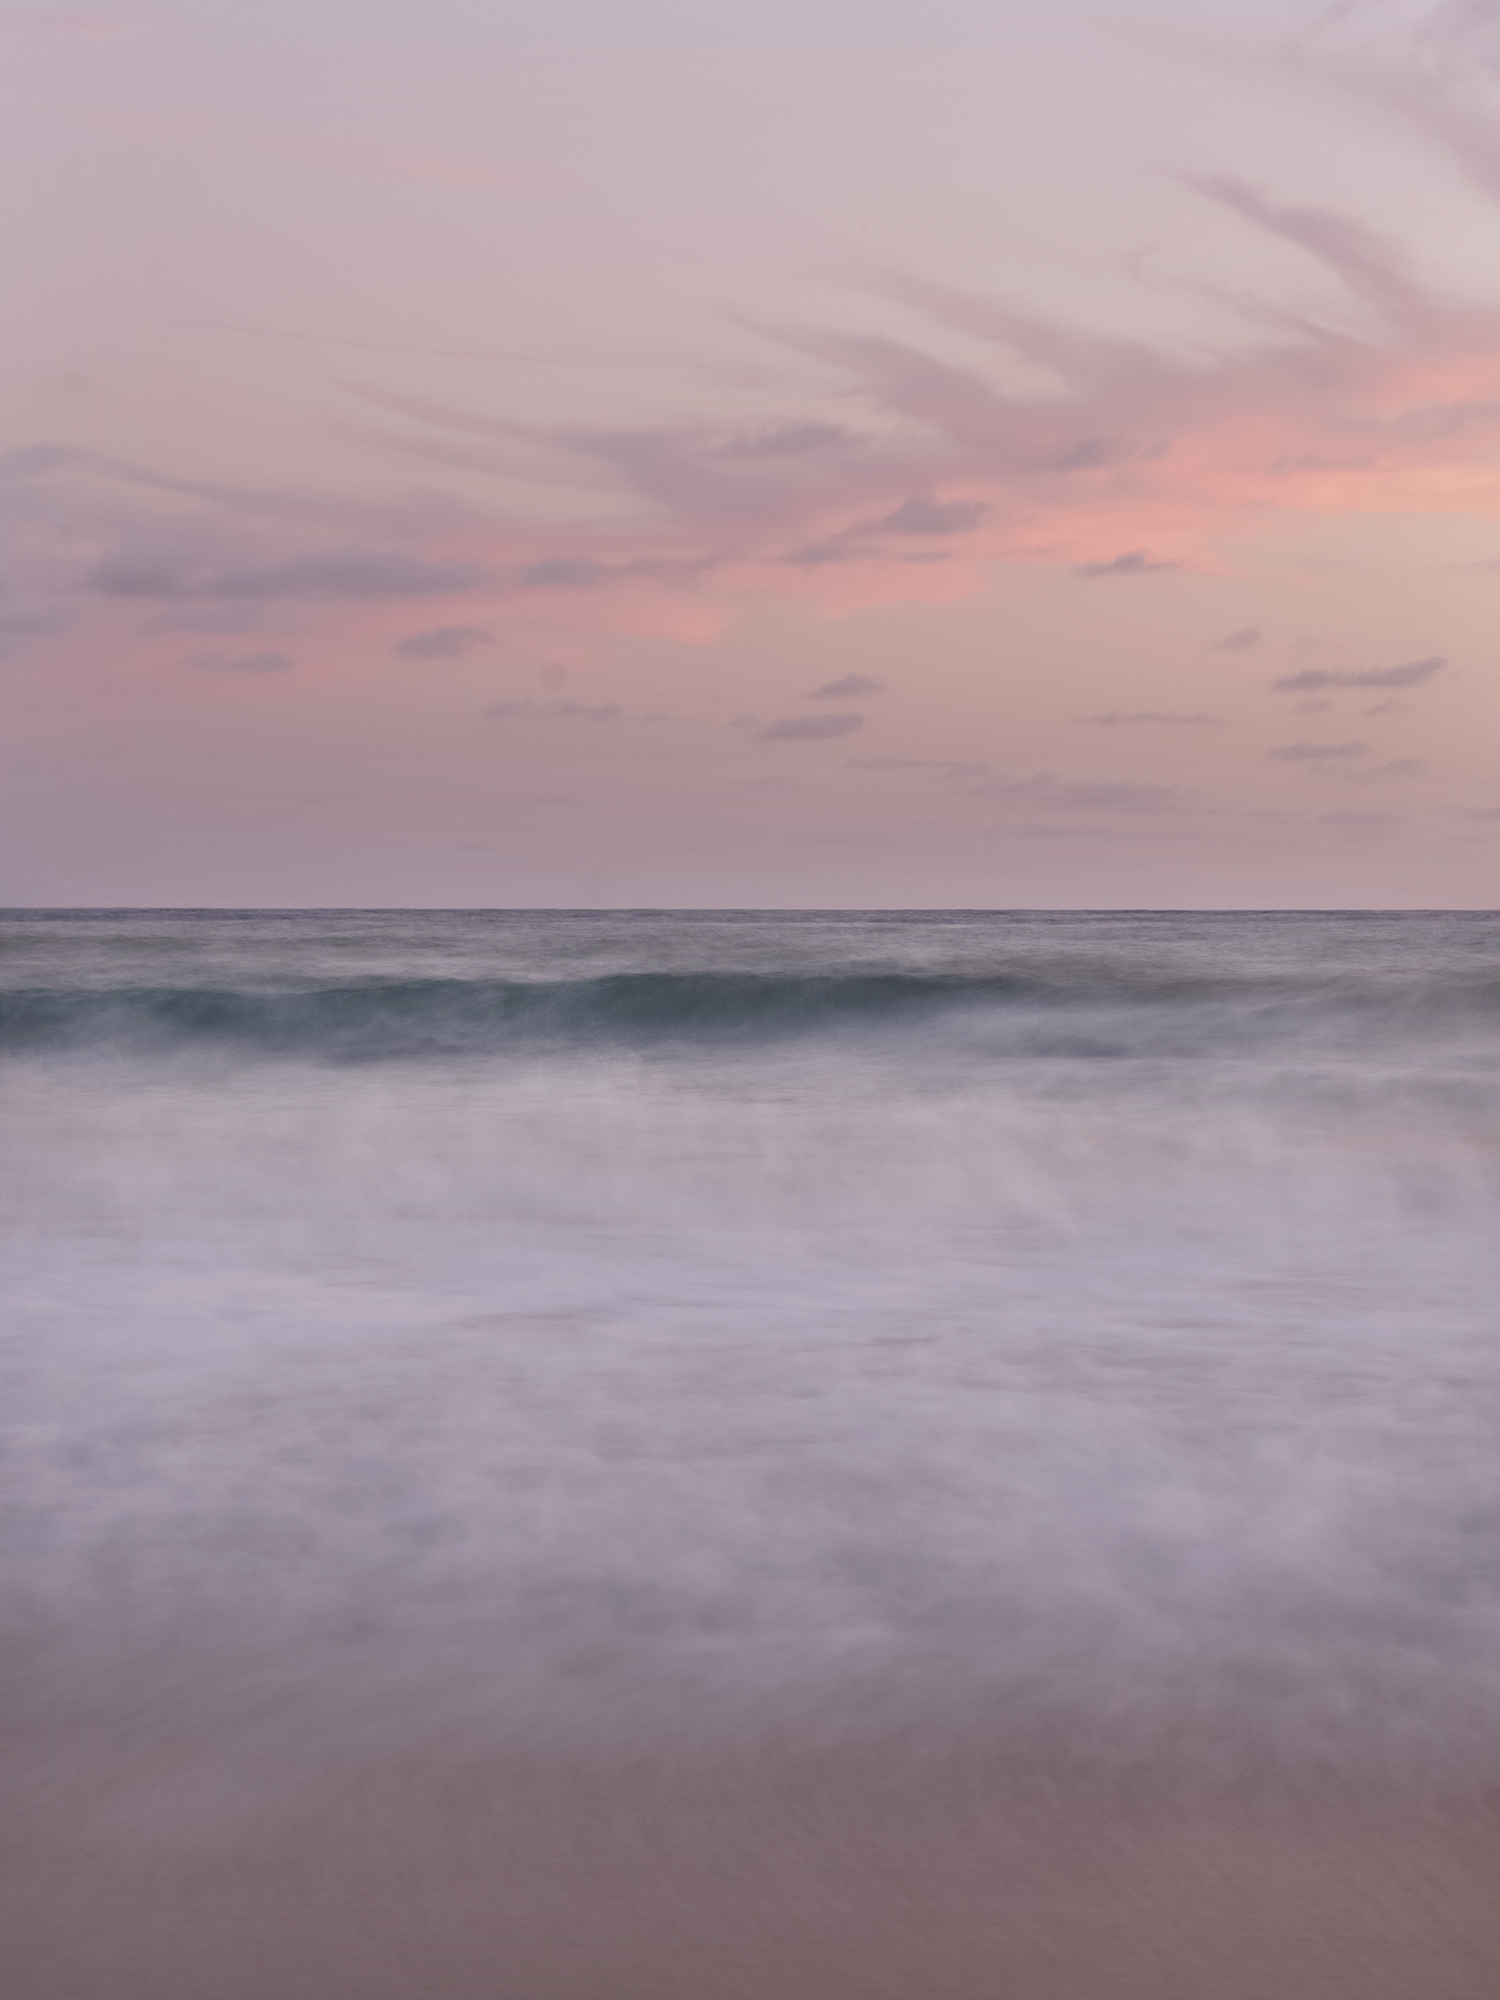
Beach Photo #3 – Apollo Bay, Victoria
Stretching for 3km, Apollo Bay sees rolling hills reach the coast in a beautiful landscape just a few hours drive from Melbourne, Australia. Visiting at sunset provided the perfect chance to sit on the eastern end of the beach, explore the rockpools and wait for the sky to erupt in an evening show of colour.
The clouds were aligning beautifully for a magic sky on the evening I captured this image and as dusk hit, the pinks sat perfectly above the wave line.
I really enjoy using the movement of the water to create long exposures. When shooting with the OM SYSTEM OM-1 camera, I can opt for the Live ND Filter which captures movement within the frame and produces stunning long exposure results like the image below. The stability of the camera means I can capture this without a tripod, standing still for just 2.5seconds to achieve this shot.
Camera Settings – ISO 800, 2.5sec, f/16, 40mm (40-150mm f2.8 M.Zuiko lens)
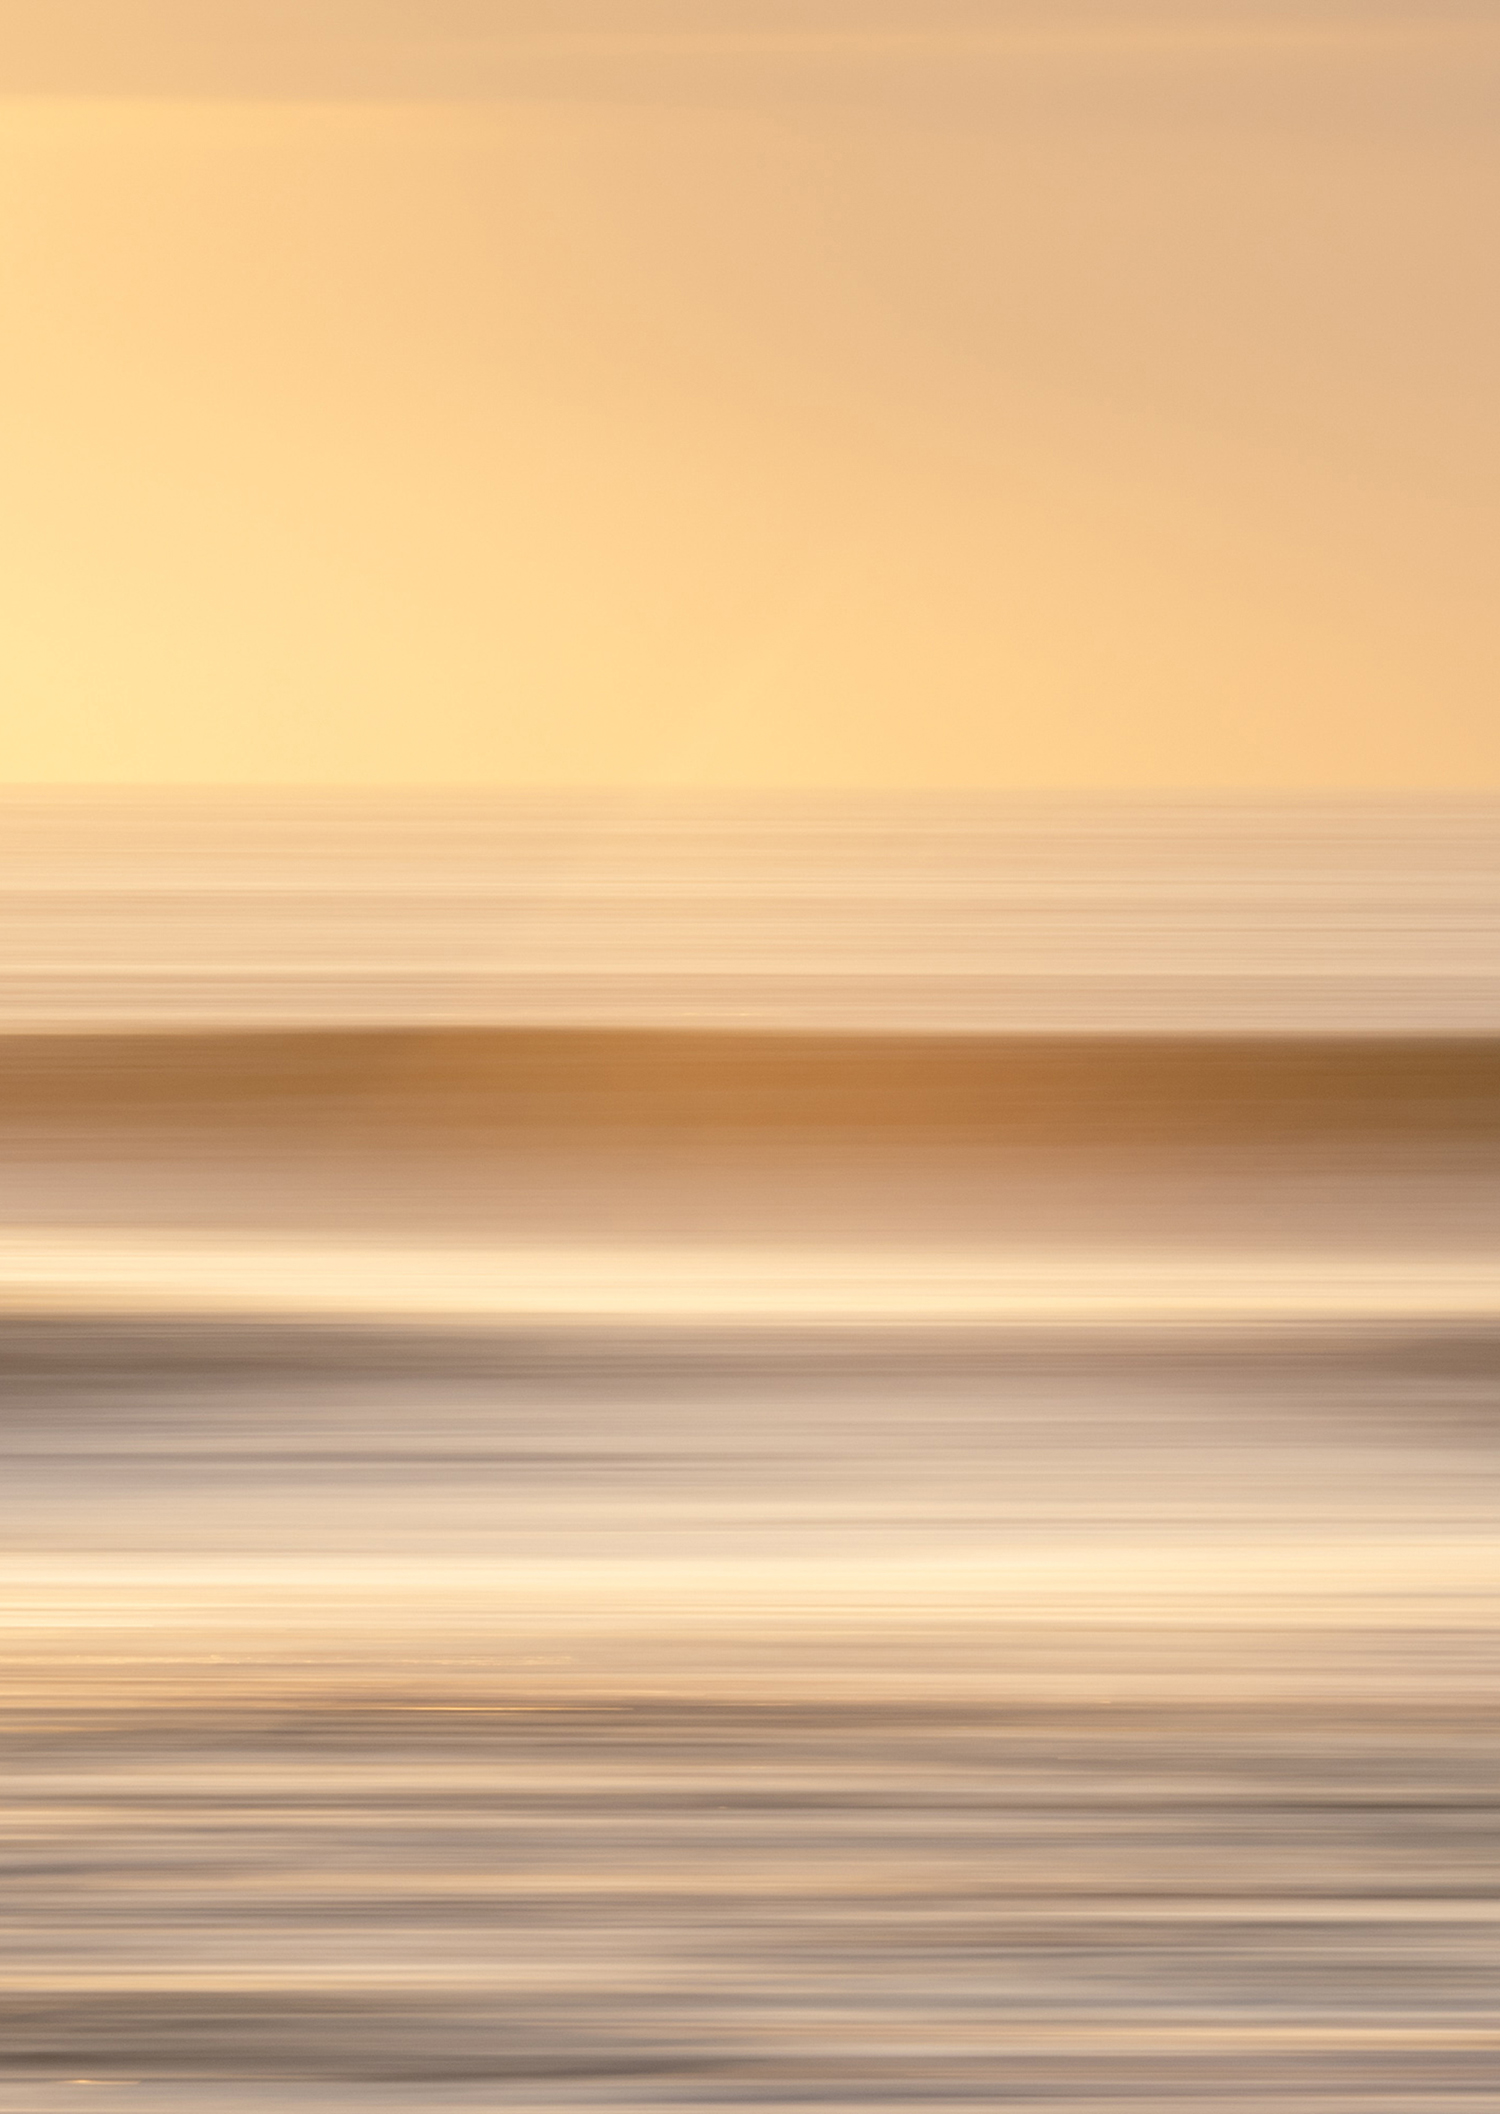
Beach Photo #4 – Sunshine Beach, Queensland
Speaking of movement, a creative technique I love using at the beach is ICM Photography, Intentional Camera Movement. Using the movement of the landscape or subject, paired with your own movement of the camera. You can get creative as you like because there’s no strict rules, it’s meant to be a creative use of movement to showcase the scene however you wish.
I love using the coastal and swell lines to produce images with a panning effect. Setting the camera up and slowing the shutter speed, I then turn quickly from left to right to blur the scene and highlight any visible lines within it.
This image was captured using the Olympus E-M1 MKIII and 40-150mm f2.8 M.Zuiko pro lens. It was taken at sunrise, (I have a total love/hate relationship with sunrises!) as the beautiful morning glow rose above the sea. As the waves rolled in, I timed the shot for when waves were piled toward the horizon. Take a peek at my guide to ICM Photography here for all the creative tips and settings.
Camera Settings – ISO 100, 1/25sec, f/18, 150mm
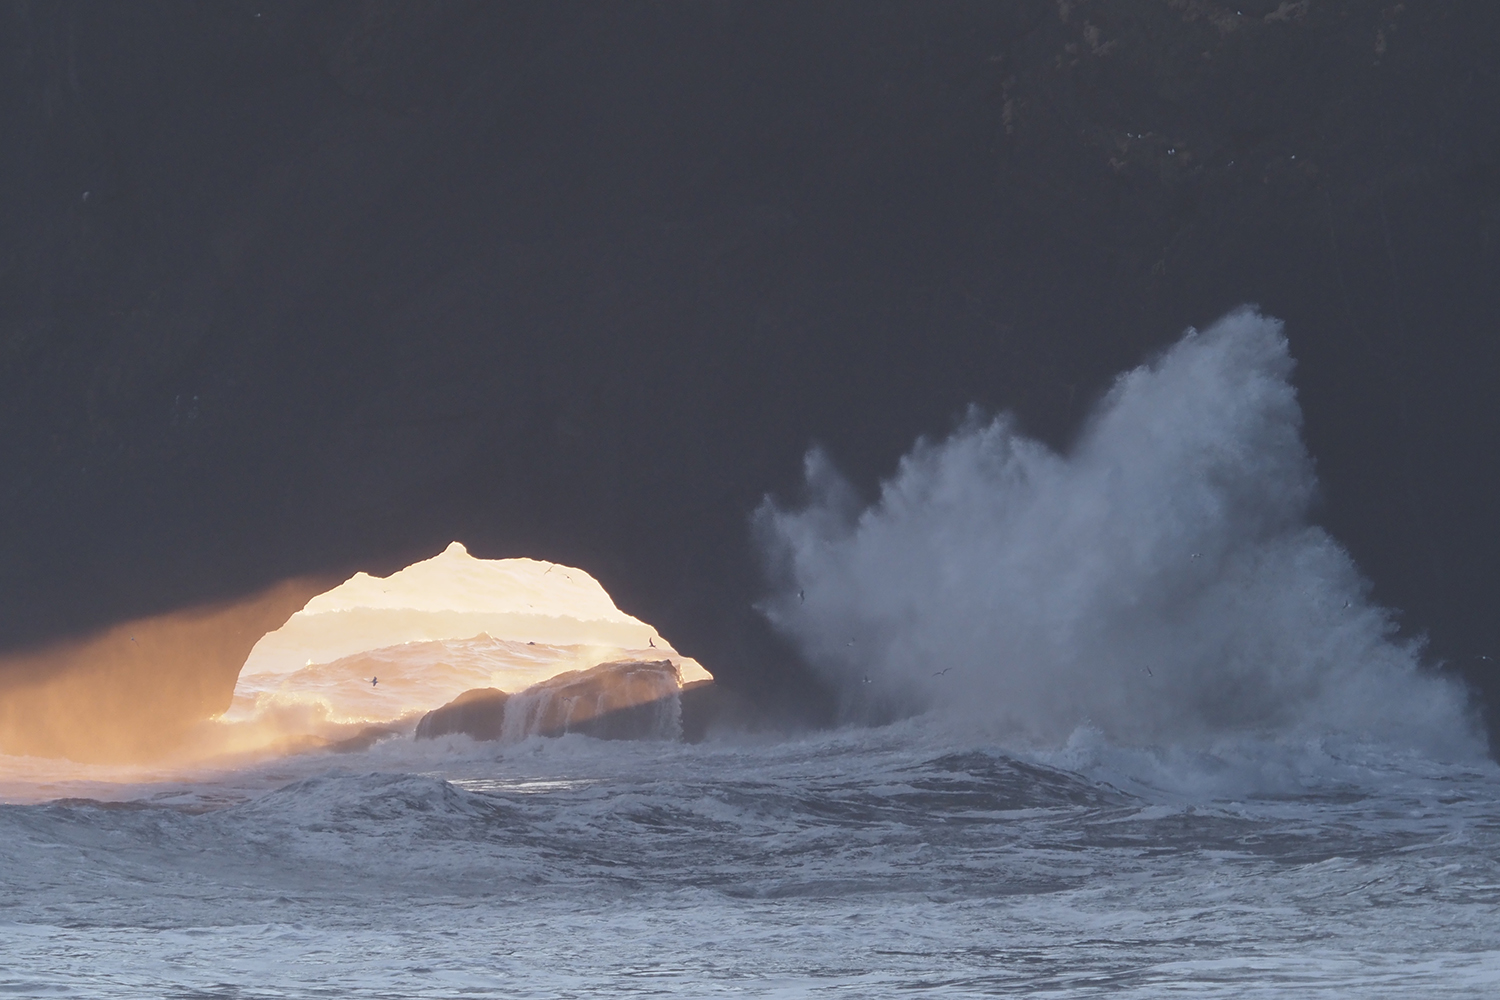
Beach Photo #5 – Dyrhólaey, Iceland
On the wild south coast of Iceland, this spot is one of my favourite for epic waves crashing into cliffs and rocks. During this particular visit, the waves were crashing, birds were soaring above and the late afternoon sunlight was shining through the rock arch.
It was so spectacular that I still don’t think this photo does the moment justice but I’m so happy with the image and how it captured the magic, even in a small way.
When photographing a contrasting scene with dark and light areas, it’s important to properly expose your shot to avoid ending up with an image that is too dark or too bright. You want to ensure all visible highlights and shadows can be edited it need be and the colours are true to the scene. I like to do this by exposing for the area just where the light and dark spots meet and captured this shot with the Olympus OM-D E-M1X, 40-150mm f2.8 pro lens plus the MC-20 2x teleconverter.
Camera Settings – ISO 640, 1/400sec, f/5.6, 260mm, -0.3 exp
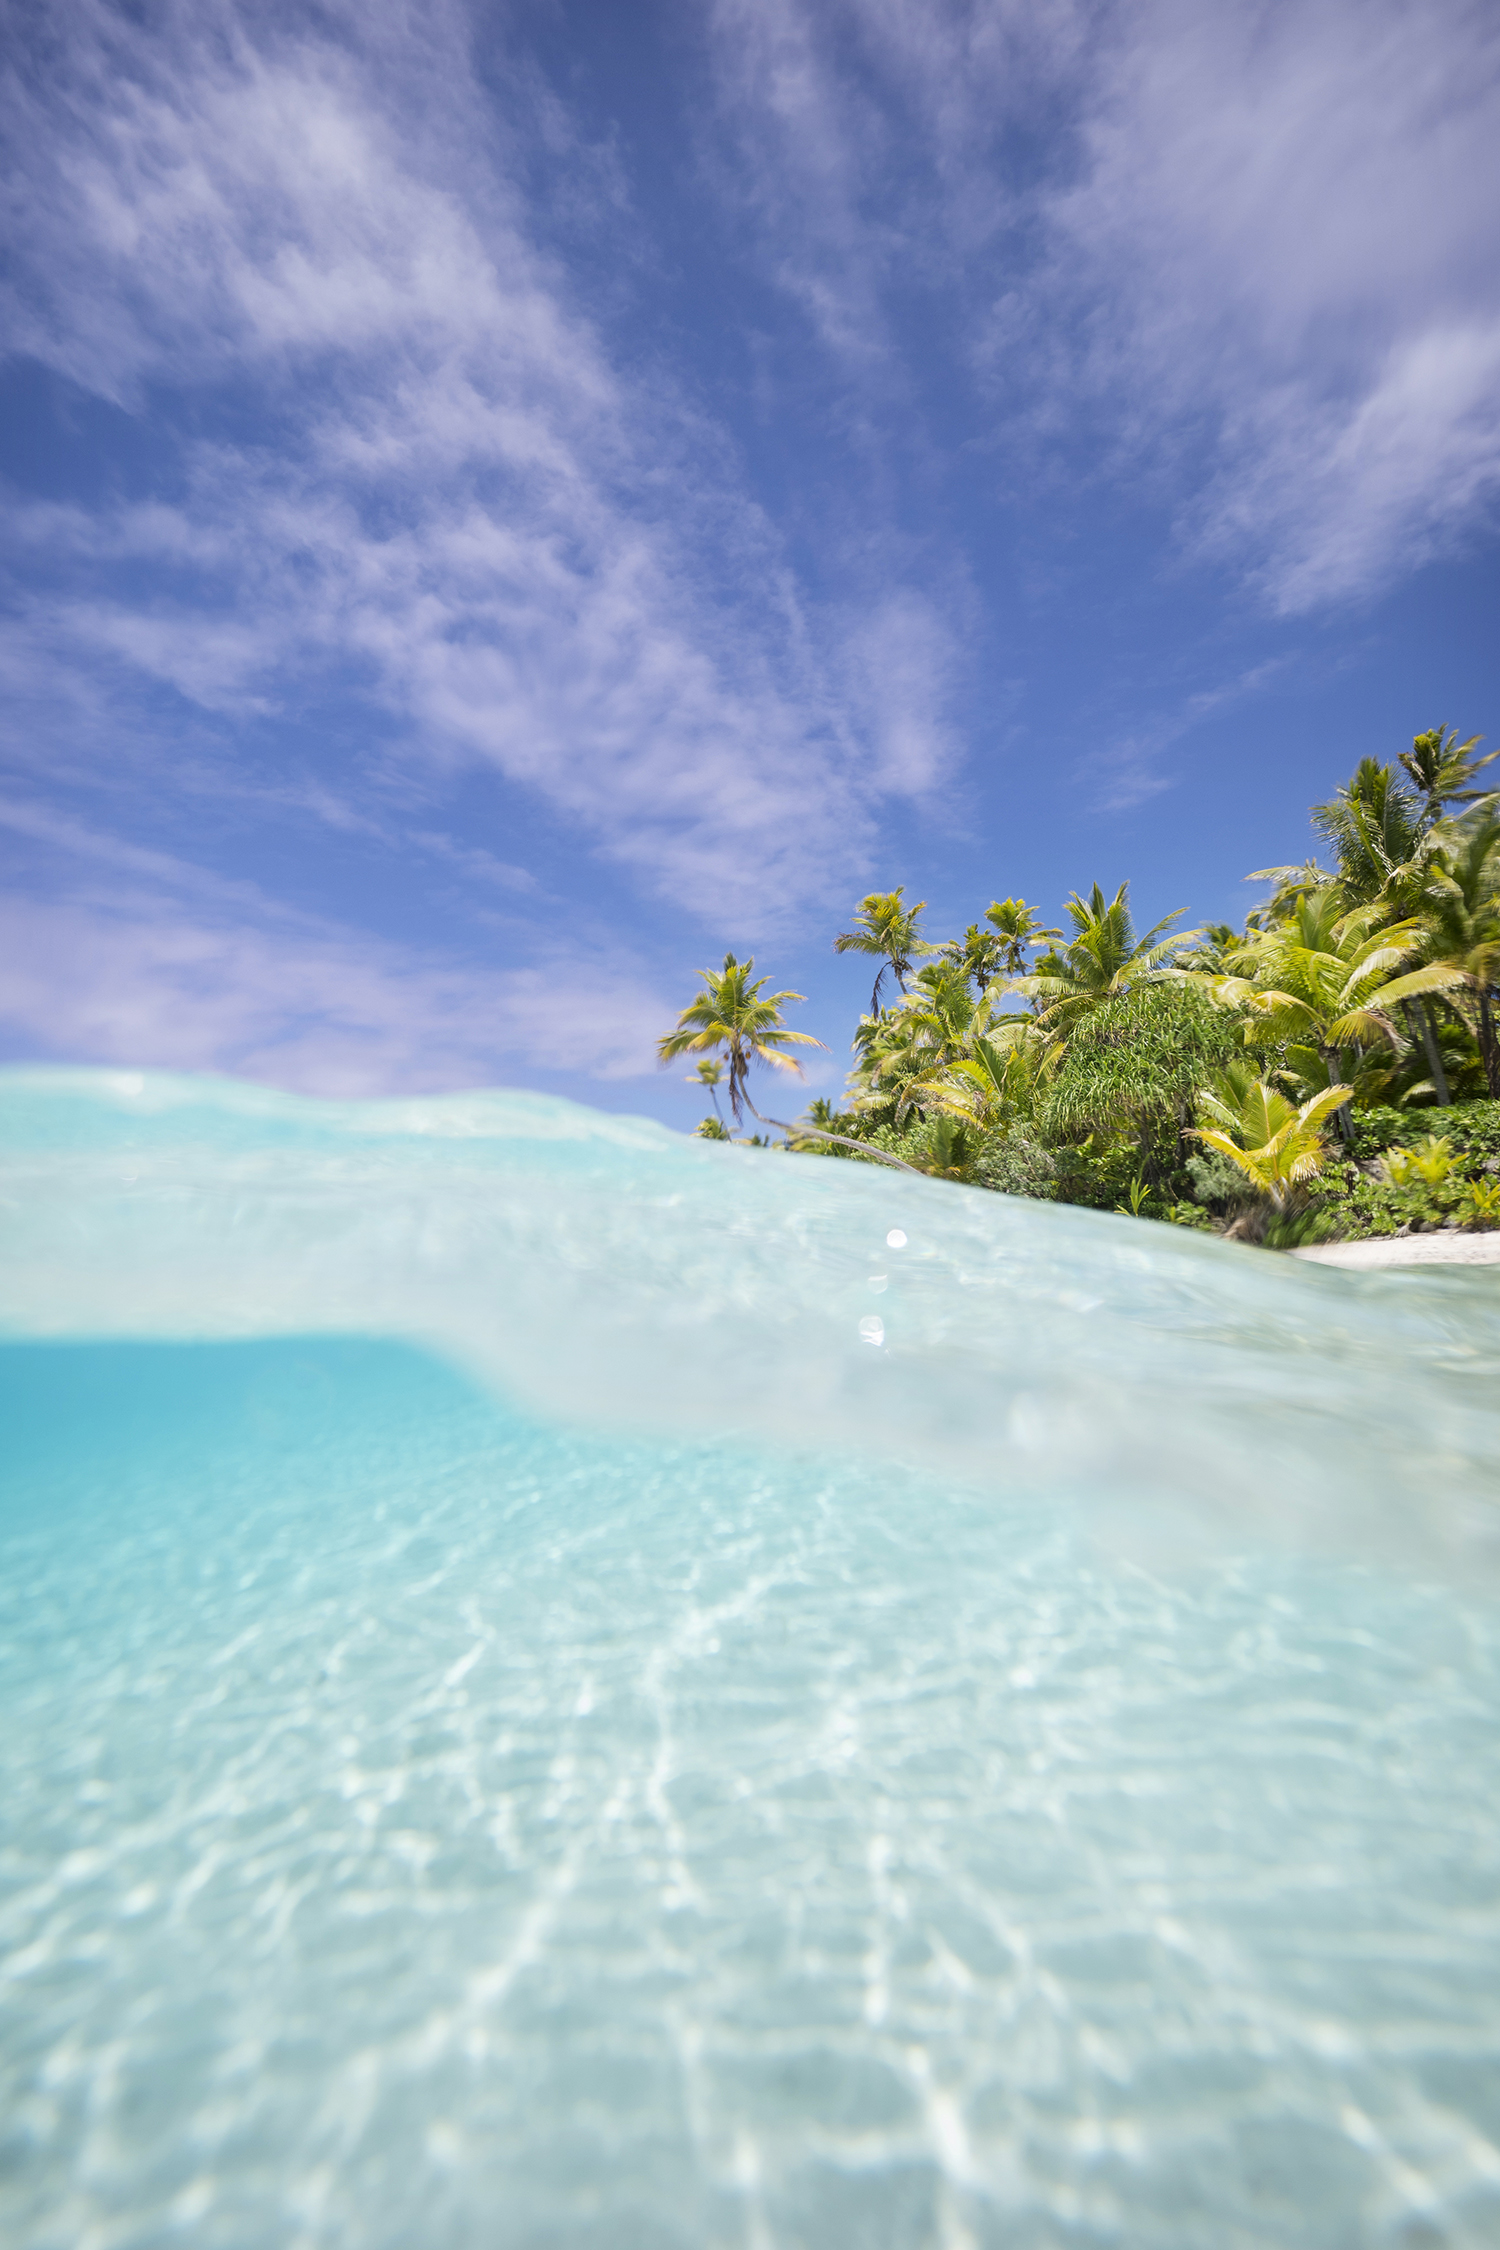
Beach Photo #6 – Aitutaki, Cook Islands
If you were to step into your screensaver of ‘paradise’, this is probably where you’d end up. One Foot Island within the Aitutaki Lagoon is pure idyllic island perfection.
Palms line a pure white sandy beach that rolls into some of the clearest water you’ll ever see. The TV Series Survivor was filmed here one season and due to its remote location, there’s just one dwelling on the island used for cooking up a feast for visiting day trippers.
Floating in the warm water of Aitutaki Lagoon is so relaxing, but also inspiring as a photographer obsessed with split-level underwater images. I love captured above and below the water level and there’s really no better place to test this out than a lagoon with calm water and stunning scenery.
To capture both landscapes above and below sharply, you need to shoot with an aperture of f/11 and above. If you’re aiming for a sharp shot above, but a little blurry below (like my example here), you can opt for an aperture of f2.8 which will produce a beautiful bokeh.
Tilting your camera slightly upward as you hover below the surface will help to even out the composition of the two areas. Tilting down means the area under the water surface will be more apparent in your image, and tilting too far up will mean the landscape above won’t be visible.
I use the Olympus EP-14 underwater housing for my E-M1 MKII camera and typically pair it with the 7-14mm f2.8 M.Zuiko pro lens.
Camera Settings – ISO 64, 1/1600sec, f/2.8, 7mm, +0.3exp
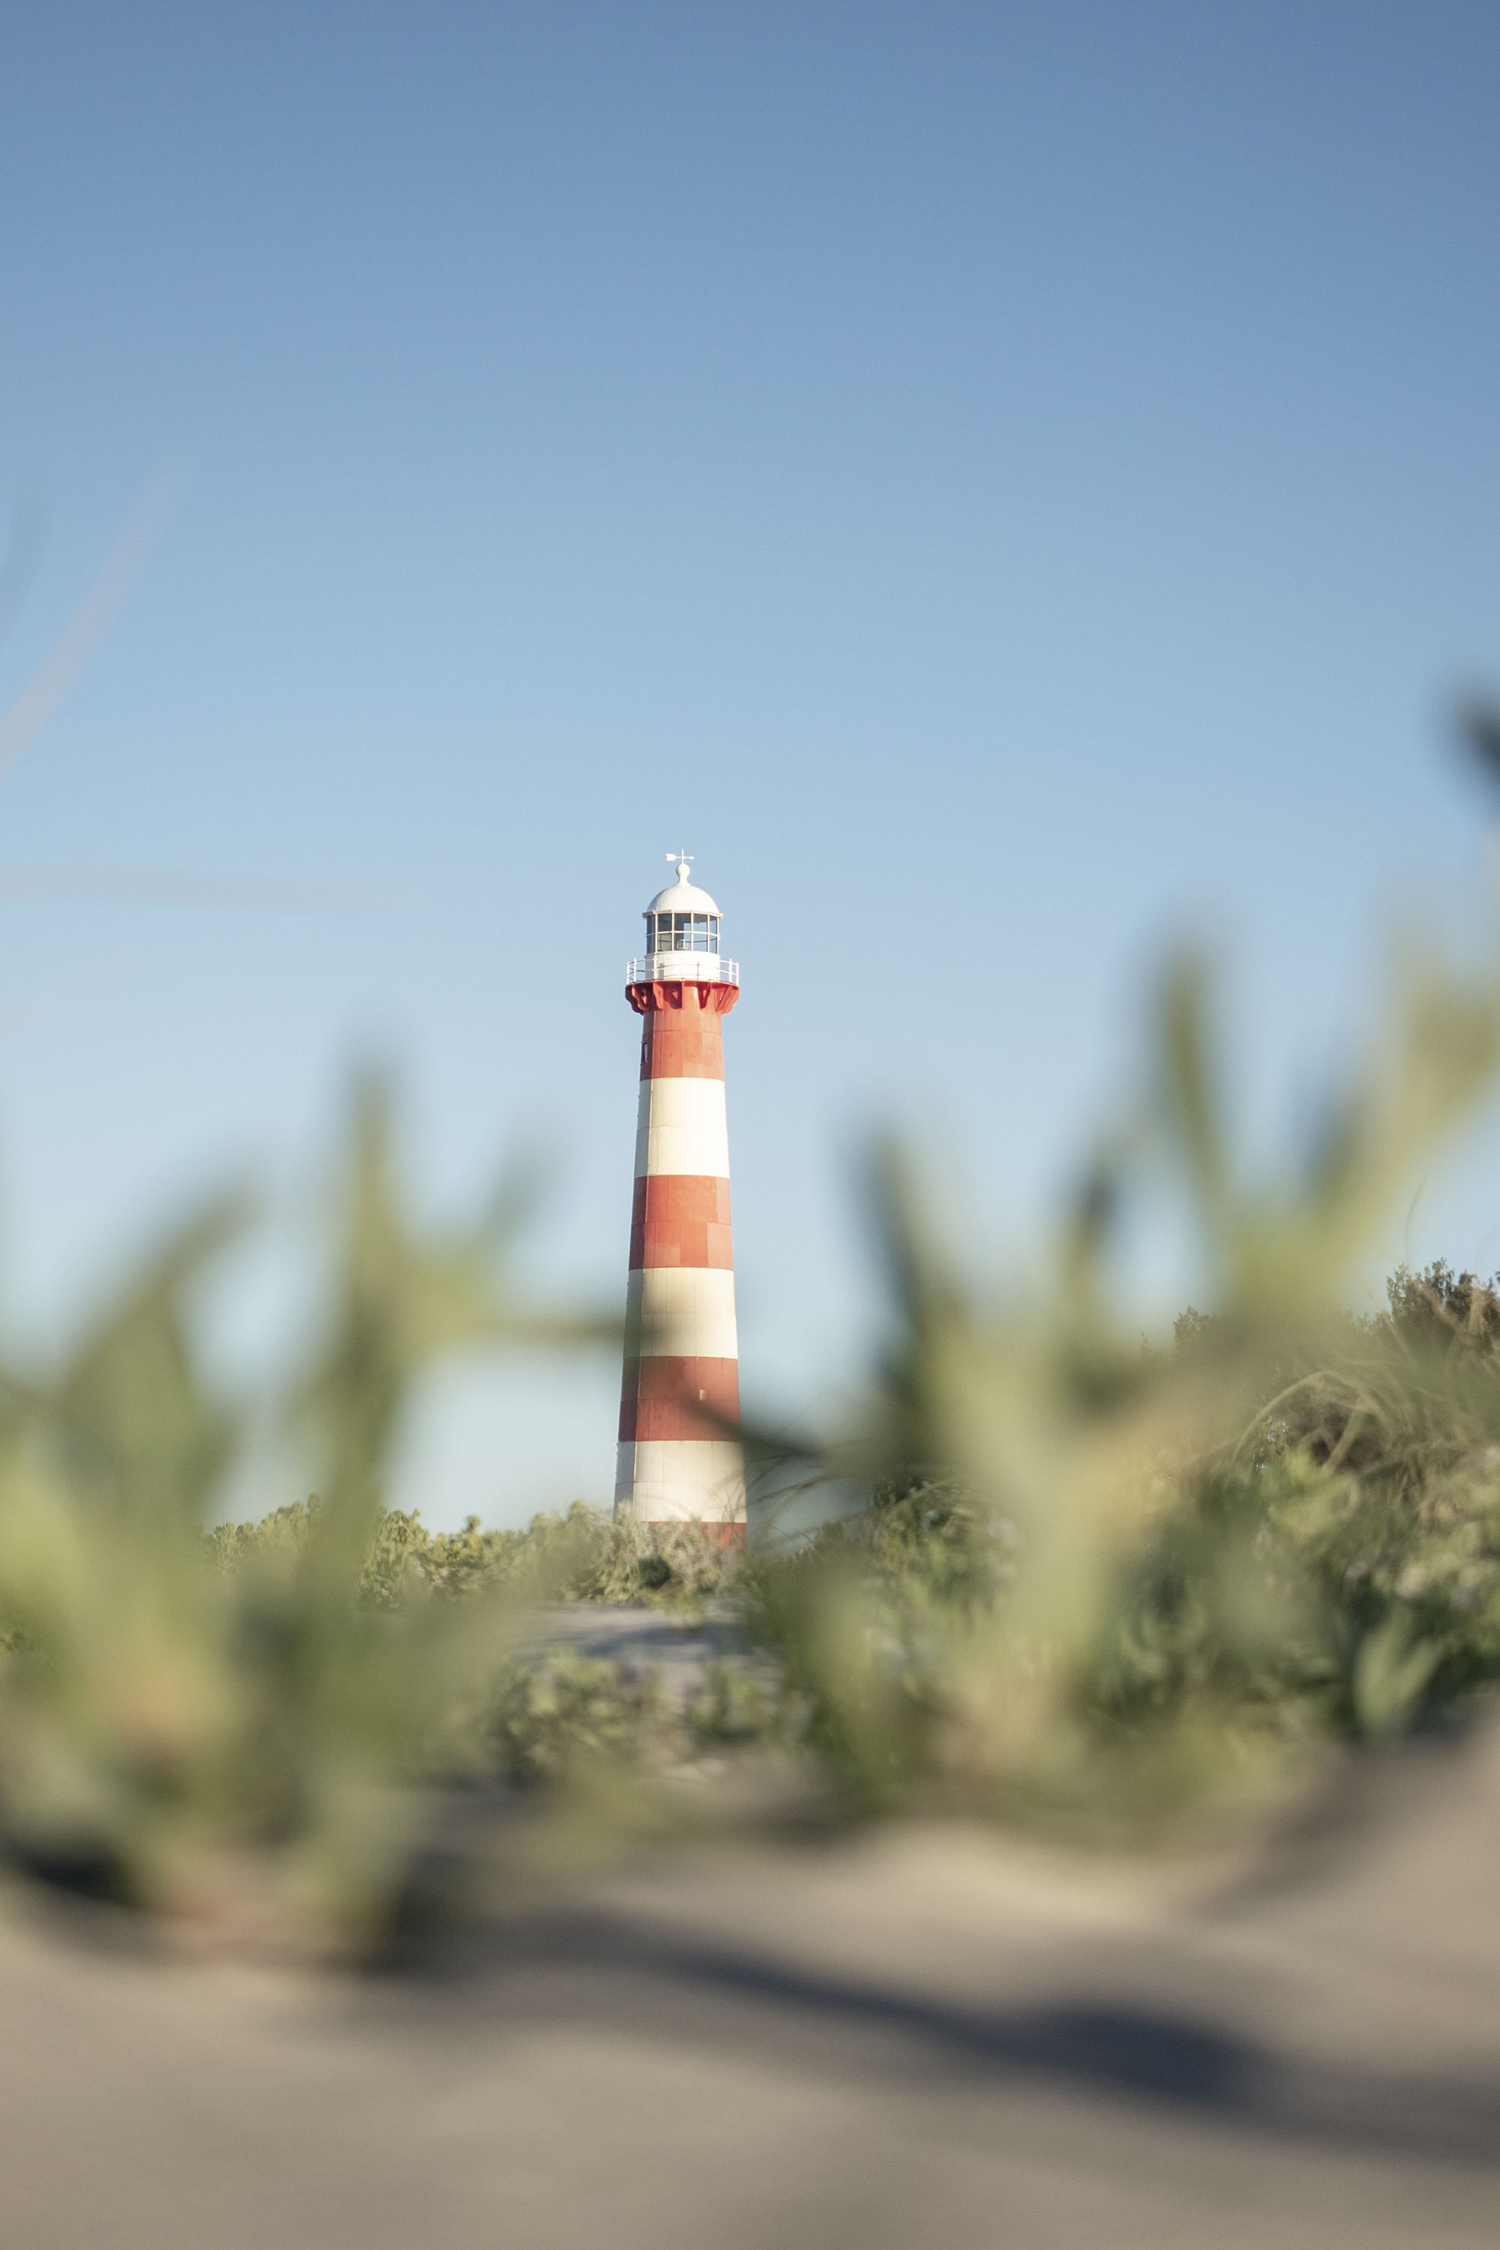
Beach Photo #7 – Geraldton, Western Australia
When taking beach photos, capturing nearby subjects or related sights can be a great way to take photos of something other than sand. This lighthouse is so striking with it’s red and white stripes and I used the beach grass as a foreground feature to capture a more unique angle.
Incorporating textures or additional elements within your foreground helps to compose a more creative shot. You can get low to the ground and use the sand itself, or like I’ve done here, opt for a wide aperture and position the subject to create depth of field.
Aim to shoot through subjects which will blur the foreground with bokeh, create a pop of colour and still enable your main subject to remain in focus.
Camera Settings – ISO 200, 1/4000sec, f/2.8, 36mm
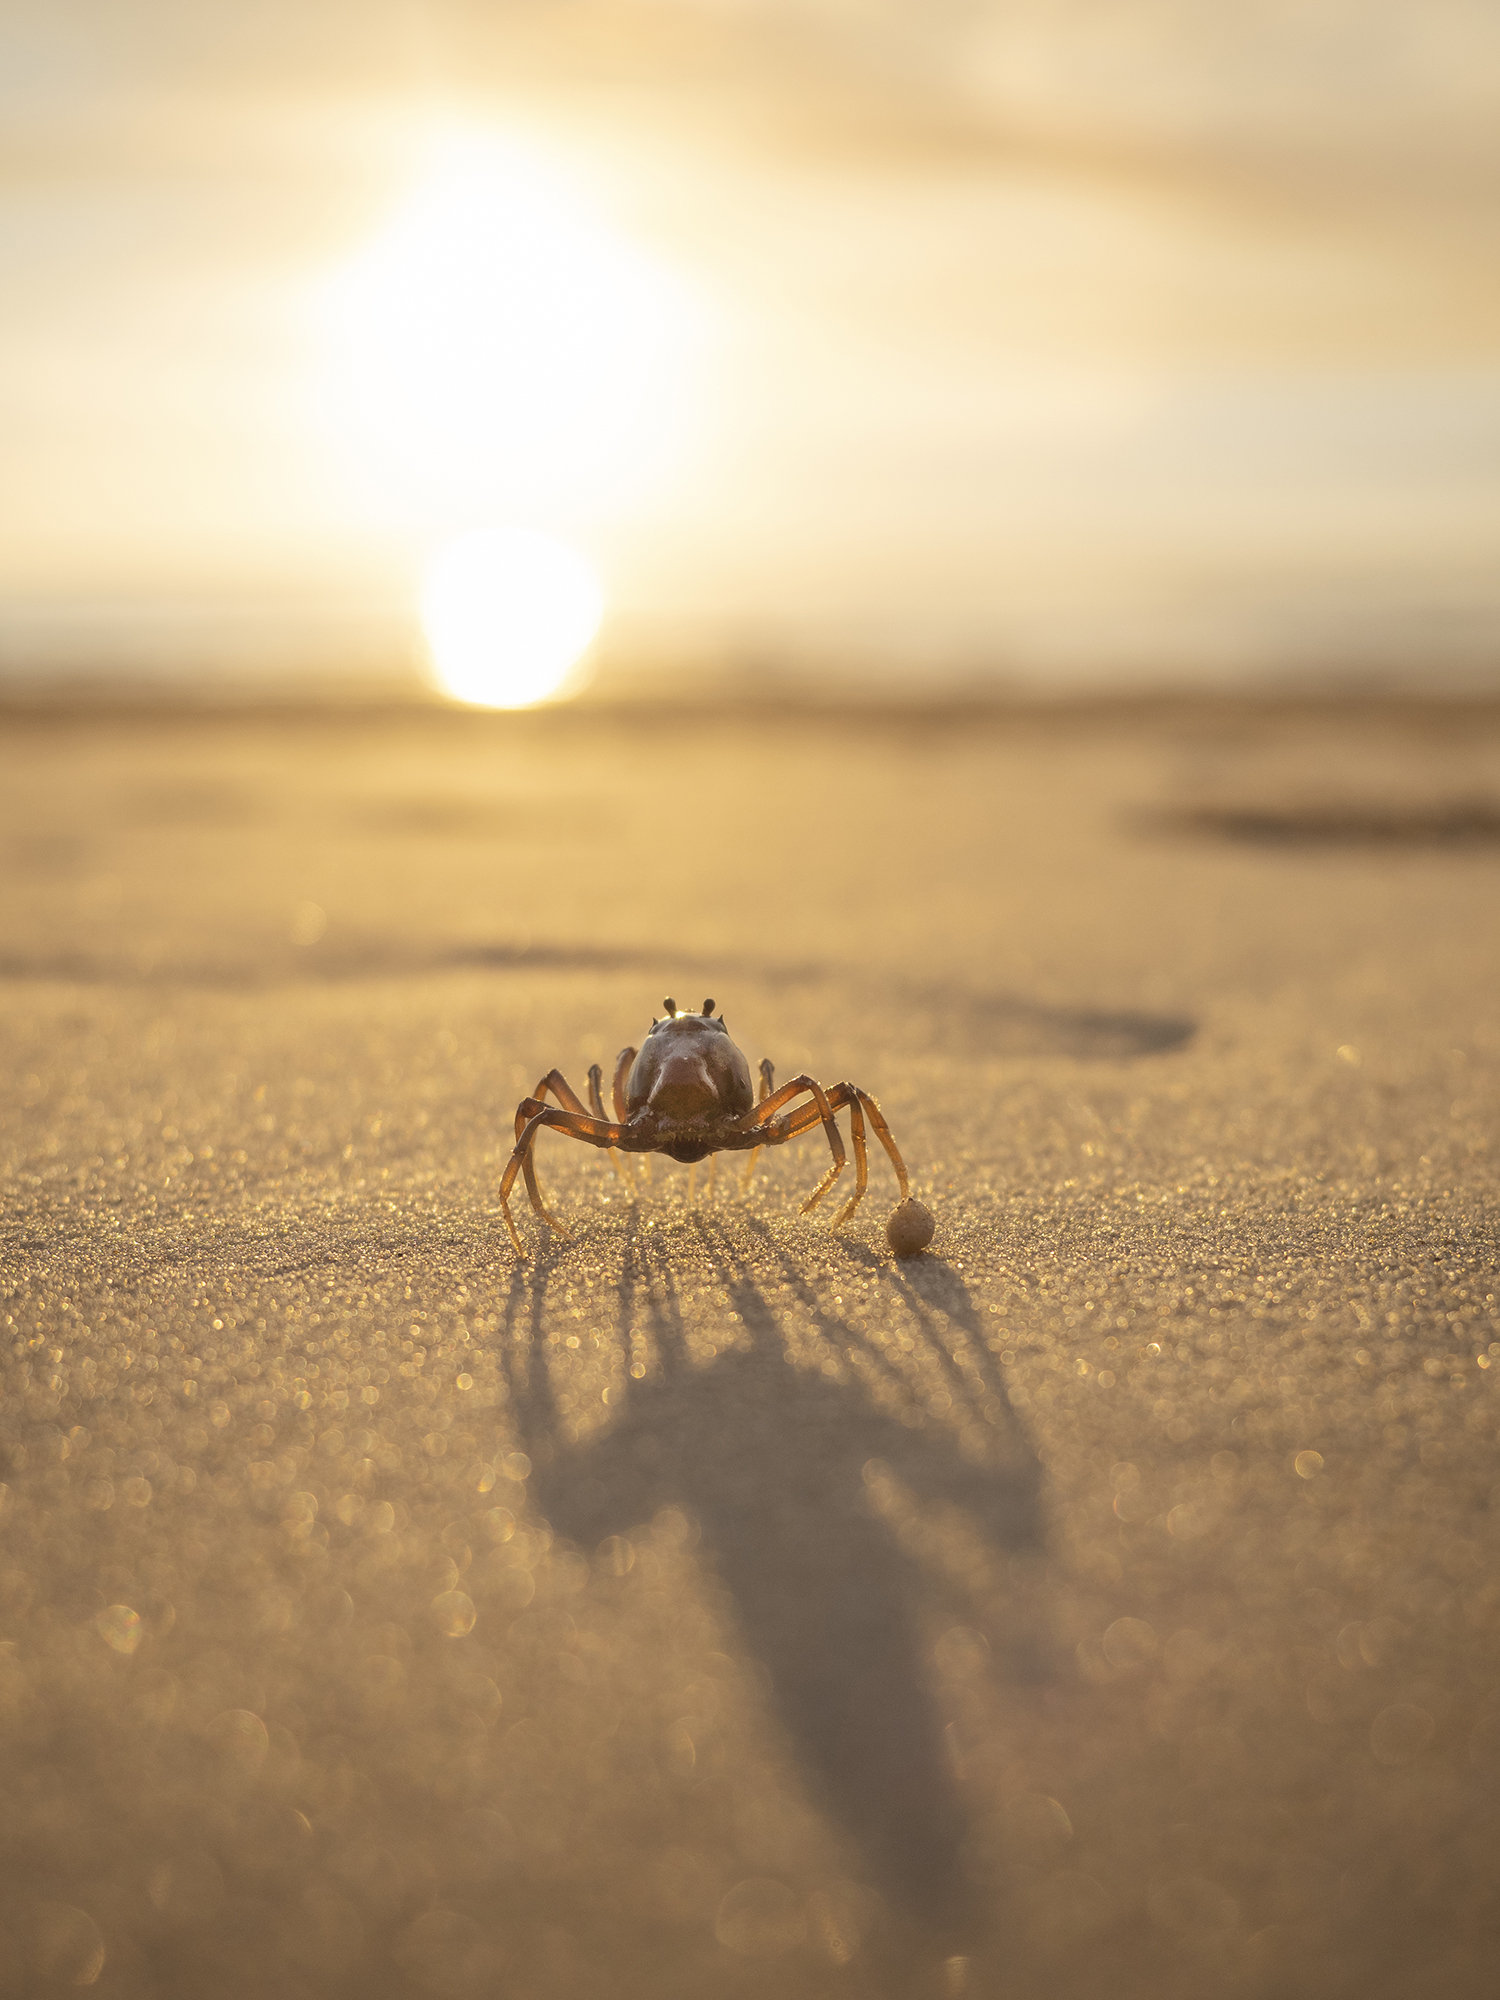
Beach Photo #8 – Fraser Island, Queensland
This little cutie was creating balls of sand as the sun went down on Fraser Island. I was creating content for a client, focusing on landscape images and aerials with my drone, but couldn’t resist stopping to take a portrait of this soldier crab.
Unlike the Hermit Crab image earlier, this crabby wasn’t bothered by my presence. Instead, he paused a little, then continued his busy job of rolling sand balls.
To capture this shot I positioned myself and the camera low to the ground to enhance his shadow and I love the result and how it makes him look so big and strong with the sand ball under his leg.
Camera Settings – ISO 200, 1/2500sec, f/2.8, 22mm, +0.7exp
To continue reading about beach photos, take a peek at the following guides on The Wandering Lens –
How to Take Better Beach Photos
Setting the Scene: Golden Hour Photography Tips
The Best Settings for Aerial Beach Photos
A Quick Guide to Minimalist Landscape Photography
Do you want to improve your photography or find work as a photographer? Take a peek at the creative courses and resources for photographers available at The Wandering Lens store and eBook library.


Hello! I’m the founder and photographer behind The Wandering Lens.
With 19+yrs experience as a professional travel and landscape photographer, all advice found on this site is from my personal experience, or that of contributors, on the road. I hope it’s useful for your own travels and would love to hear in the comments about your trips and experiences around the world.
Leave a Comment