
A Photographer’s Singapore Itinerary
Planning to visit a new city can be a little daunting, especially when you want to make sure you get to see the best places and of course, the most photogenic.
If you’re travelling through Singapore on a stopover or have a few days to explore, this itinerary will give you an outline of everything you can squeeze into just one day. If you’re staying longer you can spread it out a little more and spend more time soaking up the atmosphere in each of the locations.
Starting with breakfast in Tiong Bahru and heading right through to the twinkling lights of Marina Bay, I’ve put this itinerary together based on my personal experience wandering Singapore like a crazed photographer who just can’t stop taking photos. I ended my day in Singapore looking and feeling like a sweaty mess but I’d happily do it all over again because no inch of this city should go without seeing, even if you’ve only got 24hrs.
I’d suggest adding in some air-con time to the itinerary if you’re prone to getting a case of the heat cranks…air-con and cold drinks will make all the difference to your mood and photography results so be sure to stay hydrated while travelling around this humid city.
To get started, here’s a little summary of my suggested Singapore Itinerary –
Itinerary: One full day in Singapore
8am – 9:30am Tiong Bahru
10am – 11:30am Chinatown
12pm – 1pm Little India
1:15pm – 3:30pm Singapore Botanic Garden + National Orchid Garden
4:30pm – 6pm Cloud Forest
6pm – 8pm Supertree Grove
8:15pm onwards – Helix Bridge + Marina Bay
And a little map for reference…
A Singapore Itinerary
Morning –
8am-9:30am Tiong Bahru
(Recommend time 1.5 hours)
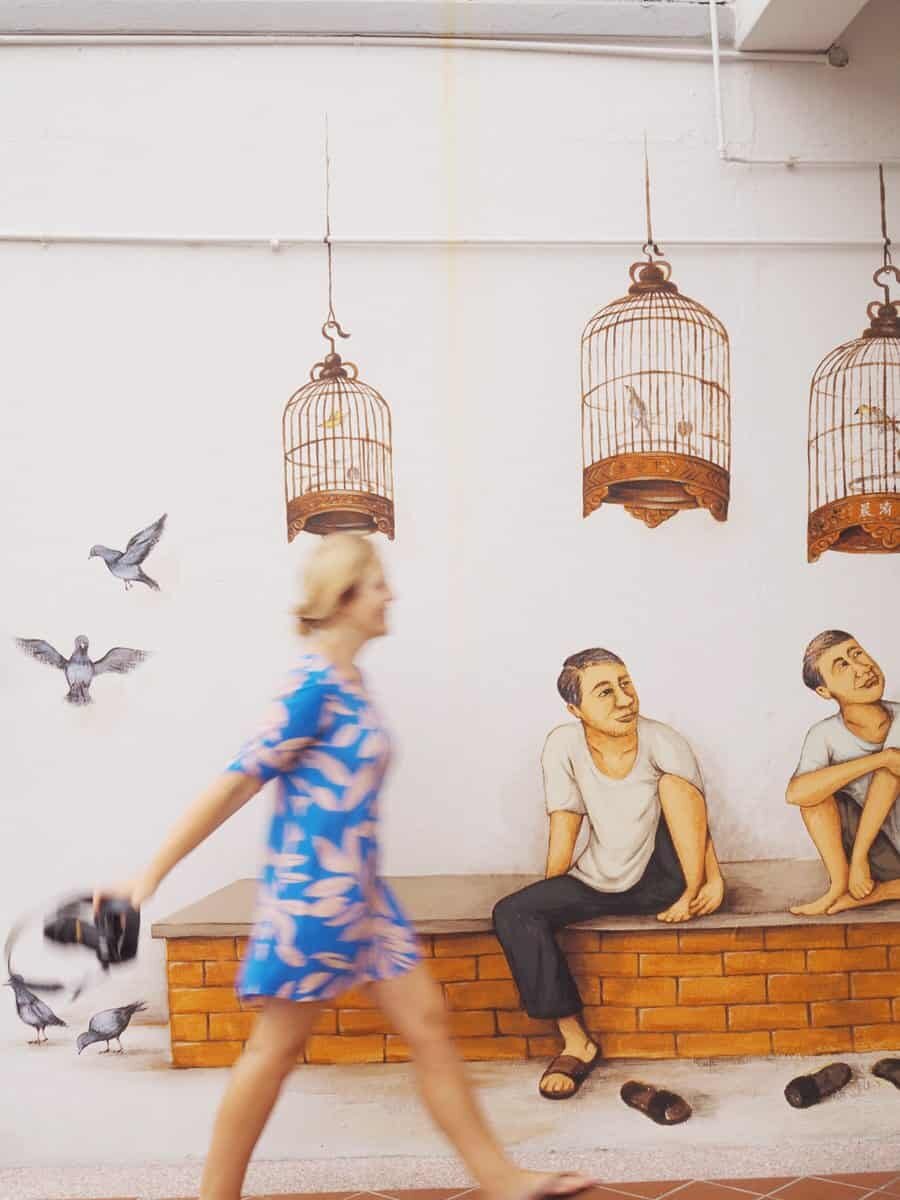
Quiet, cultural and filled with wall art, Tiong Bahru is the perfect place for a morning coffee and breakfast before a big day of photography. Cosy little cafes and trendy eateries line the alleys which are decorated in painted scenes depicting the past and heritage of Singapore.
There’s a local market too which is great for photographing the bustling action with colour bursting from every stall.
Photography Tips: The early morning light filtering through the streets will make for a great atmosphere to photograph. Look for people walking past the wall art, seek to find the series of goat mural hidden throughout the suburb and capture quaint street shots of this heritage district.
Best Gear: A 50mm lens is perfect for capturing the scenes throughout Tiong Bahru. I personally use the Olympus 25mm (50mm equivalent) f/1.2 lens with my OM-D E-M1 MkII camera…super light and easy to carry around! Otherwise my OM-D E-M10 Mk III paired with the tiny but handy 14-42mm f/3.5-5.6 lens is great for happy snapping your way around.
Getting Here: MRT Green Line to Tiong Bahru Station EW17 or take one of the many bus lines that drop off at Tiong Bahru Plaza, Bus Stop Number 10169, the following routes service this stop 5, 16, 33, 63, 121, 122, 123, 123M, 195, 851.
Next Stop > Chinatown
Travel Time – 22min walk | 15mins Bus #851 | 9min Taxi
Mid-morning
10am – 11:30am Chinatown
(Recommended time 1.5hours)
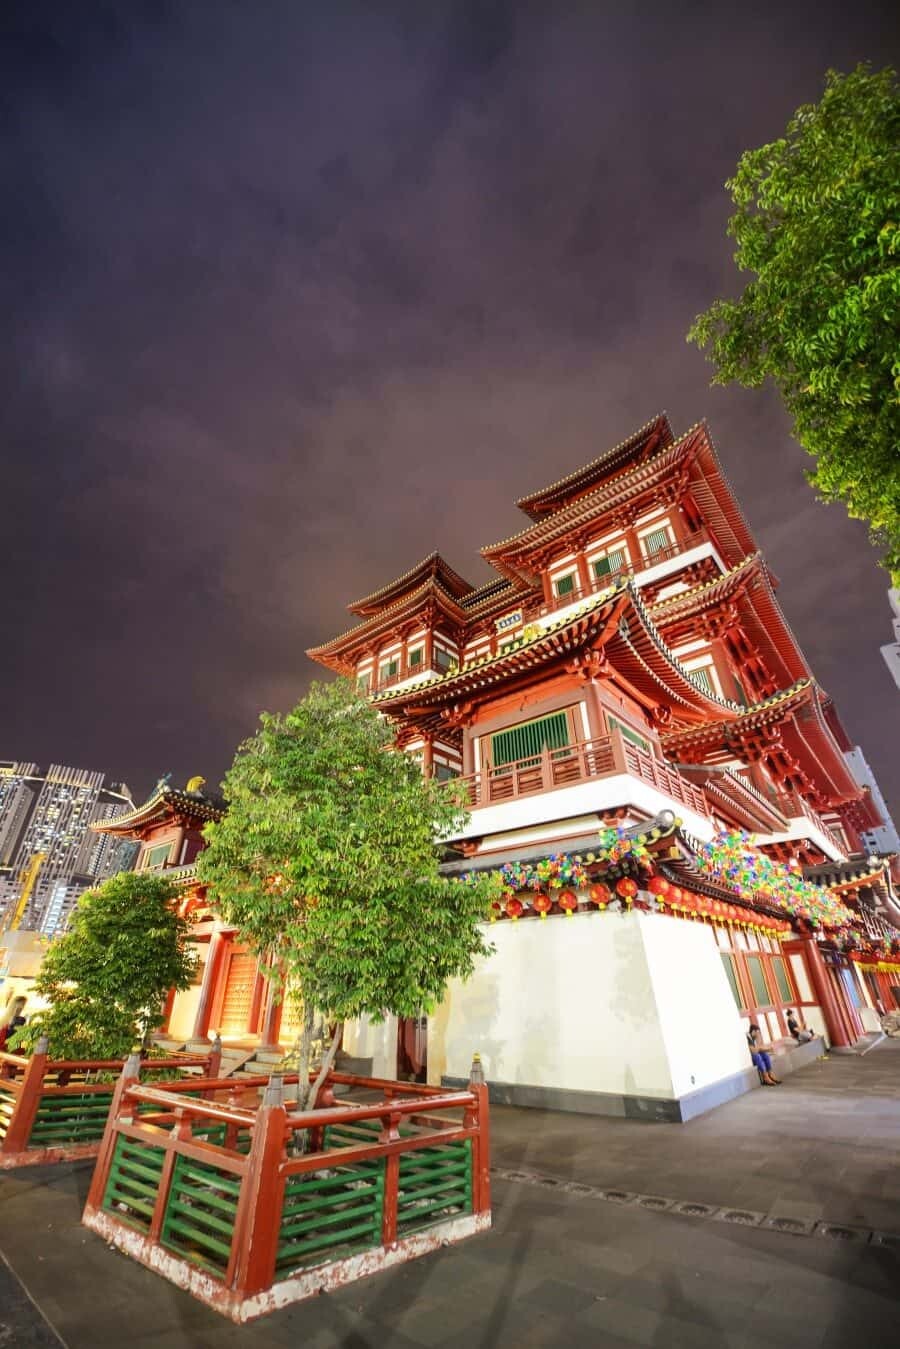
From Tiong Bahru, continue the culture by heading over to Chinatown. Alive with vibrant shop fronts, market streets and dangling red souvenirs in every direction, this area of Singapore is not to miss.
Perfect for injecting a little energy into your morning, Chinatown is worth a quick wander for photographing the maze-like streets and lively scenes. There’s also the very photogenic Buddha Tooth Relic Temple + Museum which is a huge complex on the edge of Chinatown, definitely try and peek inside and then wander across the street to photograph the building in its entirety.
Photography Tips: Use the souvenirs as foreground subjects when capturing street scenes and don’t be afraid to attempt some slower shutter shots to capture the movement. My Olympus OM-D (read about my gear here) is known for it’s amazing stability so I love taking hand-held long exposures to create a sense of place within an image. If your camera isn’t so sturdy, look for something to lean on, a bench or just attempt to stay really, really still…it should be possible for shots around 1 second without too much blur.
Best Gear: Similar to Tiong Bahru, a 50mm lens (or 25m equivalent) is perfect for capturing the scenes throughout Chinatown. When photographing the Buddha Tooth Relic Temple however, a wide-angle lens like my 7-14mm f/2.8 offers the ability to get up close and create some perspective with the towering temple.
Getting Here: From Tiong Bahru it’s a 20-30minute walk depending on your pace or alternatively you can catch bus #851 from near the Tiong Bahru Market. If you’ve already gone off the itinerary and skipped Tiong Bahru, you’ll find Chinatown is easily accessible from the city centre as it’s right near Clark’s Quay or just a few blocks west from the Merlion Statue.
Next Stop > Little India
Travel Time – 40-45min walk | 10min MRT (train) | 10min Taxi
Lunch
12pm – 1pm Little India
(Recommended time 1hour)
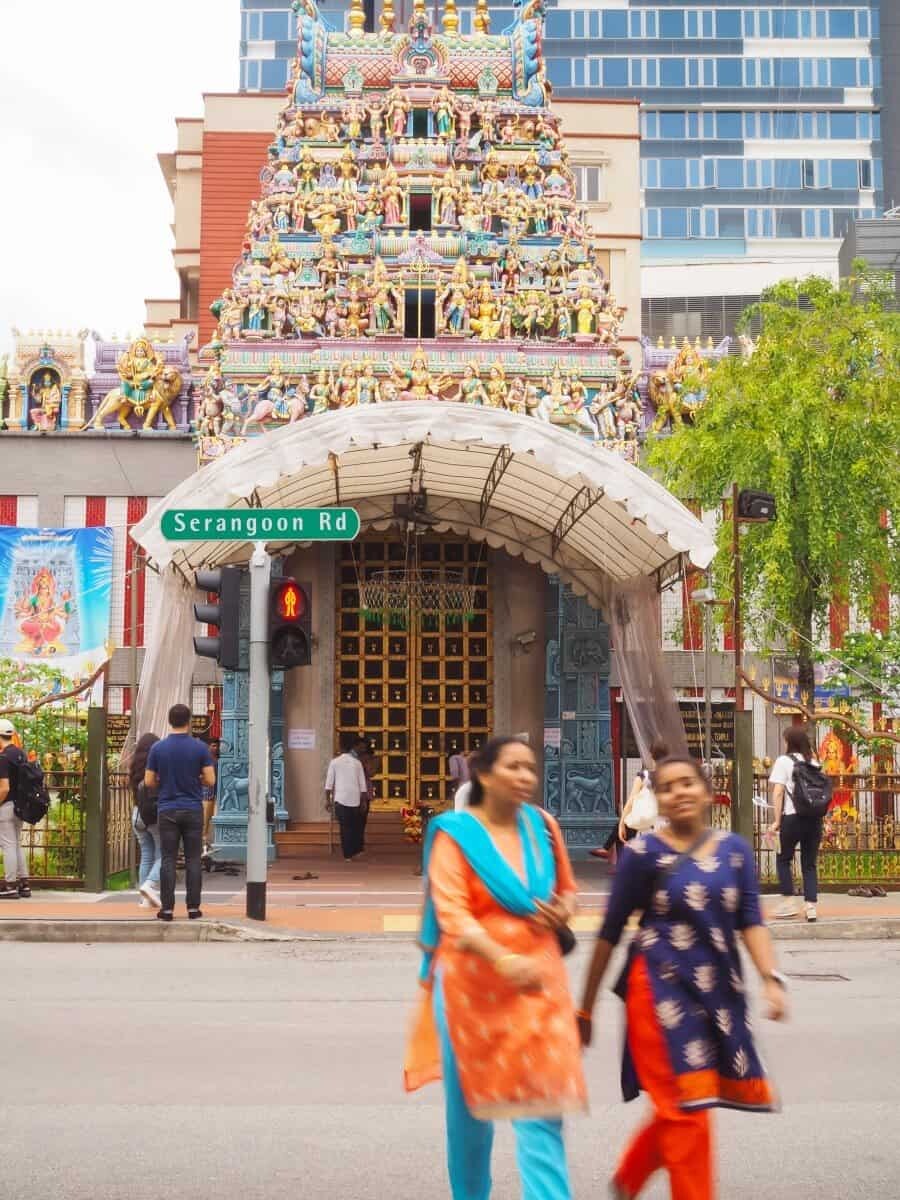
Usually when I’m travelling a grab quick bites on the go to make sure I can fit in as many spots as possible…but if you’re looking for somewhere great for lunch, Little India has you covered.
From restaurants like CreatureS on Desker Road serving Singaporean fusion meals through to the hawker stalls of the Tekka Centre there’s something for everyone. Located right near the MRT station on the corner of Bukit Timah Road and Serangoon Road, here you’ll find seafood markets, colourful sari stalls and food, lots and lots of food. Try the Briyani, masala or look for Hainanese Chicken Rice, a national dish of Singapore.
Photography Tips: Little India is filled with opportunities to photograph not only culture, but colourful buildings. Head straight for the House of Tan Teng Niah which is like looking at two storeys of rainbow goodness.
It’s also a great place for shooting portraits but just be wary of taking photos if people aren’t so keen. To avoid any awkward encounters, look to frame people as they’re walking by, blur their movement against the colourful building facades and markets.
Best Gear: I photographed around Little India with my 12-40mm (24-70/80mm equivalent) lens which is nice and versatile, ideal for travelling. With a zoom lens like this it enables you to capture street scenes and zoom into details, meaning if you’re capturing people you don’t have to get in their faces.
Getting Here: From Chinatown take the purple North-Eastern MRT line to the Little India MRT Station. Alternatively you can also take the blue Downtown line, it’s just a few minutes longer. Also I work in colours so love when metro lines are colour coded! Singapore is super easy to get around!
Next Stop > Singapore Botanic Gardens + National Orchard Garden
Travel Time – 1hr walk (avoid walking, it’s too far!) | 9mins MRT (train) | 10min Taxi
Afternoon
1:15pm – 3:30pm Singapore Botanic Gardens + National Orchid Garden
(Recommended time 2+ hours)
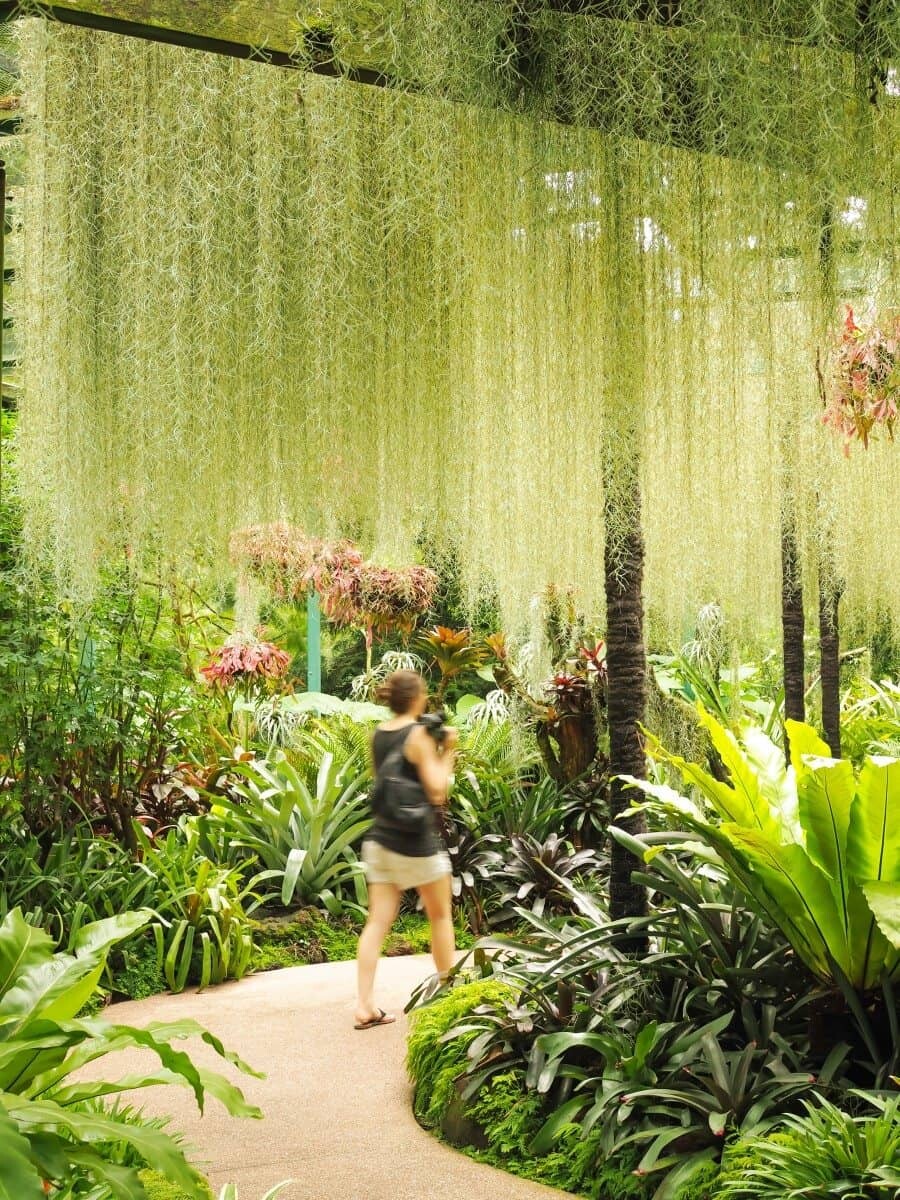
For lush landscapes and rainforests dripping with greenery and exotic plants, the Singapore Botanic Gardens are the perfect place to spend the afternoon.
Giant Monkey Pot Trees, Cannonball Trees and Banyans among thousands of others that fill the gardens, the world’s only tropical garden to be listed as a UNESCO World Heritage Site.
Easy to follow paths lead around the botanic gardens and you can start at the MRT station and make your way down towards the National Orchid Garden.
As my favourite place in the gardens I’m going to say that a visit inside the National Orchid Garden is essential, you need to see the beauty that lies within! Orchids of all shapes and sizes, colours, patterns and exotic appearances scattered the mist filled space that oozes with atmosphere. If it’s a hot and sticky day (which it most likely will be in Singapore!) you can even take a little break inside the air-conditioned cool room, a dome of cold air that’s just like stepping into a wintry rainforest.
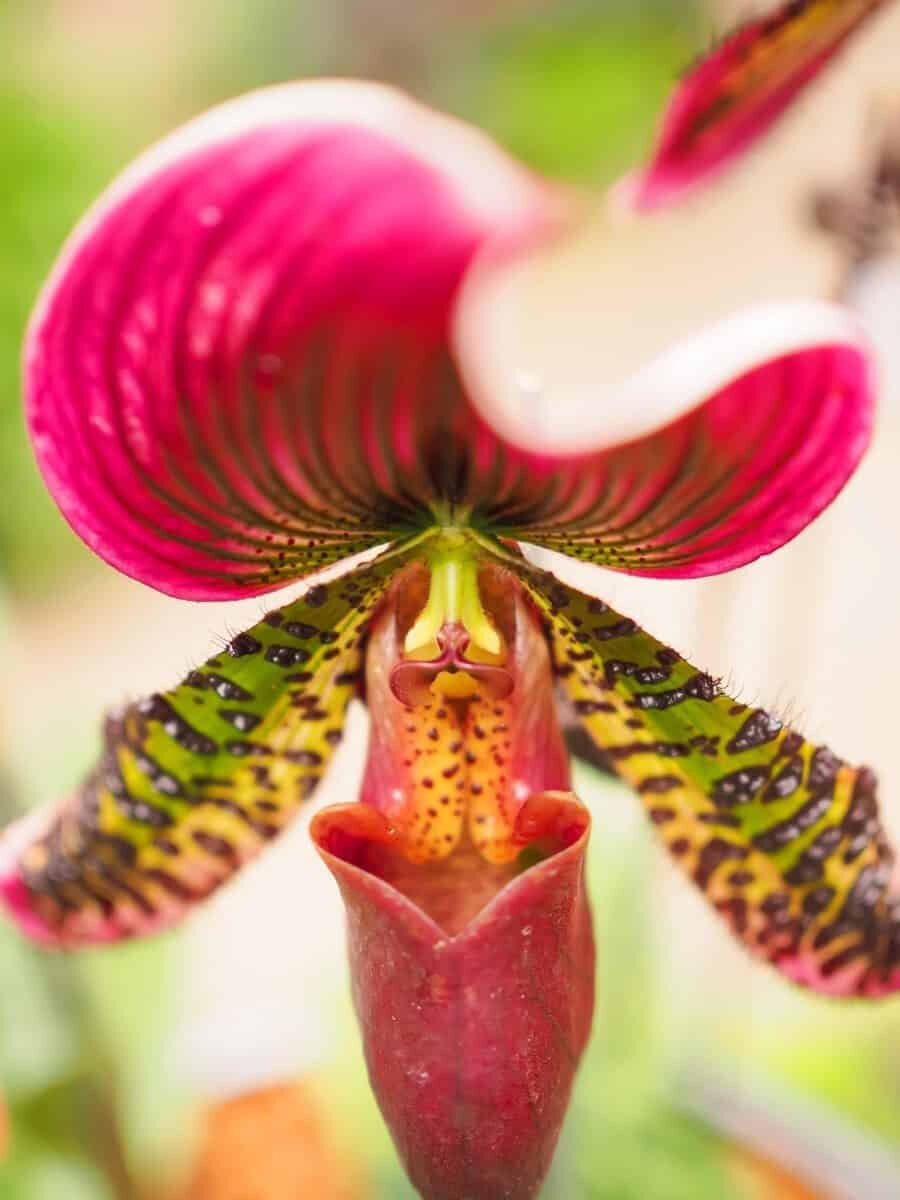
Photography Tips: Keep an eye out for the beautiful patterns and framing options available to photograph throughout the gardens. There’s also historic houses but the highlight is surely the Orchid’s, perfect for using gorgeous bokeh as a way to highlight their intricate details.
Best Gear: Switching back to a prime lens will work wonders within the National Orchid Garden. Using a 50mm (or like me the 25mm Olympus f/1.2 PRO lens) will enable you to get nice and close to the orchids and create a beautiful blur behind the flowers.
Within the botanic gardens, a wide lens or standard zoom will be great for capturing the immense landscapes that fill the grounds.
If you only want to use one lens within the gardens I’d stick with a 12-40mm or similar so you can have the best of both worlds.
Getting Here: Take the blue Downtown Line and arrive at the Botanic Gardens MRT station. It’s about a 20minute walk down to the National Orchid Garden but along the way are plenty of things to photograph so allow some more time if you’re prone to taking photo pit stops.
Next Stop > Cloud Forest
Alternatively, you can stop by at Orchard Road for some shopping on the way, or pop into the ArtScience Museum for some Instagram worthy light displays!
Getting Here: 1.5hrs Walk (too far, unless you want to see Orchard Rd) | 40-50mins Bus | 20min Taxi | 55mins MRT + walk
Late Afternoon
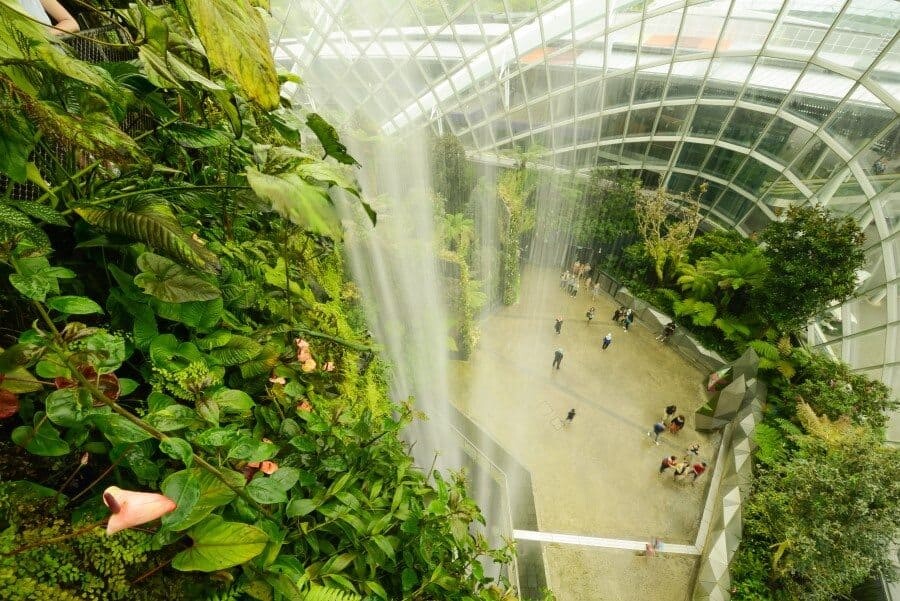
4:30pm – 6pm Cloud Forest
Step inside this mysterious dome of mist filled magic. Where a waterfall drops six storeys right from the moment you enter and walkways dangle above rainforest canopies, weaving their way higher and higher into the forest.
It’s a little Jurassic Park and lost world with caves, mountain flora and even Lego venus fly traps! Wandering throughout the Cloud Forest is like losing yourself in another world.
Next door there’s also the Conservatory Flower Dome if you’re really into flowers!
Photography Tips: Switch your white balance to cloudy to really bring out the tones within the dome. Also watch out for mist and spray on your lens because the waterfall churns out some impressive mist and it tends to hover throughout the dome, have a lens cloth on hand.
Best Gear: A wide-angle lens is perfect for capturing the incredible structure of this dome. It’s also great for showcasing the height of the waterfall but having a second lens to photograph the smaller details is beneficial!
Getting Here: This will be the longest travel time of the day as you’ll be jumping right across the city to get to the Cloud Forest and Marina Bay Sands area. You’ve got three main options; either jump in a taxi which takes only 20mins, walk back to the Botanic Gardens MRT station and take the blue Downtown line to Bayfront, or take bus #77 from Napier Rd (near the Cluny Rd gardens entrance) to Pan Pacific and walk 20mins across to the Cloud Forest.
Next Stop > Gardens by the Bay + Supertree Grove
Travel Time – 1-15min walk, located right next to the Cloud Forest
Sunset + Dusk
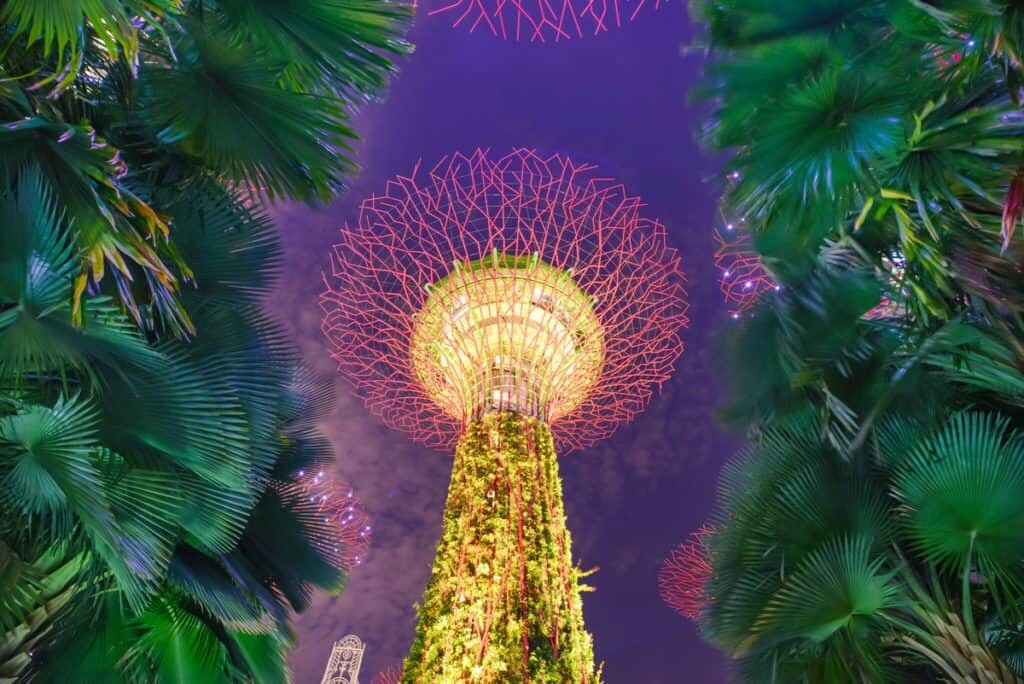
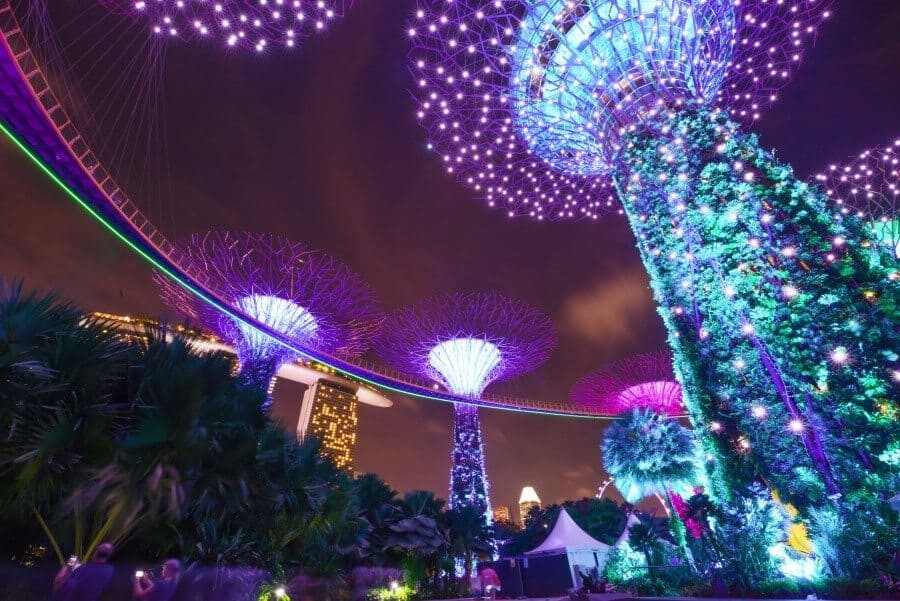
6pm – 8pm Gardens by the Bay + Supertree Grove
(Recommended time 2hrs)
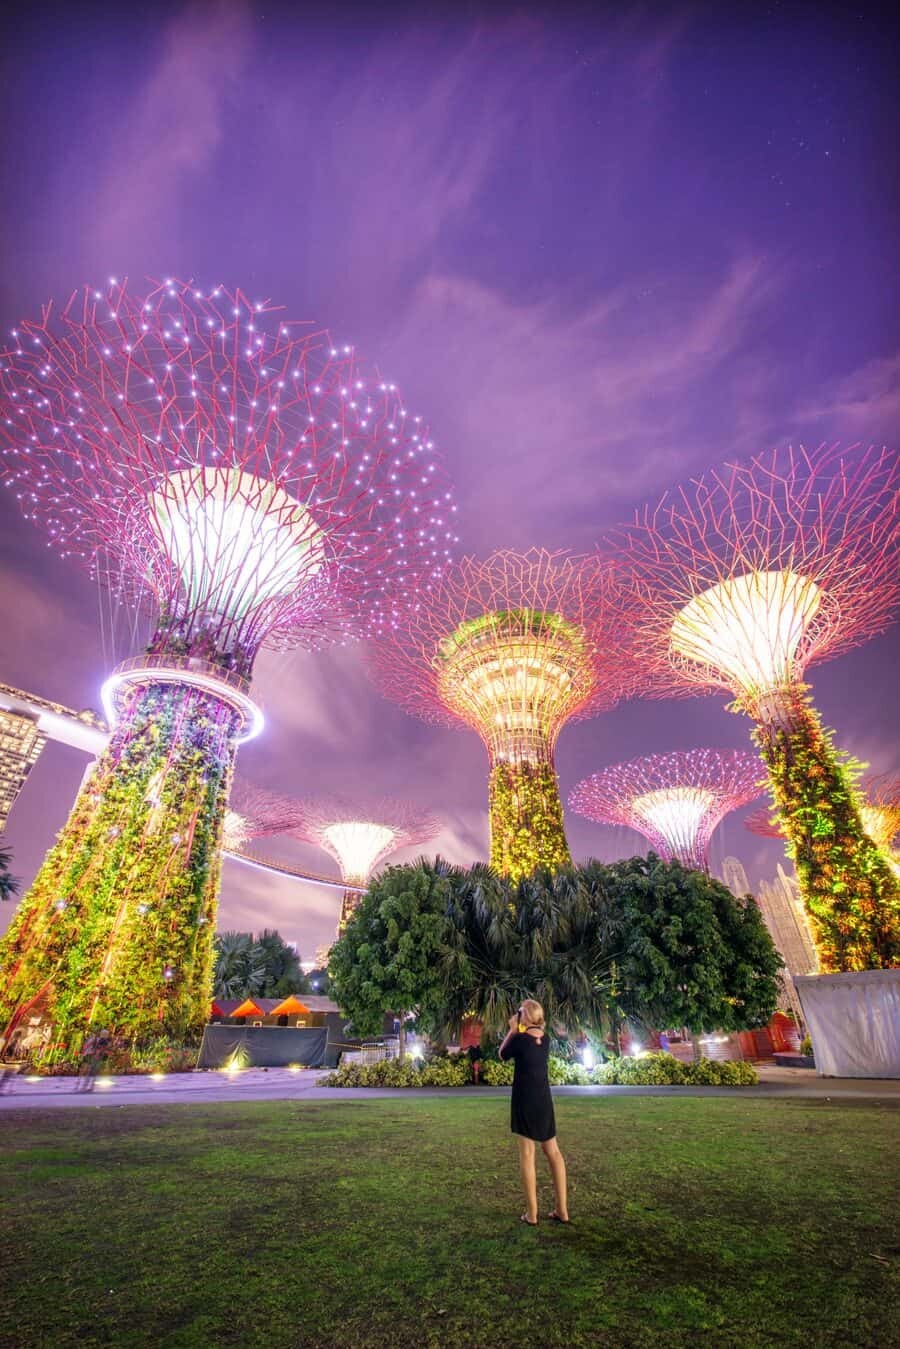
If there’s one place to experience the modern magic of this photogenic city it’s the Supertree Grove and Gardens by the Bay.
Standing tall and ethereal like a set from Avatar, the Supertree Grove is spectacular. Rising to 50m, these marvels are giant vertical gardens with over 160,000 plants, climbers and bromeliads making for one impressive sight to photograph.
Sunset in Gardens by the Bay is a beautiful sight so be sure to wander around and capture both the Supertrees from across the lake (great for reflections!) and also look out for Marina Bay Sands hotel as the sunset should light up behind it. Kingfisher and Dragonfly Lakes are great to shoot wide-angle landscapes from at dusk!
Another potential spot to view the sunset is Marina Barrage which is a 20-30min walk from Cloud Forest…from there you get an amazing view back toward the city!
Once the lights come on at dusk the Supertree Grove takes on a whole other life. Wander throughout the canopy on the OCBC Skyway or photograph from beneath the structures.
Oh and at Christmas time there’s markets and the most incredible soundtrack of songs that plays in time with a lightshow.
Photography Tip: Use someone to add perspective to just how high these trees really are. There’s a little open space at the southern end of the trees where you can stand and look up to the structures and once the sun dips, it’s easier to capture a shot without too many people in it, especially if you take a long exposure and have your subject stand really still.
Also take advantage of the rainforest canopy and use it for your foreground to frame the Supertrees.
Best Gear: Just like inside the Cloud Forest, a wide-angle lens works magic here. These structures are so impressively huge that you really need to work to showcase their size. I used the 7-14mm f/2.8 M.Zuiko PRO lens with my Olympus OM-D E-M1 MkII that has a 5-axis stabilisation system so enables me to take longer exposures hand-held…because who likes carrying a tripod around all day!? If you do need some stabilisation, there’s some benches around the park or you can lean it on the pavement and angle upward.
Getting Here: It’s located within the Gardens by the Bay Complex where you can enter both the Cloud Forest, Supertree Grove and Flower Dome.
Next Stop > Helix Bridge + Marina Bay
Travel Time – 15min walk | 10min Taxi (be sure to get off near Youth Olympic Park)
Evening
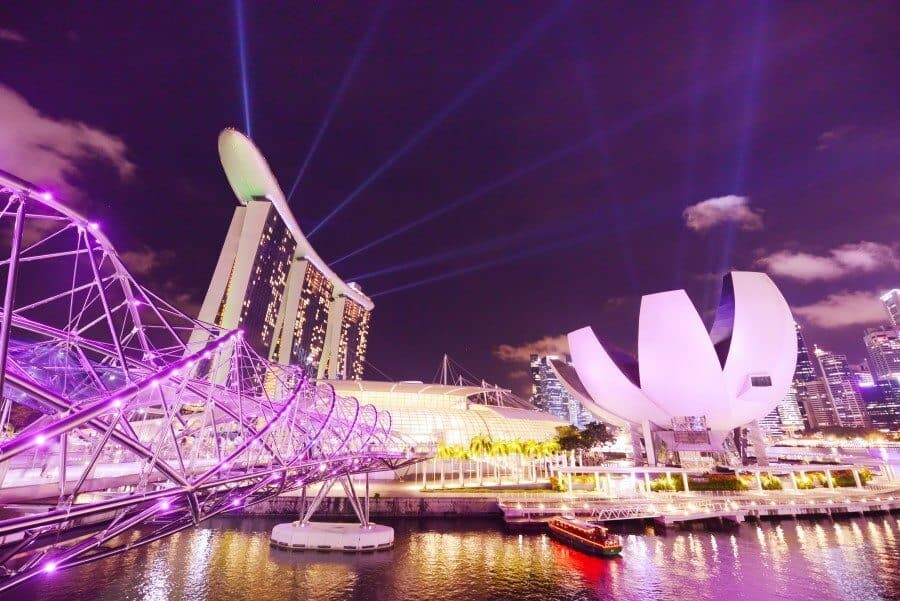
8:15pm – 10pm Helix Bridge + Marina Bay
(Recommended time 1-2hrs)
As the city gets ready for bed it likes to go out with a bang with the Marina Bay light show dazzling at 8pm and 9pm (10pm on weekends too). You can get a great position to capture the show at one of the many viewpoints along Helix Bridge or head over to the Youth Olympic Park to capture the bridge glowing too.
Alternatively you can wander around the waterfront towards the Merlion Statue for a great view towards Marina Bay Sands, the Supertree Grove and Bayfront buildings like the ArtScience museum which is shaped like a giant lotus flower.
This walk is a great way to end what’s a long day out and about in Singapore!
Photography Tips: Along Helix Bridge there’s a number of great vantage points to view both the light show or frame the surrounding architecture with the twisting lights that wrap around the bridge. Long exposures of this scene are incredible to capture so if you did happen to carry a tripod with you all day long, this is the place to use it! If not, there’s plenty of railings to lean on 😊
Best Gear: If you’re looking to include the entire skyline from the Merlion statue or Helix Bridge it’s worth whipping out the wide-angle lens again. Otherwise, a standard zoom will do fine here because the landscape is quite far away so there’s plenty to capture within the scene.
Getting Here: From Gardens by the Bay, wander under the bridge towards the ArtScience Museum then you’ll see the Helix Bridge looking very much like the Helix Bridge (you’ll see what I mean!). Waterfront Promenade will take you all the way around to the Esplanade Bridge which links over to the Merlion Statue. From here it’s nice and easy to grab a taxi to your hotel and collapse after a long day.
Where to Stay in Singapore
The Best Stopover Hotel – Crowne Plaza Changi
If you want to get off the plane and roll straight into bed then the Crowne Plaza Changi is your best option. Not only is it located mere 3-minute walk from the arrivals hall but it’s designed like a tropical oasis, perfect for restoring your energy before you head out and explore Singapore.
The beds, bathroom and airport views are every travellers dream and staying here means you don’t have to stress about missing your flight, simply zip your wheelie bag down the hall and check right in.
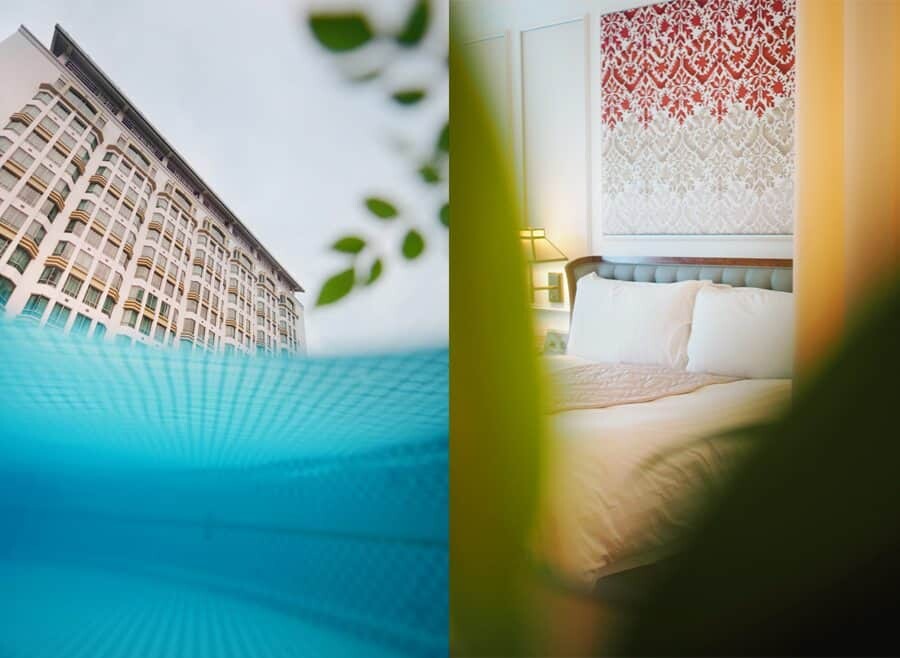
The Best City Centre Hotel – Intercontinental Singapore
For wandering Singapore the Intercontinental is perfectly located. With the Merlion Statue a short walk away, metro access just around the corner and an outdoor pool ready to soak in after a long day out photographing it’s a great base. The bottom of the hotel is also built within a heritage shophouse from the 1920s!
The Best Budget Hotel – Hotel 81 Chinatown
There’s a few Hotel 81’s scattered around Singapore but this one is located right in the action of Chinatown, a great district to enjoy the culture and city scenes of the city. Clean rooms, a great reputation and fantastic location means this budget hotel is a popular choice for travellers looking to maximise time outdoors and minimise hotel costs.
Singapore Travel Tips
Weather: It’s warm and humid in Singapore so be prepared to get a little sweaty as you walk around the city. Keep hydrated and take advantage of the many arcades and air-conditioned centres!
Currency: Singapore Dollar ($1SD = $0.73USD, $1.01AUD, £0.56GDP, €0.62EUR)
Rough conversion as of August 2020. Check xe.com for up to date conversion rates.
Singapore is considered quite an expensive city to visit but most of this will be in accommodation costs. Getting around is really easy and affordable.
Getting Around: Upon arrival you can purchase a Singapore Tourist Pass at Changi Recommends. Prices vary depending on length, 1 day pass $10, 2 day pass $16, 3 day pass $20.
This will get you unlimited travel on public buses and trains for the duration of the pass which means you can zip around all over Singapore nice and easy! Plus buses and trains are air-conditioned…bonus! See more here – Singapore Tourist Pass.
On the occasion you need to take a taxi, you can work off the rate that 10minutes is about $30.
Read more – “The Best Photography Locations in Singapore”

Hello! I’m the founder and photographer behind The Wandering Lens.
With 19+yrs experience as a professional travel and landscape photographer, all advice found on this site is from my personal experience, or that of contributors, on the road. I hope it’s useful for your own travels and would love to hear in the comments about your trips and experiences around the world.
Blog Comments
Louisa
February 22, 2018 at 9:28 am
This is the BEST! I read your Singapore photo spots guide and love that I can now follow this for my trip in May, thank you 🙂
Hannah
February 25, 2018 at 9:29 am
I love this! Singapore is one of my favorite places and the Super Trees are just SO COOL. Although I’ve done all this I’d love to do it again!
Christie Sultemeier
February 25, 2018 at 10:54 am
As a fellow photographer, I love this post! Super helpful as I am always looking for the best photo shots when I go somewhere. Gonna pin this for when I go!
Althea
March 7, 2018 at 12:15 am
Concise , complete and updated. I’m going to Singapore next week and your blog gives me all the information I need. Thank you
Kal
March 9, 2018 at 4:12 pm
I will be visiting Singapore next month. Hoping to visit to Tiong Bahru this time to get some pics as I hadn’t explore the neighborhood before.
Ruchi
March 28, 2018 at 12:35 am
Thank you for sharing such a great information and photograph with us. You are doing great work. Keep it up