
Photoshop Editing Tips
The magic of Photoshop is something we are all familiar with. You’ve either seen fashion magazine images edited within an inch of reality, fake backdrops, intense skies that were never really that dramatic or something simple like text written over a photo.
When it comes to travel photography it’s best to keep editing simple and realistic. Travel is about the experience, the journey, people you meet along the way and the amazing places you see. Who wants to distort that reality?
What you can do though is make it just a little bit prettier.
There is no harm in creating travel photos that look professional and in this post I’ll be showing you a few easy tricks to make your photographs pop by using Adobe Photoshop (totally meant to rhyme!).
Firstly, if you don’t want to commit to the full version of Photoshop straight up you can take a 30 day trial to test it out or pay per month! I like to use both Adobe Lightroom and Photoshop so will be sharing my Lightroom techniques in a separate post soon.

You’ll find a few tools I mention below in the Image>Adjustments menu of Photoshop
Before you read any further my biggest tip of all is this. Before editing any photographs ALWAYS save the original version twice in your computer so you don’t accidentally save a badly edited image. Working from the copy will allow you to test editing techniques and adjustments without worrying about going too far and ruining the original.
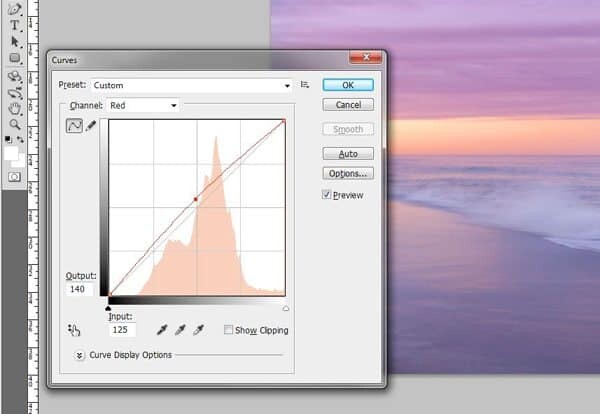
Technique One: Using Curves
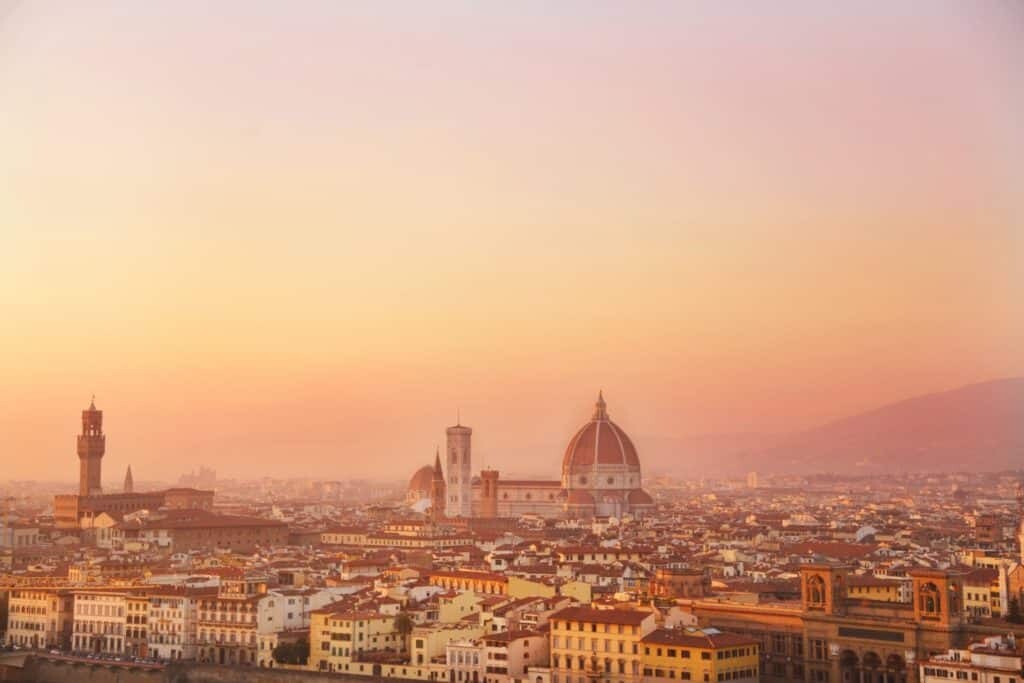
For cityscapes or street shots you want to keep it real but excite the viewer with a scene that makes them dream of visiting. This image of Rome is lovely but the reality felt so much more alive with colour and mood, something the Curves tool can create with just a few adjustments.
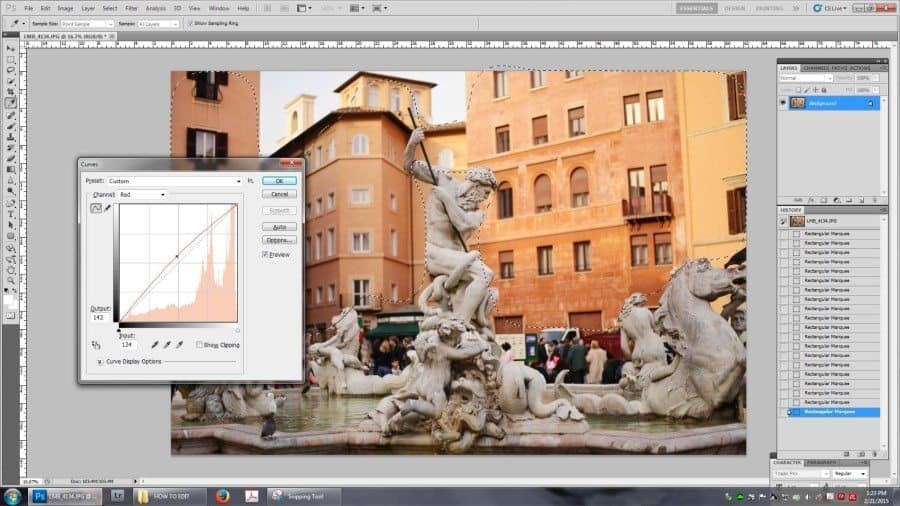
You will find the Curves tool in the top menu under Image > Adjustments > Curves. In the pop up box set the preset to Custom, switch the channel to RGB and then using your cursor arrow pull up the little line in the graph to adjust the brightness/darkness and tones of your image. Using the RGB mode will adjust all of the colours at once so you can brighten or darken at your leisure. Be careful when using curves because they can throw your image way off balance and always grab the line right in the centre of the graph for an even tone. Play around to see just how crazy things can look, grabbing the line a few times will change the highlights, mid tones and shadows… don’t be scared if you suddenly see the 70’s retro era return…just cancel and start again.
Changing the curves channel from RGB to Red, Green or Blue allows you to adjust the tones of each individual colour palette and the Red in particular is a great way to add warmth to your image. For this image I used the Red to increase the tones of the Roman buildings helping to differentiate them from the fountain. To ensure you don’t turn the fountain red too, use the Marquee selection tool to determine which parts you want adjusted.
Technique Two: Selection and Inverse Selection
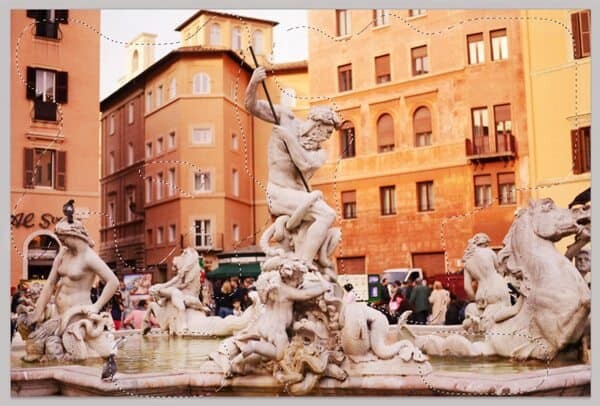
If you don’t want to add an effect to the entire image you can use the handy dandy selection tool to highlight an exact area to work on. The tool has a few options for shapes; rectangular, circular etc. Typically I just use the rectangular option and then in the top menu bar I change the feather to 222px (just a random number that works best) which makes it a little more circular.
You can either select a large part of the image, for example a section of sky, or if you have something to work around you can highlight smaller sections whilst holding the shift key.
Holding the shift key down and overlapping your selections will force the selection tool to create odd shapes allowing you to select the space around an object.
Once you’ve selected the parts you want to work on you can easily switch focus to the other areas without having to re-select them. In the menu option titled ‘Select’ scroll down to the one named ‘Inverse’, click this and it will automatically select the remaining sections of your image allowing you to work on them without disturbing the initial selection.
Technique Three: Contrast + Brightness
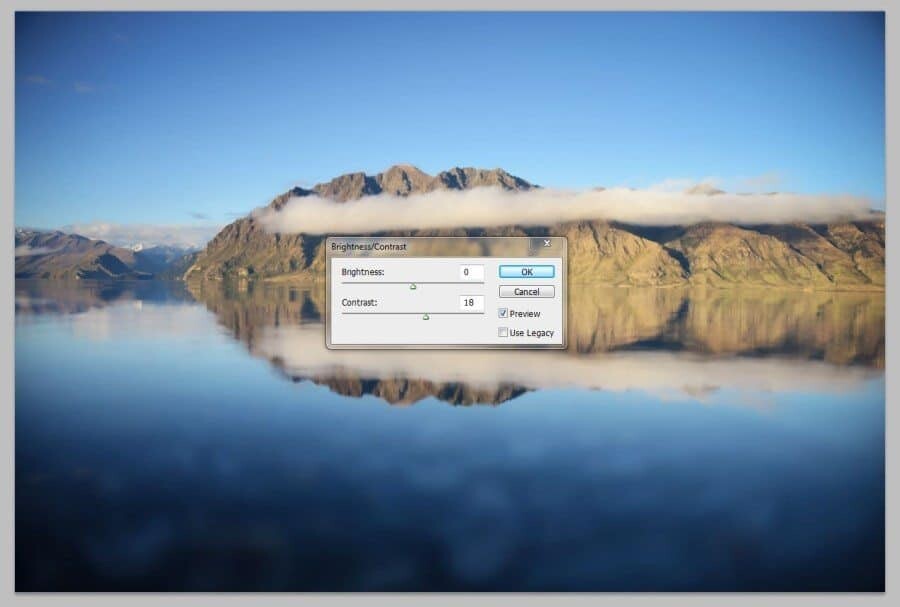
You’ll find the contrast tool in the menu under Image > Adjustments > Brightness/Contrast. This easy little gem simply adds contrast or brightness to your image. I know, obvious.
Using these two techniques together adjusts the tonal range of your photograph adding highlights or shadows depending on which way you slide.
Usually for a standard landscape image with blues, browns and green hues I’ll use a tiny bit of contrast. I avoid over contrasting images because I’m not a big fan of the deep shadows with blues and blacks but it’s completely up to personal preference. You’ll notice the more contrast you add the more defined your photo becomes which is great for cityscapes and enhancing the details of buildings, rocks etc.
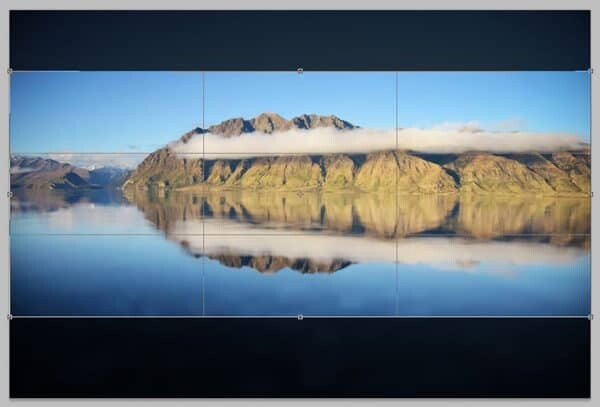
Technique Four: Cropping
You won’t always be in the right place at the right time and standing in the best possible position to capture a scene. If you are, I want to travel with you! Cropping an image is simply another form of composing your shot.
While it’s always best to try and get it right in the camera to avoid cropping and loosing image quality, the crop tool can be a great way to change the viewpoint. You’ll find it in the tool menu on the left side of your screen.
Take this image of Lake Hawea, New Zealand for example. The original is your standard photo dimension however I didn’t feel it had the wow factor because the giant parts of blue sky and reflecting blue water were a little distracting. Cropping it to a panoramic shape showcases the length of the mountain range and also highlights the amazing reflection and cloud line.
You can crop to zoom in, crop to enlarge or crop to fit a certain dimension it’s just a matter of adjusting the measurements in the tool bar. If you’re posting your images online you might have already got your own technique for creating low resolution images but in Photoshop its super simple. Before cropping always create a copy of your image in your folder so you don’t crop the original. Open it up in Photoshop, select the crop tool, type in the exact measurements you want your image to be and the resolution then crop away. For social media and my blog I use 800px wide + 300 pixels/inch resolution, probably way more than you need but I like them to be sharp and clear.
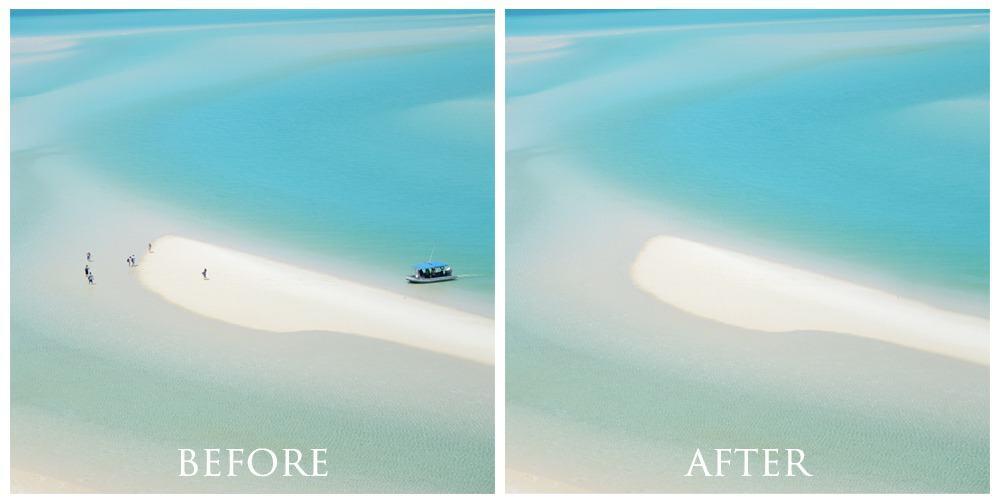
Technique Five: Clone and Spot Healing
These two tools are like secret weapons. They really do create magic so don’t ask me how they do it. I do however know how to use them.
Sometimes you’ll have dust on your lens or image sensor, water droplets or a bug that pops up unexpectedly. The best way to remove these unwanted things from your photos is to use what I call the Bandaid button, technical name, Spot Healing Brush. It does exactly what its name suggests. Puts a little bandaid over the problem area and fixes the spot.
You can also use the Clone tool to remove anything you don’t want in your photo. Cloning allows you to choose a small set of pixels or part of your photo, copy it then place it somewhere else.
Simply click the ALT key to select a piece of your photo and the Clone tool will then clone that piece to wherever you want. You can use the bandaid tool for this too. It works best though when there is space around the person or subject you wish to remove…it collects pixels from the area around so if you’ve got a white beach and a person in the middle, click the bandaid over the person and it will easily take the sand and cover the person up while you watch in amazement.
Technique Six: Dodge and Burn Tools
Located in the tool menu on the left side of Photoshop you’ll find the Burn Tool and the Dodge Tool. Both are super handy to brighten or darken a smaller section of your image. If you want to increase the brightness of a face for example, use the Dodge Tool to gently brighten the tones and exposure. It’s a little like using a paintbrush and is great for more intricate work.
If you’ve accidentally overexposed your photo you can use the Burn Tool to darken sections and bring back more detail. You can choose the size of the tool and work on tiny sections like under the eye, or make the tool bigger to work on half the photo at once for a section of sky.
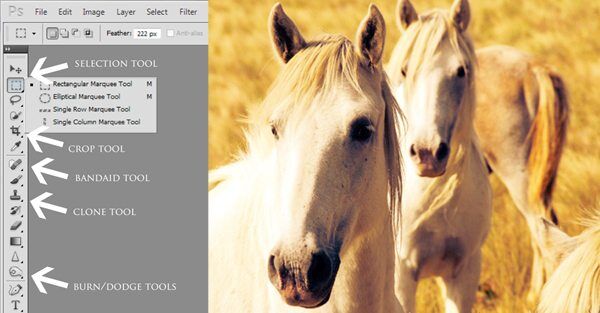
The tool menu for editing is found on the left side of the window.
What tools to use for…
Underwater Images – Unless you are using a high quality digital SLR underwater your images will probably be a little more faded than reality. The blue tones of the underwater world can diminish when using smaller hand held waterproof cameras so be sure to add a little saturation or blue tones using the curves technique.
City Scenes – Adding some contrast and brightness to a city scene always makes it pop. Obviously it depends on the scene but your regular street with roads and buildings will look amazing once you add some contrast or highlight the street with some curves/brightness.
Sunset Photos – Using the Curves tool and adjusting the red tones will work wonders on sunset photographs. By using the selection tool to select the sky section of the image, you can bring out the rich red hues and enhance the photo. If you’ve ever looked at an incredible sunset only to take a photo and have it turn out dull and boring, the curves tool is your friend. Add a sprinkle of saturation if you feel the need but avoid going over the top, think of your sunset sky as a tan…too much looks fake. It’s all about enhancing reality, not distorting it.
In the Image > Adjustments menu of Photoshop you’ll find lots of useful tools such as Saturation/Hue, Vibrance, Black & White, Shadows/Highlights etc. Have fun exploring and testing out all of the tools to see what works best for your style of photography.
As always, if you’ve found these tips useful let me know in the comments below! I would love to see your images so feel free to get in touch via email at hello@thewanderinglens.com or share on Instagram using the hashtag #thewanderinglens.
*This is not a sponsored post or product review, I’m simply sharing some of my editing techniques.
Hello! I’m the founder and photographer behind The Wandering Lens.
With 17+yrs experience as a professional travel and landscape photographer, all advice found on this site is from my personal experience on the road. I hope it’s useful for your own travels and would love to hear in the comments about your trips and experiences around the world.
Blog Comments
Sarah Shumate
February 23, 2015 at 8:04 pm
These are great tips, Lisa! I have been wanting to learn how to edit my photos for years, but have never taken the time to do it. I think I need someone experienced to sit down at the computer with me and show me in person. I am looking forward to your Lightroom tips. My dad bought me Lightroom 5 last year and I still haven’t really done anything with it because it just looks too intimidating…just like my super outdated version of PSE. 🙂
thewanderinglens
February 23, 2015 at 9:44 pm
Lightroom is a great place to start, it’s very user friendly compared to Photoshop! I’m almost finished my tips for Lightroom and will hopefully show that it’s not as scary as it looks 🙂
You’ll find loads of YouTube videos that walk you through each step so you can pause and replay too.
Fearless Nomad
March 6, 2015 at 1:28 am
Great tips! Love your photographs.
Jimmy Dau
March 10, 2015 at 2:27 pm
Nice read and easy to follow. Photoshop is such an intimidating tool when starting out. I spent many hours on youtube learning how to use it.
Melinda DiOrio
March 22, 2015 at 7:35 am
These are great and easy to understand tips! I’m happy I came across your blog, I’ll be following! 🙂
Maria @ A little adventure
May 12, 2015 at 5:28 pm
Great tips! I already play around with some of them but so far I’ve shied away from Dodge/Burn. You’ve inspired me to give them a go!
cheekee
May 16, 2015 at 1:33 am
i love your photos! i’m planning to buy a camera to take with me for travelling. Can you share what gear you typically use?
sasha
May 6, 2016 at 8:31 pm
Thank you so much for this. I’ve always wanted to edit my photos but had no idea where to start. I’m bookmarking this post for sure!
Georgia Brooks
February 11, 2018 at 9:07 pm
Many many thanks for sharing such a superclass tutorial with great explanation. I personally like to recommend adobe photoshop for anyone who enjoys taking pictures and sharing them on social media.
Adam Houdge
April 21, 2018 at 5:12 pm
Thanks for sharing great information with us. I got some great information that I really didn’t know!
Michel Thomas
May 20, 2018 at 3:36 pm
Thanks for sharing great information with us. I got some great information that I really didn’t know!
Robert Thompson
July 9, 2018 at 5:03 pm
Thanks for taking the time to explain things in such great detail is easy to understand!
Michael Peterson
July 19, 2018 at 7:19 pm
Wow, it’s a great post about how can i edit my travel picture with photoshop. Thanks for sharing.
Lisa Michele Burns
July 21, 2018 at 6:09 pm
Thanks, I’m glad it’s helpful!